Showing posts with label Give It A Whirl Dies. Show all posts

Saturday, February 11, 2023

Ink. Stamp. Share. February Showcase Blog Hop

Welcome to the Ink. Stamp. Share. February Showcase Blog Hop as we share projects that we are currently working on. You will have the opportunity to visit with talented Stampin' Up! Demonstrators from around the world as they share their projects and ideas to help inspire you. 
With Valentine's Day just a few days away, I thought I would share two cards I created for a recent Valentine's Day exchange with fellow Stampin' Up! Demonstrators. The cards I created used the same supplies but the designs are unique, so that each person is getting their own special card. It was a fun way to show how you can take just a few supplies to create two beautiful but different designs. 
Products Used:
Love Cats stamp set (item #160410)
Framed Florets stamp set (item #161815)
Design A Daydream Designer Series Paper (item #159161) Host Reward
Stylish Shapes Dies (item #159183)
Give It A Whirl Dies (item #154336)
Petal Pink Cardstock (item #146985)
Real Red Cardstock (item #102482)
Basic White Cardstock (item #159276)
Memento Tuxedo Black Pad (item #132708)
Parakeet Party Stampin' Blends Combo Pack (item #159220)
Real Red Stampin' Blends Combo Pack (item #154899)
Petal Pink Stampin' Blends Combo Pack (item #154893)
Pastel Adhesive Backed Sequins (item #160387)
Stampin' Dimensionals (item #104430)
Stamparatus (item #146276)
Measurements: (Both Cards are the same)
Petal Pink Cardstock
Card Base - 8 1/2" x 5 1/2" (Scored at 4 1/4")
Large Stitched Circle die cut with the Stylish Shapes Dies
Basic White Cardstock
Inside Layer - 5 1/4" x 4"
Medium Stitched Circle die cut with the Stylish Shapes Dies
Sentiment Label die cut with the Give It A Whirl Dies
Design A Daydream Designer Series Paper
Card Front - 5 1/4" x 4"
Inside Strip - 3/4" x 4"
Real Red Cardstock
5 Hearts (various sizes) die cut with the Give It a Whirl Dies
As you can see, the basic supplies are the same for both cards. What is different about the designs, is the pattern on the designer series paper (one is the reverse side of the same sheet of paper) and the arrangement of the hearts to create the layout. To stamp the cat image, I used the Stamparatus, to make sure that I got a nice solid black image of the cat. With the Stamparatus, I had the opportunity to stamp the image several times, reinking each time, to get a nice crisp image. I also used the Stamparatus to stamp the sentiment onto the label so that I could center sentiment. I was able to stamp the images for both cards using the same set up with my Stamparatus to make sure that I was successful each time. To add some character to the cat, I used the Light Parakeet Party Stampin' Blends Marker to color the eyes, Dark Petal Pink Stampin' Blends Marker to color the nose and the Dark Real Red Stampin' Blends Marker to color the heart. I arranged the Real Red hearts and attached them to the card front around the focal image. For a touch of bling, I added two Petal Pink Sequins to the sentiment label. 
For the inside of the cards, I added a strip of the coordinating designer series paper across the bottom of the Basic White cardstock layer. I stamped the sentiment with Memento Tuxedo Black ink onto the Basic White layer and adhered it to the inside of the card. I love how these cards turned out and how I was able to create two different designs using basically the same supplies. 
The Love Cats stamp set has so many adorable images and sentiments for creating cards for a variety of occasions beyond Valentine's Day. It is perfect for the cat lover in your life. The Design A Daydream Designer Series Paper is filled with amazing designs that provide you with so many options for creating unique card designs. This pretty paper is a Host Reward and can only be earned free with a qualifying order or with a qualifying party order. Please let me know if you would like more information about how you can earn this paper for free. 
Thank you for taking the time to visit my blog. I hope that my Valentine's Day cards will help inspire you to create your own beautiful cards to send out to family and friends. As you can see from these beautiful cards, you don't have to have a lot of supplies to create your own amazing designs. 
Please take the time to visit with my fellow Design Team members by clicking on the links in the Roll Call List below. We would appreciate it if you would leave us a comment and let us know what you liked about our projects. I hope you enjoy our blog hop. 

If you live in the U.S. and do not have a Stampin' Up! Demonstrator, please contact me and I would be happy to help you with your creative projects. You may also visit my Online Store to place your order and have it shipped to you. 


Until Next Time

Happy Stamping,

Tricia Butts
Independent Stampin' Up! Demonstrator

Like What You See? Visit My Online Store Here

Visit My Facebook Business Page for Updates & Ideas

Click here to Contact Me


Time Is Running Out
To Take Advantage Of Sale-a-bration
Click Below For More Details


Wednesday, January 11, 2023

Around The World On Wednesday January Blog Hop CASe The Mini Duo

Welcome to the Around The World On Wednesday January Blog Hop as we start off the New Year CASEing the new January-April 2023 Mini Catalog and 2023 Sale-a-bration Catalog. What is CASEing? It stands for Copy And Share Everything or Copy And Selectively Edit and basically means that you take a project sample from one of the catalogs and create your own version of it, either by copying it exactly or taking parts of the design to provide inspiration for your own project. Our wonderful Design Team members will be sharing their amazing projects and ideas to help inspire you to get creative in 2023. I hope you will take the time to join us and create your own beautiful projects.
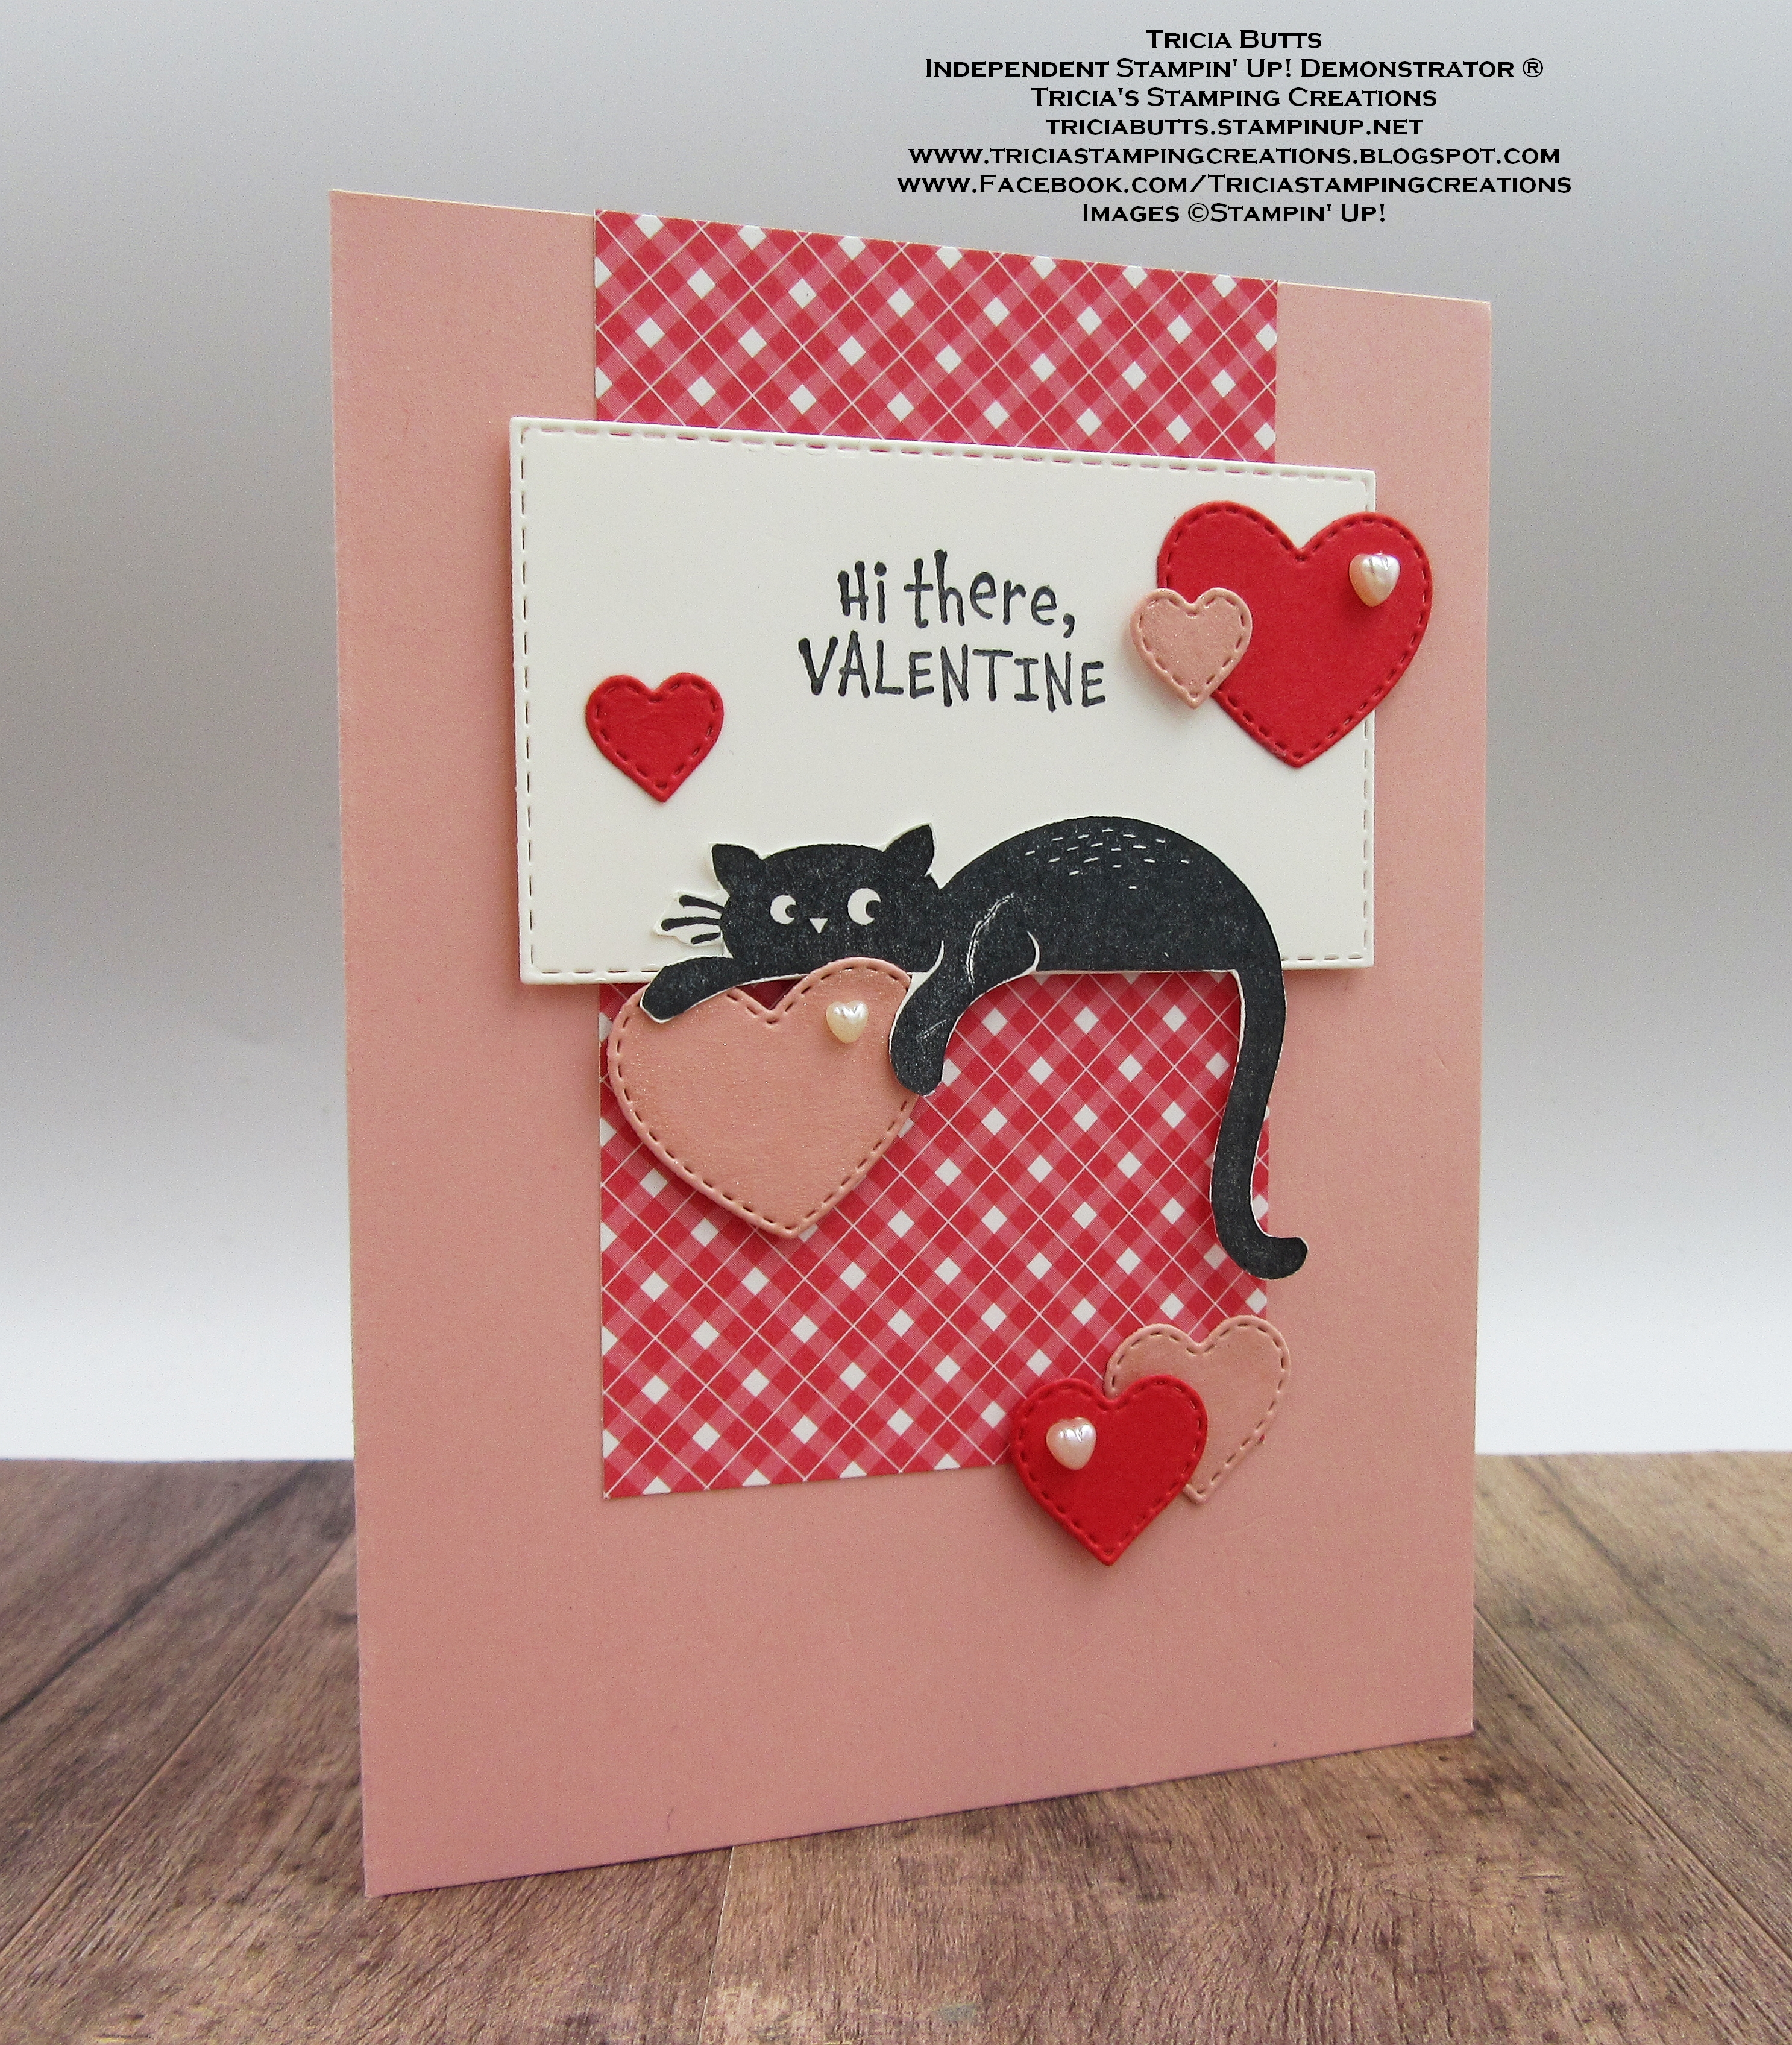
For my CASE, I decided to use the layout from the top Thanks Friend card on page 45 of the new January-April 2023 Mini Catalog. I changed the colors and decided to create a full size card instead of the square card design in the catalog. The clean and simple design really appealed to me and I thought it would be fun to create my own version of this card design. I hope you like what I created using products from the new mini catalog.
As a cat lover, I just couldn't resist the cute Love Cats stamp set from the new January-April 2023 Mini Catalog. I combined it with the new Country Gingham 6"x6" Designer Series Paper to create a sweet Valentine's Day card that is sure to melt any cat lover's heart. In addition to the original layout from the CASEd card design, I decided to add some fun heart die cuts and some Heart Pearls to step up my card. 
Products Used:
Love Cats stamp set (item #160410)
Stitched Rectangles Dies (item #151820)
Give It A Whirl Dies (item #154336)
Country Gingham 6"x6" Designer Series Paper (item #160388)
Blushing Bride Cardstock (item #131198)
Sweet Sorbet Cardstock (item #159268)
Basic White Cardstock (item #159276)
Memento Tuxedo Black Pad (item #132708)
Clear Wink of Stella Glitter Brush (item #141897)
Heart Pearls (item #159190)
Mini Stampin' Dimensionals (item #144108)
Measurements:
Blushing Bride Cardstock
Card Base - 8 1/2" x 5 1/2" (Scored at 4 1/4")
3 Hearts die cut with the Give It A Whirl Dies 
Sweet Sorbet Cardstock
3 Hearts die cut with the Give It a Whirl Dies
Basic White Cardstock
Stitched Rectangle die cut with the Stitched Rectangles Dies
Stamped and fussy cut cat image from the Love Cats stamp set
Country Gingham Designer Series Paper (Sweet Sorbet)
Background Strip - 2 1/2" x 4 1/4"
This fun card design was created on a full size card, so I adjusted the size of the background designer series paper piece to fit in with the larger card design and adhered it to the card base. For the sentiment label, I used one of the Stitched Rectangles Dies and stamped the sentiment with Tuxedo Black ink and then adhered the label to the card base with Mini Stampin' Dimensionals, centering it over the designer series paper, about 3/4" from the top of the card. For the cat, I stamped the image with Tuxedo Black ink onto a scrap of Basic White cardstock and fussy cut it out with Paper Snips. I adhered the cat so that it lined up with the bottom of the sentiment label with the paws and tie hanging over the edge. For the Blushing Bride hearts, I colored them with Clear Wink of Stella. I added the largest Blushing Bride heart underneath the paws of the cat using Mini Stampin' Dimensionals, so that it looks like the cat is holding onto it. For a touch of bling, I added several Heart Pearls to the card front to complete the design. I just love how this card turned out and I how I was able to adapt the original card to create my design.
Thank you for taking the time to visit my blog. I hope that my card design will help inspire you to take a look at the wonderful project ideas in the new catalogs to help you create your own beautiful designs. There are so many wonderful possibilities to explore. 
Now it's time to visit Teri's blog and see what she has CASEd for our challenge. Just click the Next button below to visit her blog or use the Roll Call List to find your way. We would love it if you would leave us a comment and let us know how our projects inspired you. I hope you enjoy the rest of our blog hop. 

Roll Call List

If you live in the U.S. and do not have a Stampin' Up! Demonstrator, please contact me and I would be happy to help you with your creative projects. You may also visit my Online Store to place your order and have it shipped to you. 

Until Next Time

Happy Stamping,

Tricia Butts
Independent Stampin' Up! Demonstrator

Like What You See? Visit My Online Store Here

Visit My Facebook Business Page for Updates & Ideas

Click here to Contact Me


Celebrate The New Year
With The January-April 2023 Mini Catalog
Click Below To Visit My Online Store

Earn Free Exclusive Products
During Sale-a-bration
Click Below For More Details

Join The Stampin' Up! Family
Choose From 3 Amazing Options
Click Below To Learn More

Saturday, December 17, 2022

Stamping With Friends Blog Hop New Catalogs Sneak Peeks

Welcome to the Stamping With Friends Blog Hop as we share Sneak Peeks from the upcoming new January-April Mini Catalog and 2023 Sale-a-bration Catalog. It's always so exciting to share new projects created with these amazing new products to help inspire you. Our wonderful Design Team members will be sharing their projects and ideas to help spark your creativity. The January-April 2023 Mini Catalog and 2023 Sale-a-bration Catalog will be available for customers to order from beginning January 5th, 2023.
There is no better way to start prepping for the New Year than new products from new catalogs. There are so many wonderful products to choose from, so it took me a little while to come up with my card design. I knew I wanted to create a birthday card because it's one of the most popular cards that people send out throughout the year, and I thought it would be a great way to inspire you to get creative in 2023. One of my favorite stamp sets from the January-April 2023 Mini Catalog, is a hidden gem called Best Day. It is towards the end of the catalog on page 67 and I love the combination of images and sentiments. I decided to combine this stamp set with the Dandy Designs Designer Series Paper, which is a mega paper pack with 48 sheets of 12"x12" designer series paper, that you can earn Free with a qualifying $100 order. The colors and patterns in this pack are so pretty and work well for all ages and all occasions. For my card, I chose to use Fresh Freesia, Petal Pink, Pale Papaya and Basic White with a touch of Silver to step up the design. I love how fun and festive this card design, so perfect for making someone feel special on their birthday
Products Used:
Best Day stamp set (item #160798) Sneak Peek January-April 2023 Mini Catalog
Deckled Rectangles Dies (item #159173)
Give It A Whirl dies (item #154336)
Dandy Designs Designer Series Paper (item #160836) Sneak Peek 2023 Sale-a-bration Catalog
Fresh Freesia Cardstock (item #155613)
Pale Papaya Cardstock (item #155668)
Basic White Cardstock (item #159276)
Silver Foil Specialty Pack (item #156457)
Fresh Freesia Classic Ink Pad (item #155611)
Pale Papaya Classic Ink Pad (item #155670)
Memento Tuxedo Black Pad (item #132708)
Versamark Pad (item #102283)
Metallics Embossing Powders (item #155555)
Fresh Freesia Stampin' Blends Combo Pack (item #155518)
Pale Papaya Stampin' Blends Combo Pack (item #155519)
Petal Pink Stampin' Blends Combo Pack (item #154893)
Highland Heather Stampin' Blends Combo Pack (item #154887)
Clear Wink of Stella Glitter Brush (item #141897)
Pale Papaya 3/8" Open Weave Ribbon (item #155672)
Stampin' Dimensionals (item #104430)
Sponge Daubers (item #133773)
Measurements:
Fresh Freesia Cardstock
Card Base - 8 1/2" x 5 1/2" (Scored at 4 1/4")
Large Deckled Rectangle die cut with the Deckled Rectangles Dies
Basic White Cardstock
Focal Layer die cut with the Deckled Rectangles Dies 
Dandy Designs Designer Series Paper 
Background Layer - 5 1/4" x 4"
Pale Papaya Cardstock 
Sentiment Label die cut with the Give It A Whirl Dies
Silver Foil Specialty Pack
Assorted stars die cut with the Give It A Whirl Dies 
This card design is made up of different layers to provide depth and dimension. I stamped the focal image with Momento Tuxedo Black ink onto the Basic White layer and colored the image with Stampin' Blends Markers, choosing colors that coordinated with the designer series paper layer. For the sentiment, I heat embossed the image with Silver embossing powder onto the Pale Papaya sentiment label and added it to the bottom of the focal layer with Stampin' Dimensionals. To assemble the card, I attached the focal layer to the Fresh Freesia Deckled Rectangle. Next, I attached the Pale Papaya Open Weave Ribbon around the center of the designer series paper layer to the card base. Using Stampin' Dimensionals, I attached the focal layer to the card base, centering it on the designer series paper. To add a touch of sparkle, I added the Silver Foil stars to the card front and then colored the Happy and layers of the cake with Clear Wink of Stella. I love how fresh and cheerful this card design looks and I think it's a wonderful way to showcase these amazing new products and how they work with existing products in the 2022-2023 Annual Catalog. 
Thank you for taking the time to visit my blog. I hope that my card design will help get you excited about these wonderful new products from the January-April 2023 Mini Catalog and 2023 Sale-a-bration Catalog, when they launch on January 5th, 2023. There are so many wonderful possibilities to help you with your creative journey for the New Year.
Please take the time to visit my fellow Design Team members, by clicking on the links in the Roll Call List below, to visit their blogs. We would appreciate it if you would leave us a comment and let us know what you liked about our projects and maybe what your favorite new product might be. I hope you enjoy the rest of our blog hop. 

If you live in the U.S. and do not have a Stampin' Up! Demonstrator, please contact me and I would be happy to help you with your creative projects. You may also visit my Online Store to place your order and have it shipped to you. 
Until Next Time

Happy Stamping,

Tricia Butts
Independent Stampin' Up! Demonstrator

Like What You See? Visit My Online Store Here

Visit My Facebook Business Page for Updates & Ideas

Click here to Contact Me


Visit The Clearance Rack
Save Up To 60% On Discontinued Products
Click Below To Shop Now

Save Up To 60% On Retiring Products
From The July-December 2022 Mini Catalog While Supplies Last
Click Below To Visit My Online Store


Saturday, December 10, 2022

Stamping Inkspirations December Blog Hop Sounds of the Season

Welcome to the Stamping Inkspirations December Blog Hop as we celebrate the Sounds of the Season with our last blog hop for 2022. Many of us are busy getting ready for the holidays and creating last minute projects to celebrate this special season. Our wonderful Design Team members will be sharing their beautiful projects to help inspire you to create your own projects.
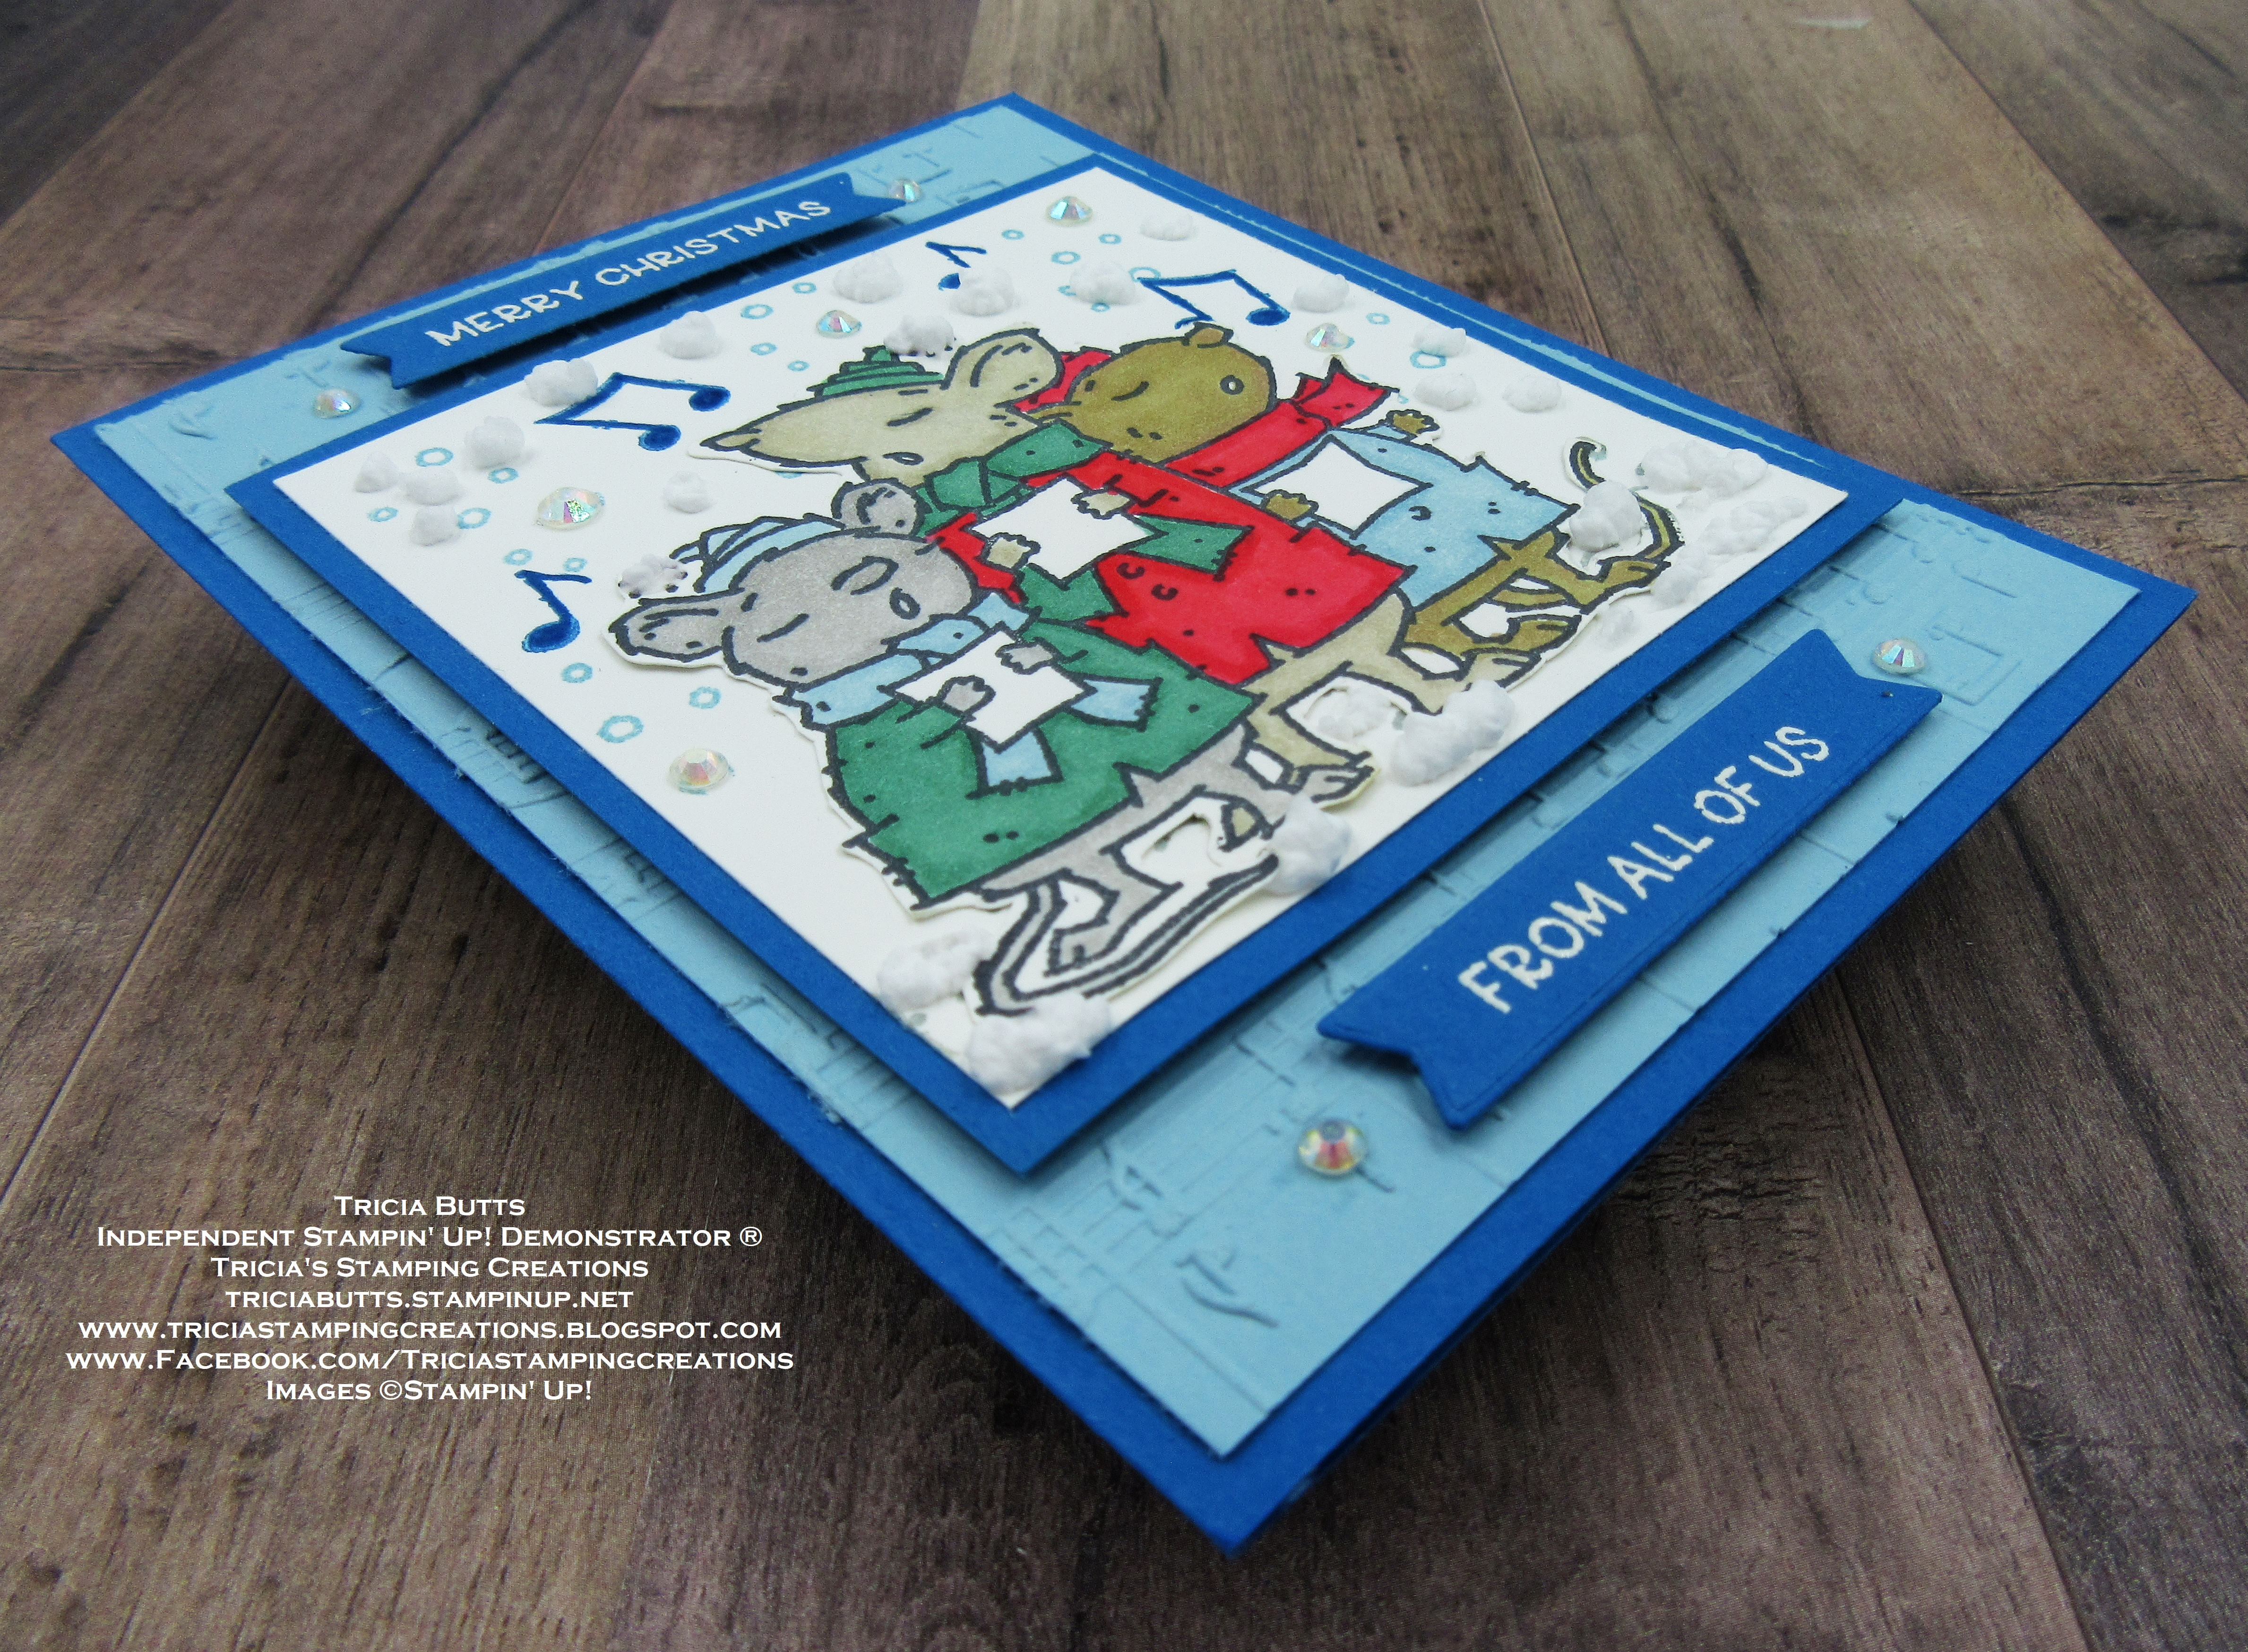
For today's card, I decided to use the retiring Host stamp set Caroling Mice. They look so cute and festive and I love the idea of them singing to the person that receives this card. I paired it with the Merry Melody 3D Embossing Folder, which adds some wonderful texture to this card and adds to the musical theme I have chosen for today's blog hop. For my color combination, I decided to use Balmy Blue and Pacific Point with splashes of bright holiday colors for the mice. I like to think that the sounds of the season are joyful and uplifting, just like my cute little carolers. 
Products Used:
Caroling Mice stamp set (item #159912) Host Reward - Retiring
Give It A Whirl Dies (item #154336)
Merry Melody 3D Embossing Folder (item #156392)
Pacific Point Cardstock (item #111350)
Balmy Blue Cardstock (item #146982)
Basic White Cardstock (item #159276)
Smoky Slate Classic Ink Pad (item #147113)
Balmy Blue Classic Ink Pad (item #147105)
Pacific Point Classic Ink Pad (item #147098)
Memento Tuxedo Black Pad (item #132708)
Versamark Pad (item #102283)
Basics Embossing Powders (item #155554)
Balmy Blue Stampin' Blends Combo Pack (item #154830)
Shaded Spruce Stampin' Blends Combo Pack (item #154903)
Poppy Parade Stampin' Blends Combo Pack (item #154958)
Soft Suede Stampin' Blends Combo Pack (item #154906)
Crumb Cake Stampin' Blends Combo Pack (item #154882)
Gray Granite Stampin' Blends Combo Pack (item #154886)
Brights Stampin' Write Marker Assortments Pack (item #147157)
Snowfall Accents Puff Paint (item #150691) - Retiring
Iridescent Rhinestones Basic Jewels (item #158130)
Stampin' Dimensionals (item #104430)
Measurements:
Pacific Point Cardstock
Card Base - 8 1/2" x 5 1/2" (Scored at 4 1/4")
Large Square Layer - 3 3/4" x 2 2/4"
2 Sentiment Labels die cut with the Give It A Whirl Dies 
Basic White Cardstock
Large Square Layer - 3 1/2" x 3 1/2"
Stamped Mice image (fussy cut with Paper Snips)
This sweet card design just "sings" Christmas with these cute little Caroling Mice and I added some texture to the background with the Merry Melody 3D Embossing Folder. I stamped the mice image onto a piece of Basic White cardstock and colored them in with Stampin' Blends Markers. I chose to use Gray Granite, Soft Suede and Crumb Cake to color the mice and used Shaded Spruce, Balmy Blue and Poppy Parade to color in their coats, hats and scarves. Using Paper Snips, I fussy cut the image out. For the focal background, I stamped the ground using Smoky Slate Classic ink and the falling snow with Balmy Blue Classic ink. The musical notes were stamped with Pacific Point Classic ink and I colored them in using the Pacific Point Stampin' Write Marker to help them stand out. I added the mice to the stamped background, centering it on the Basic White square and then layered it onto the Pacific Point layer. 
The sentiment labels were created using the sentiment die from the Give It A Whirl Dies and I heat embossed the sentiments with White embossing powder to make them pop. I attached the focal square and sentiments to the card front with Stampin' Dimensionals to pop them up. Using some Snowfall Accents Puff Paint, I added some snow to the ground around the mice's feet and also to the falling snow to add some texture to the design. To add a touch of sparkle, I added some Iridescent Rhinestones Basic Jewels to either side of each of the sentiments and to the falling snow on the focal layer. This cute Christmas card was so much fun to create and I think it fits today's theme perfectly. 
Thank you for taking the time to visit my blog. I hope that my card design will help inspire you to use our wonderful theme to create your own beautiful projects to celebrate the holiday season. There are so many wonderful products to choose from to help spark your creativity.
Now it's time to visit Gez's blog and see what beautiful projects she has to share with us. Just click on the Next button below to visit her blog or use the Roll Call List to find your way. We would love it if you would leave us a comment and let us know what you liked about our projects. I hope you enjoy the rest of our blog hop. 


Roll Call List

If you live in the U.S. and do not have a Stampin' Up! Demonstrator, please contact me and I would be happy to help you with your creative projects. You may also visit my Online Store to place your order and have it shipped to you. 

Until Next Time

Happy Stamping,

Tricia Butts
Independent Stampin' Up! Demonstrator

Like What You See? Visit My Online Store Here

Visit My Facebook Business Page for Updates & Ideas

Click here to Contact Me


Check Out The Clearance Rack Refresh
Save Up To 60% Off Discontinued Products
Available Only While Supplies Last
Click Below To Visit My Online Store

Save Up To 60% Off Select Retiring Products
From The July-December 2022 Mini Catalog Last Chance List
Click Below To Visit My Online Store