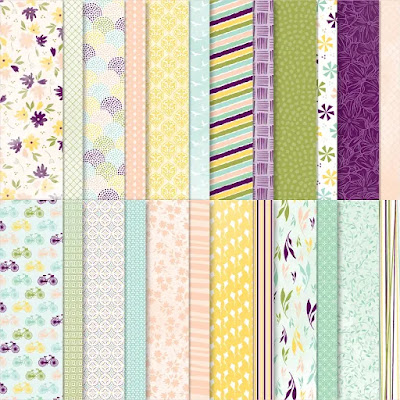
Showing posts with label Design A Daydream Host Designer Series Paper. Show all posts

Saturday, February 11, 2023

Ink. Stamp. Share. February Showcase Blog Hop

Welcome to the Ink. Stamp. Share. February Showcase Blog Hop as we share projects that we are currently working on. You will have the opportunity to visit with talented Stampin' Up! Demonstrators from around the world as they share their projects and ideas to help inspire you. 
With Valentine's Day just a few days away, I thought I would share two cards I created for a recent Valentine's Day exchange with fellow Stampin' Up! Demonstrators. The cards I created used the same supplies but the designs are unique, so that each person is getting their own special card. It was a fun way to show how you can take just a few supplies to create two beautiful but different designs. 
Products Used:
Love Cats stamp set (item #160410)
Framed Florets stamp set (item #161815)
Design A Daydream Designer Series Paper (item #159161) Host Reward
Stylish Shapes Dies (item #159183)
Give It A Whirl Dies (item #154336)
Petal Pink Cardstock (item #146985)
Real Red Cardstock (item #102482)
Basic White Cardstock (item #159276)
Memento Tuxedo Black Pad (item #132708)
Parakeet Party Stampin' Blends Combo Pack (item #159220)
Real Red Stampin' Blends Combo Pack (item #154899)
Petal Pink Stampin' Blends Combo Pack (item #154893)
Pastel Adhesive Backed Sequins (item #160387)
Stampin' Dimensionals (item #104430)
Stamparatus (item #146276)
Measurements: (Both Cards are the same)
Petal Pink Cardstock
Card Base - 8 1/2" x 5 1/2" (Scored at 4 1/4")
Large Stitched Circle die cut with the Stylish Shapes Dies
Basic White Cardstock
Inside Layer - 5 1/4" x 4"
Medium Stitched Circle die cut with the Stylish Shapes Dies
Sentiment Label die cut with the Give It A Whirl Dies
Design A Daydream Designer Series Paper
Card Front - 5 1/4" x 4"
Inside Strip - 3/4" x 4"
Real Red Cardstock
5 Hearts (various sizes) die cut with the Give It a Whirl Dies
As you can see, the basic supplies are the same for both cards. What is different about the designs, is the pattern on the designer series paper (one is the reverse side of the same sheet of paper) and the arrangement of the hearts to create the layout. To stamp the cat image, I used the Stamparatus, to make sure that I got a nice solid black image of the cat. With the Stamparatus, I had the opportunity to stamp the image several times, reinking each time, to get a nice crisp image. I also used the Stamparatus to stamp the sentiment onto the label so that I could center sentiment. I was able to stamp the images for both cards using the same set up with my Stamparatus to make sure that I was successful each time. To add some character to the cat, I used the Light Parakeet Party Stampin' Blends Marker to color the eyes, Dark Petal Pink Stampin' Blends Marker to color the nose and the Dark Real Red Stampin' Blends Marker to color the heart. I arranged the Real Red hearts and attached them to the card front around the focal image. For a touch of bling, I added two Petal Pink Sequins to the sentiment label. 
For the inside of the cards, I added a strip of the coordinating designer series paper across the bottom of the Basic White cardstock layer. I stamped the sentiment with Memento Tuxedo Black ink onto the Basic White layer and adhered it to the inside of the card. I love how these cards turned out and how I was able to create two different designs using basically the same supplies. 
The Love Cats stamp set has so many adorable images and sentiments for creating cards for a variety of occasions beyond Valentine's Day. It is perfect for the cat lover in your life. The Design A Daydream Designer Series Paper is filled with amazing designs that provide you with so many options for creating unique card designs. This pretty paper is a Host Reward and can only be earned free with a qualifying order or with a qualifying party order. Please let me know if you would like more information about how you can earn this paper for free. 
Thank you for taking the time to visit my blog. I hope that my Valentine's Day cards will help inspire you to create your own beautiful cards to send out to family and friends. As you can see from these beautiful cards, you don't have to have a lot of supplies to create your own amazing designs. 
Please take the time to visit with my fellow Design Team members by clicking on the links in the Roll Call List below. We would appreciate it if you would leave us a comment and let us know what you liked about our projects. I hope you enjoy our blog hop. 

If you live in the U.S. and do not have a Stampin' Up! Demonstrator, please contact me and I would be happy to help you with your creative projects. You may also visit my Online Store to place your order and have it shipped to you. 


Until Next Time

Happy Stamping,

Tricia Butts
Independent Stampin' Up! Demonstrator

Like What You See? Visit My Online Store Here

Visit My Facebook Business Page for Updates & Ideas

Click here to Contact Me


Time Is Running Out
To Take Advantage Of Sale-a-bration
Click Below For More Details


Friday, August 5, 2022

Global Stamping Friends August Blog Hop Back To School

Welcome to the Global Stamping Friends August Blog Hop as we celebrate going Back To School. It's hard to believe the Summer is almost over and it's time to focus on school supplies and figuring out a new routine. Our Design Team members will be showcasing wonderful projects and ideas to help you get back into the groove of a new school year and help you create your own fun projects.
It's hard to believe, but this will be my last year of school as my youngest son begins his Senior year of high school. I am still wondering where did the time go? As the mother of four children, I have been fortunate enough to meet so many wonderful teachers and I decided that today I wanted to design a card to recognize and thank teachers have had made a huge difference in my children's lives, just by sharing what they love. Teachers really do not get enough thanks, and they definitely don't get paid enough, for all the amazing things they do that we tend to take for granted. So I chose to use one of the beautiful designs from the Design A Daydream Designer Series Paper for the background and added a simple tag with the sentiment to create this pretty card. 
Products Used:
Ranunculus Romance stamp set (item #157968)
Design A Daydream Designer Series Paper (item #159161) 
Host Reward
Essential Tag Punch (item #153607)
Pool Party Cardstock (item #122924)
Versamark Pad (item #102283)
Basics Embossing Powders (item #155554)
Classic Matte Dots (item #158146)
Baker's Twine Essentials Pack (item #155475)
Stampin' Dimensionals (item #104430)
Measurements:
Pool Party Cardstock
Card Base - 5 1/2" x 8 1/2" (Scored at 4 1/4")
Tag punched out with the Essential Tag Punch
Designer Series Paper
Card Front - 5 1/4" x 4"
This clean and simple card design is a great layout for creating a variety of cards for all occasions. There are so many beautiful designs in the Design A Daydream Designer Series Paper Pack to choose from to create a variety of cards to add to your card stash. For the sentiment tag, I heat embossed the sentiment and lace detail across the top of the tag using White embossing powder and I added some Basic White Baker's Twine to the top to step up the design. To finish off the design, I added two of the Basic White Matte Dots to the bottom corners of the tag. I added it to the card front with Stampin' Dimensionals to add some dimension to the design. 
Thank you for taking the time to visit my blog. I hope my card design will help inspire you to create your own beautiful projects to celebrate going back to school. There are so many wonderful options to explore. 
Now it's time to visit Marieke's blog and see what she has to share with us. Just click the Next button to visit her blog. We would appreciate it if you would leave us a comment and let us know what you liked about our projects. I hope you enjoy the rest of our blog hop.


If you live in the U.S. and do not have a Stampin' Up! Demonstrator, please contact me and I would be happy to help you with your creative projects. You may also visit my Online Store to place your order and have it shipped to you. 

Until Next Time

Happy Stamping,

Tricia Butts
Independent Stampin' Up! Demonstrator

Like What You See? Visit My Online Store Here

Visit My Facebook Business Page for Updates & Ideas

Click here to Contact Me


Enjoy Some Summer Crafting
With The August Paper Pumpkin Kit
Click Below To Subscribe By August 10th

Get Creative For The Holidays
With The July-December 2022 Mini Catalog
Click Below To Visit My Online Store

Earn Exclusive Free Products
During Sale-a-bration
Click Below For More Details


Friday, June 3, 2022

Global Stamping Friends June Blog Hop Bring In The New

 
Welcome to the Global Stamping Friends June Blog Hop as we Bring In The New to celebrate the new 2022-2023 Annual Catalog. We will be sharing our projects and ideas to help inspire you to explore the wonderful new products available in this catalog.
I decided that since Father's Day is just a few weeks away, I would focus on some of the amazing masculine products in the new catalog. The Vintage Tools stamp set grabbed my attention because both my husband and his father have a connection with carpentry and I love the vintage style of the images. I paired this stamp set with the Design A Daydream Host Designer Series Paper, which has a wide variety of designs that work well for masculine cards. I love how the Gold embossing steps up this card design without being over the top. This card design would work well for Father's Day or a masculine birthday card. 
Products Used:
Vintage Tools stamp set (item #159098) New
He's All That Bundle (item #159079) New
Stylish Shapes Dies (item #159183) New
Design A Daydream Host Designer Series Paper (item #159161) Host Reward
Soft Suede Cardstock (item #115318)
Crumb Cake Cardstock (item #120953)
Basic White Cardstock (item #159276)
Early Espresso Classic Ink Pad (item #147114)
Crumb Cake Classic Ink Pad (item #147116)
Versamark Pad (item #102283)
Metallics Embossing Powders (item #155555)
Linen Thread (item #104199)
Brushed Metallic Dots (item #156506)
Stampin' Dimensionals (item #104430)
Measurements:
Soft Suede Cardstock 
Card Base - 5 1/2" x 7 1/4" (Scored at 4 1/4")
Large Stitched Square die cut with the Stylish Shapes Dies
Sentiment Banner die cut with the Stylish Shapes Dies
Embossed Banner die cut with the All That Dies
 Crumb Cake Cardstock
Medium Stitched Square die cut with the Stylish Shapes Dies
Design A Daydream Designer Series Paper
Card Front - 5 1/4" x 2 3/4"
Inside Strip - 5 1/4" x 1 1/4"
Basic White Cardstock
Inside Layer - 5 1/4" x 4"
This simple fun fold card design is easy to create and assemble. For the designer series paper, I cut a piece that was 5 1/4" x 4" and then cut that piece into two separate pieces to create the card front and the inside panel. I attached the inside panel to the right side of the Basic White cardstock layer. I stamped the sentiment with Early Espresso Classic ink and the nail image with Crumb Cake Classic ink to the bottom left corner and then adhered the layer to the inside of the card. For the card front, I stamped the image onto the Crumb Cake cardstock square with Early Espresso ink and then blended the ink slightly with a Blender Pen to add soft, subtle color to the image. I wrapped the Lined Thread around the Soft Suede square twice and tied a knot on the right side and then attached the Crumb Cake square on top with Stampin' Dimensionals. For the embossed banner, I heat embossed the stamp image from the He's All That stamp set with Gold embossing powder and die cut it with the coordinating die from the All That Dies. I attached the banner below the stamped image on the Crumb Cake square with Stampin' Seal adhesive. For the Stitched Banner, I heat embossed the sentiment from the Vintage Tools stamp set with Gold embossing powder and embellished it with two of the small Gold Brushed Metallic Dots. I attached both the square focal image and the sentiment banner to the card front flap with Stampin' Dimensionals, (on the left side only) so that the card swings freely. I love the way this clean and simple fun fold turned out and I think you could create a variety of designs with these supplies.
Thank you for taking the time to visit my blog. I hope that my card design will help inspire you to get creative with the wonderful new products in the 2022-2023 Annual Catalog. There are so many wonderful possibilities to explore.
Now it's time to visit Kimberley's blog and see what she has to share with us. Just click on the Next button below to visit her blog. We would love it if you would leave us a comment and let us know what you liked about our projects. I hope you enjoy the rest of our blog hop. 


If you live in the U.S. and do not have a Stampin' Up! Demonstrator, please contact me and I would be happy to help you with your creative projects. You may also visit my Online Store to place your order and have it shipped to you. 

Until Next Time

Happy Stamping,

Tricia Butts
Independent Stampin' Up! Demonstrator

Like What You See? Visit My Online Store Here

Visit My Facebook Business Page for Updates & Ideas

Click here to Contact Me


Create & Save With The Kits Collection
Buy One, Get One 50% Off Sale
Click Below To Visit My Online Store

Stock Up On Your Favorite Retiring Products
From The January-June 2022 Mini Catalog Last Chance List
Click Below To Shop Now


Saturday, May 21, 2022

Stamping With Friends Blog Hop 2022-2023 Annual Catalog


Welcome to the Stamping With Friends Blog Hop as we celebrate the new 2022-2023 Annual Catalog. Our Design Team members will be sharing their projects and ideas to showcase the products in this amazing new catalog. 
There are so many wonderful new products in the new 2022-2023 Annual Catalog that it was hard to choose which ones to share with you today. In the end, I decided to share what I consider to be some hidden gems that I hope you will love as much as I do. 
For my card design, I chose to create a Get Well card that would be perfect for the computer geek in your life. The Tech Support stamp set has so many wonderful sentiments and images that work for a variety of occasions and I just couldn't resist the virus pun. I paired this stamp set with one of my favorite new Die sets, the Stylish Shapes Dies. In just the short time that I have had these dies, I have used them for so many projects and they are quickly becoming my new every day favorite. For the designer series paper background, I used one of the designs from the Design A Daydream Host Designer Series Paper and I just love the wide variety of designs and colors that work for both masculine and feminine projects. This paper pack contains 48 sheets, 4 each of 12 double sided designs and is available only as a Host Reward. 
Products Used:
Tech Support stamp set (item #159101) New
Nuts & Bolts stamp set (item #157650)
Stylish Shapes Dies (item #159101) New  
Layering Circles Dies (item #151770)
Design A Daydream Host Designer Series Paper (item #159161) New Host Reward
Basic Gray Cardstock (item #121044)
Smoky Slate Cardstock (item #131202)
Pool Party Cardstock (item #122924)
Versamark Pad (item #102283)
Basics Embossing Powders (item #155554)
Sweet Sorbet Stampin' Blends Combo Pack (item #159224) New
Orchid Oasis Stampin' Blends Combo Pack (item #159223) New
Pool Party Stampin' Blends Combo Pack (item #154894)
Matte Black Dots (item #154284)
Stampin' Dimensionals (item #104430)
Measurements:
Basic Gray Cardstock
Card Base - 8 1/2" x 5 1/2" (Scored at 4 1/4")
Large Scalloped Circle die cut with the Layering Circles Dies
Medium Stitched Circle die cut with the Stylish Shapes Dies
Small Stitched Circle die cut with the Stylish Shapes Dies
Design A Daydream Designer Series Paper
Card Front - 5 1/4" x 4"
Smoky Slate Cardstock
Large Stitched Circle die cut with Stylish Shapes Dies
Medium Stitched Circle die cut with Stylish Shapes Dies
Small Stitched Circle die cut with Stylish Shapes Dies
Pool Party Cardstock 
Large Circle die cut with the Layering Circles Dies
Medium Circle die cut with the Layering Circles Dies
Small Circle die cut with the Layering Circles Dies
I love combining new products with old favorites and I couldn't resist the connection between the new Tech Support stamp set and the Nuts & Bolts stamp set from the January-June 2022 Mini Catalog. The images and sentiments work so well together and give me so many additional creative options. I heat embossed the images and sentiments onto the Smoky Slate circles with Black embossing powder and then colored the hearts with the Dark Sweet Sorbet Stampin' Blends Marker and the body of the robot with Light Orchid Oasis and Dark Pool Party Stampin' Blends Markers to bring him to life. The layering of the different colors of cardstock really helps make the circles pop against the designer series background and I used Stampin' Dimensionals to pop up layers on the smaller circles to add dimension. I wanted to keep the embellishments simple and chose the Matte Black Dots to finish off the card design. 
Thank you for taking the time to visit my blog. I hope that my card design will inspire you to explore the products in the new 2022-2023 Annual Catalog to create your own beautiful projects. There are so many wonderful options to choose from.
Now it's time to visit with our Design Team members as they share their wonderful projects and ideas with you. Just use the Roll Call List below to find your way along our blog hop. We would appreciate it if you would leave us a comment and let us know what you liked about our projects. 

If you live in the U.S. and do not have a Stampin' Up! Demonstrator, please contact me and I would be happy to help you with your creative projects. You may also visit my Online Store to place your order and have it shipped to you.

Until Next Time

Happy Stamping,

Tricia Butts
Independent Stampin' Up! Demonstrator

Like What You See? Visit My Online Store Here

Visit My Facebook Business Page for Updates & Ideas

Click here to Contact Me

 
Explore Your Creativity
With The New 2022-2023 Annual Catalog
Click Below To Visit My Online Store

Take Advantage Of The In Color Starter Kit Promotion
During The Month Of May
Click Below For More Details