Saturday, February 11, 2023

Ink. Stamp. Share. February Showcase Blog Hop

Welcome to the Ink. Stamp. Share. February Showcase Blog Hop as we share projects that we are currently working on. You will have the opportunity to visit with talented Stampin' Up! Demonstrators from around the world as they share their projects and ideas to help inspire you. 
With Valentine's Day just a few days away, I thought I would share two cards I created for a recent Valentine's Day exchange with fellow Stampin' Up! Demonstrators. The cards I created used the same supplies but the designs are unique, so that each person is getting their own special card. It was a fun way to show how you can take just a few supplies to create two beautiful but different designs. 
Products Used:
Love Cats stamp set (item #160410)
Framed Florets stamp set (item #161815)
Design A Daydream Designer Series Paper (item #159161) Host Reward
Stylish Shapes Dies (item #159183)
Give It A Whirl Dies (item #154336)
Petal Pink Cardstock (item #146985)
Real Red Cardstock (item #102482)
Basic White Cardstock (item #159276)
Memento Tuxedo Black Pad (item #132708)
Parakeet Party Stampin' Blends Combo Pack (item #159220)
Real Red Stampin' Blends Combo Pack (item #154899)
Petal Pink Stampin' Blends Combo Pack (item #154893)
Pastel Adhesive Backed Sequins (item #160387)
Stampin' Dimensionals (item #104430)
Stamparatus (item #146276)
Measurements: (Both Cards are the same)
Petal Pink Cardstock
Card Base - 8 1/2" x 5 1/2" (Scored at 4 1/4")
Large Stitched Circle die cut with the Stylish Shapes Dies
Basic White Cardstock
Inside Layer - 5 1/4" x 4"
Medium Stitched Circle die cut with the Stylish Shapes Dies
Sentiment Label die cut with the Give It A Whirl Dies
Design A Daydream Designer Series Paper
Card Front - 5 1/4" x 4"
Inside Strip - 3/4" x 4"
Real Red Cardstock
5 Hearts (various sizes) die cut with the Give It a Whirl Dies
As you can see, the basic supplies are the same for both cards. What is different about the designs, is the pattern on the designer series paper (one is the reverse side of the same sheet of paper) and the arrangement of the hearts to create the layout. To stamp the cat image, I used the Stamparatus, to make sure that I got a nice solid black image of the cat. With the Stamparatus, I had the opportunity to stamp the image several times, reinking each time, to get a nice crisp image. I also used the Stamparatus to stamp the sentiment onto the label so that I could center sentiment. I was able to stamp the images for both cards using the same set up with my Stamparatus to make sure that I was successful each time. To add some character to the cat, I used the Light Parakeet Party Stampin' Blends Marker to color the eyes, Dark Petal Pink Stampin' Blends Marker to color the nose and the Dark Real Red Stampin' Blends Marker to color the heart. I arranged the Real Red hearts and attached them to the card front around the focal image. For a touch of bling, I added two Petal Pink Sequins to the sentiment label. 
For the inside of the cards, I added a strip of the coordinating designer series paper across the bottom of the Basic White cardstock layer. I stamped the sentiment with Memento Tuxedo Black ink onto the Basic White layer and adhered it to the inside of the card. I love how these cards turned out and how I was able to create two different designs using basically the same supplies. 
The Love Cats stamp set has so many adorable images and sentiments for creating cards for a variety of occasions beyond Valentine's Day. It is perfect for the cat lover in your life. The Design A Daydream Designer Series Paper is filled with amazing designs that provide you with so many options for creating unique card designs. This pretty paper is a Host Reward and can only be earned free with a qualifying order or with a qualifying party order. Please let me know if you would like more information about how you can earn this paper for free. 
Thank you for taking the time to visit my blog. I hope that my Valentine's Day cards will help inspire you to create your own beautiful cards to send out to family and friends. As you can see from these beautiful cards, you don't have to have a lot of supplies to create your own amazing designs. 
Please take the time to visit with my fellow Design Team members by clicking on the links in the Roll Call List below. We would appreciate it if you would leave us a comment and let us know what you liked about our projects. I hope you enjoy our blog hop. 

If you live in the U.S. and do not have a Stampin' Up! Demonstrator, please contact me and I would be happy to help you with your creative projects. You may also visit my Online Store to place your order and have it shipped to you. 


Until Next Time

Happy Stamping,

Tricia Butts
Independent Stampin' Up! Demonstrator

Like What You See? Visit My Online Store Here

Visit My Facebook Business Page for Updates & Ideas

Click here to Contact Me


Time Is Running Out
To Take Advantage Of Sale-a-bration
Click Below For More Details


Wednesday, February 8, 2023

Around The World On Wednesday February Blog Hop Technique Challenge Embossing

Welcome to the Around The World On Wednesday February Blog Hop as we explore our first Technique Challenge for 2023 with Embossing. We have the choice of using heat embossing, dry embossing, using embossing paste or maybe a combination of these techniques, as we create our projects to share with you. Our wonderful Design Team members will have beautiful projects to help inspire you to take this challenge and help you add embossing to your own unique projects. 
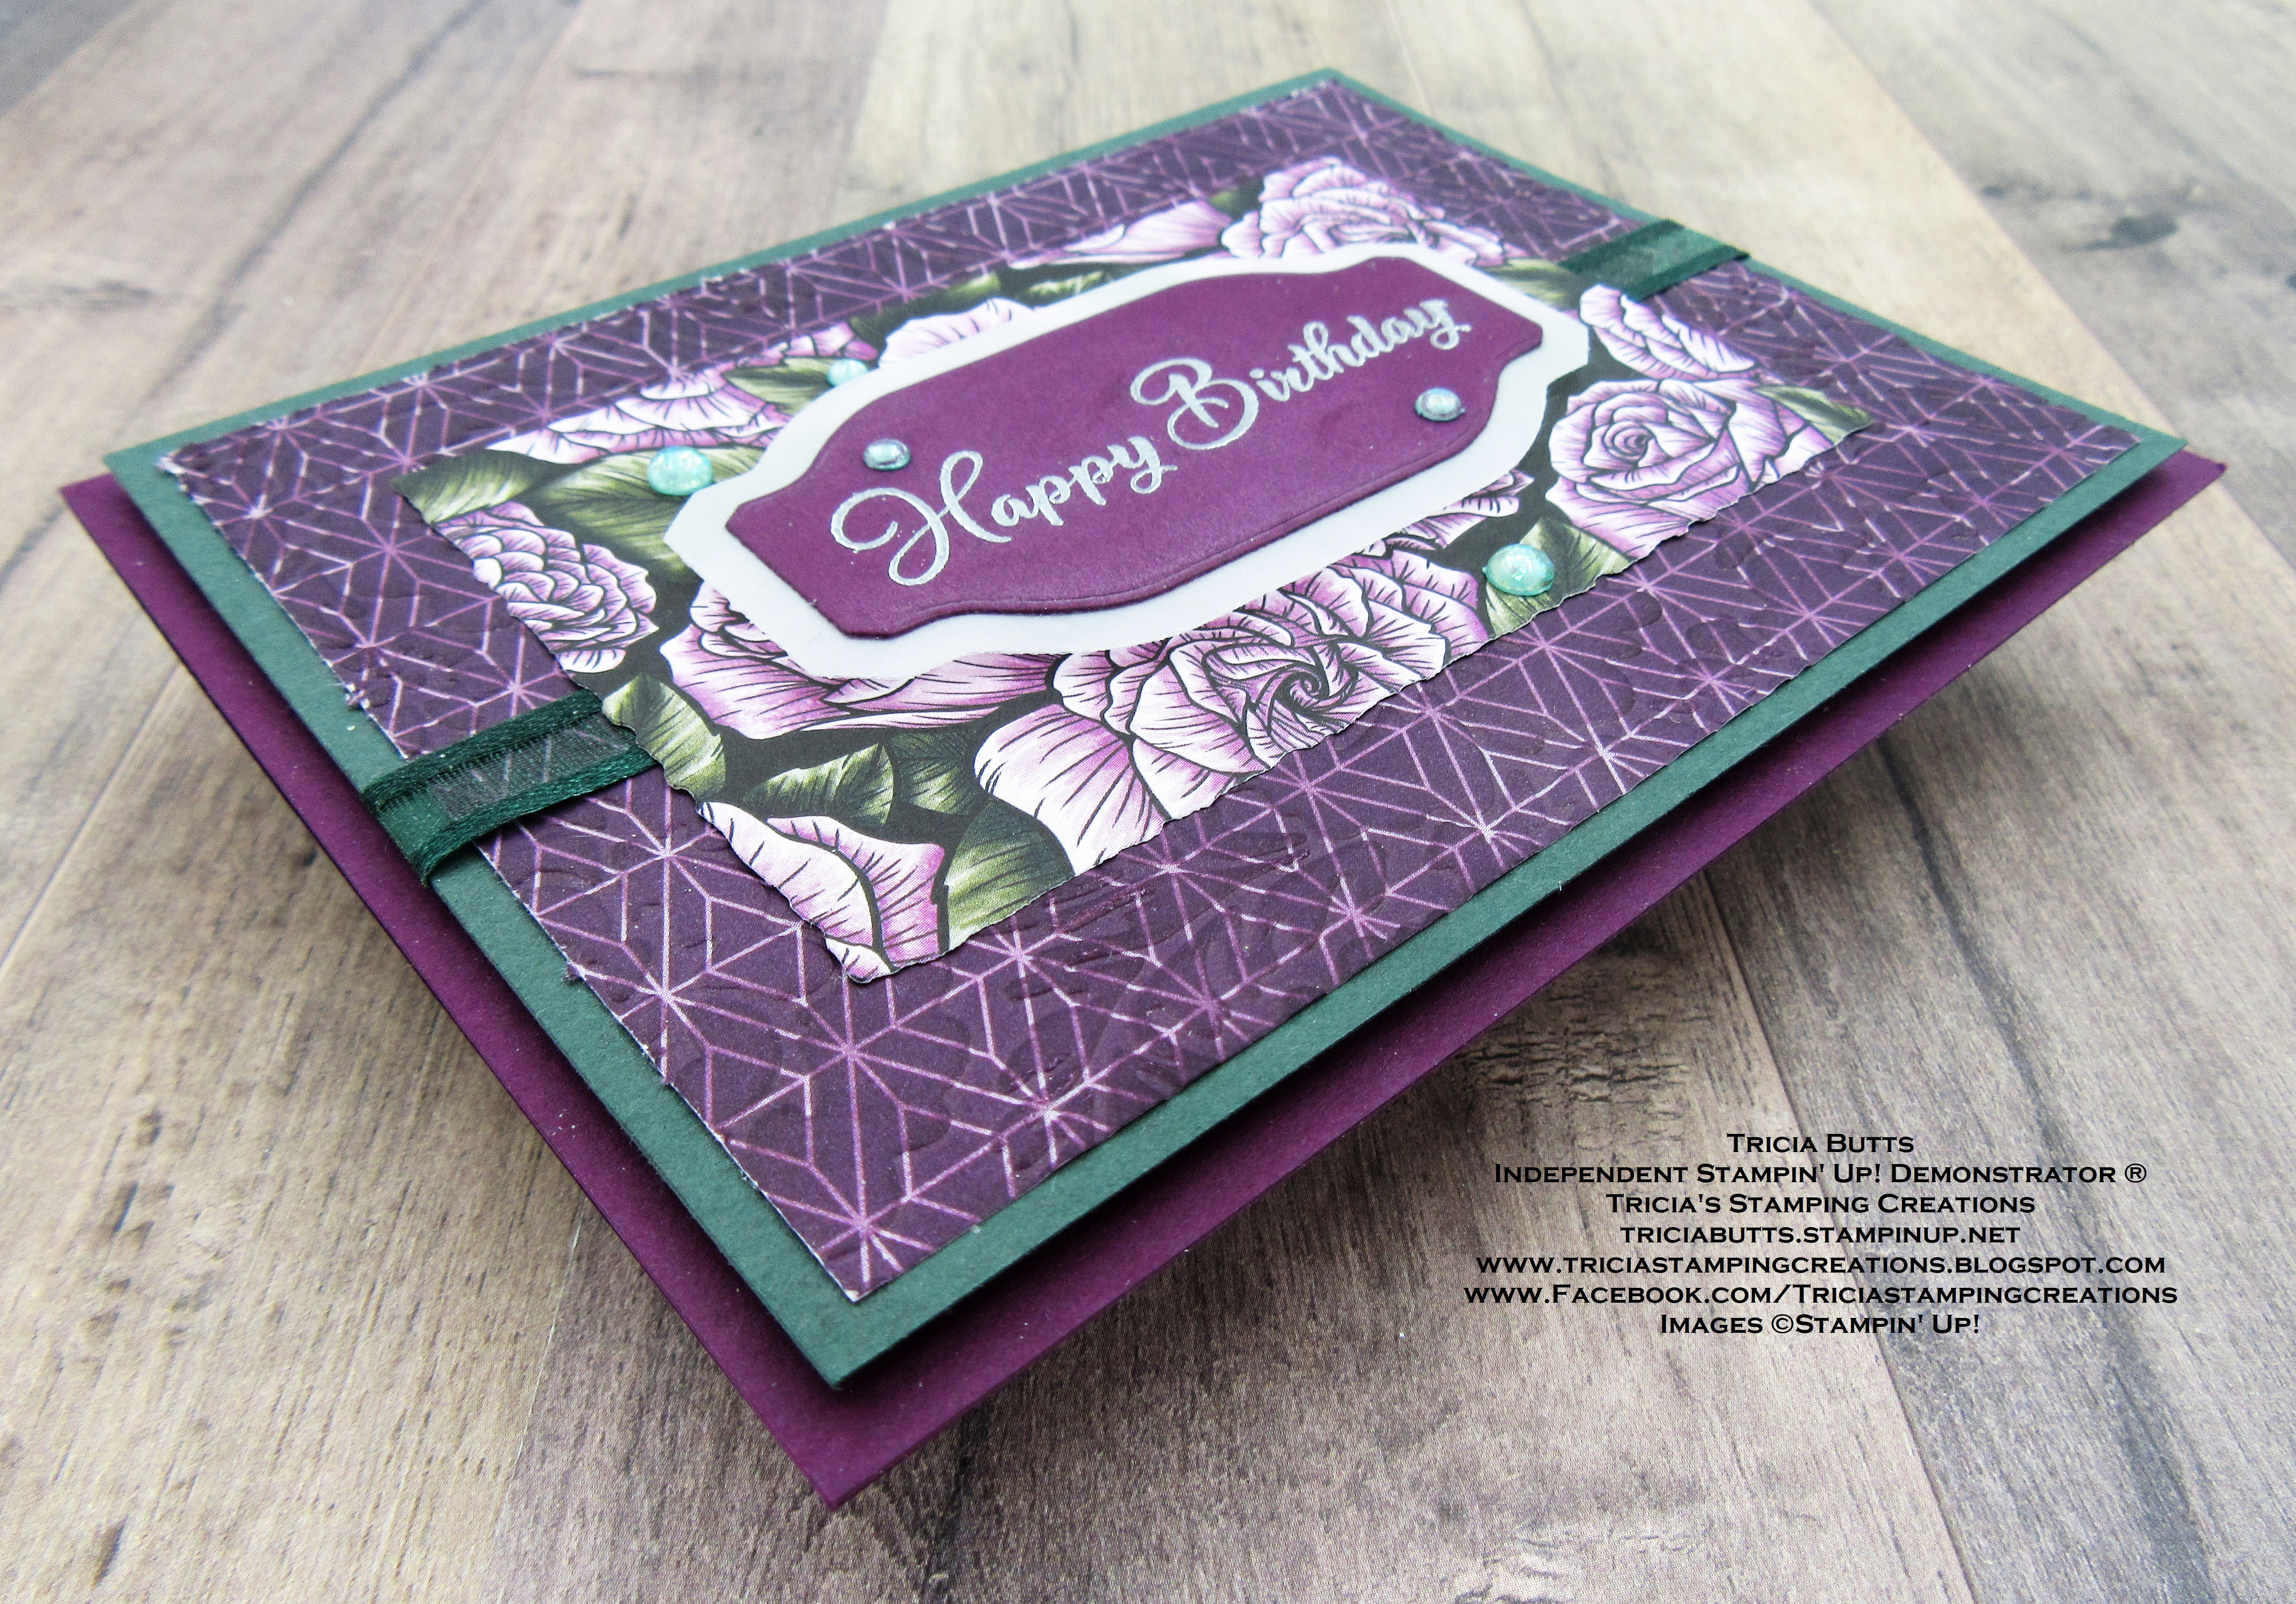
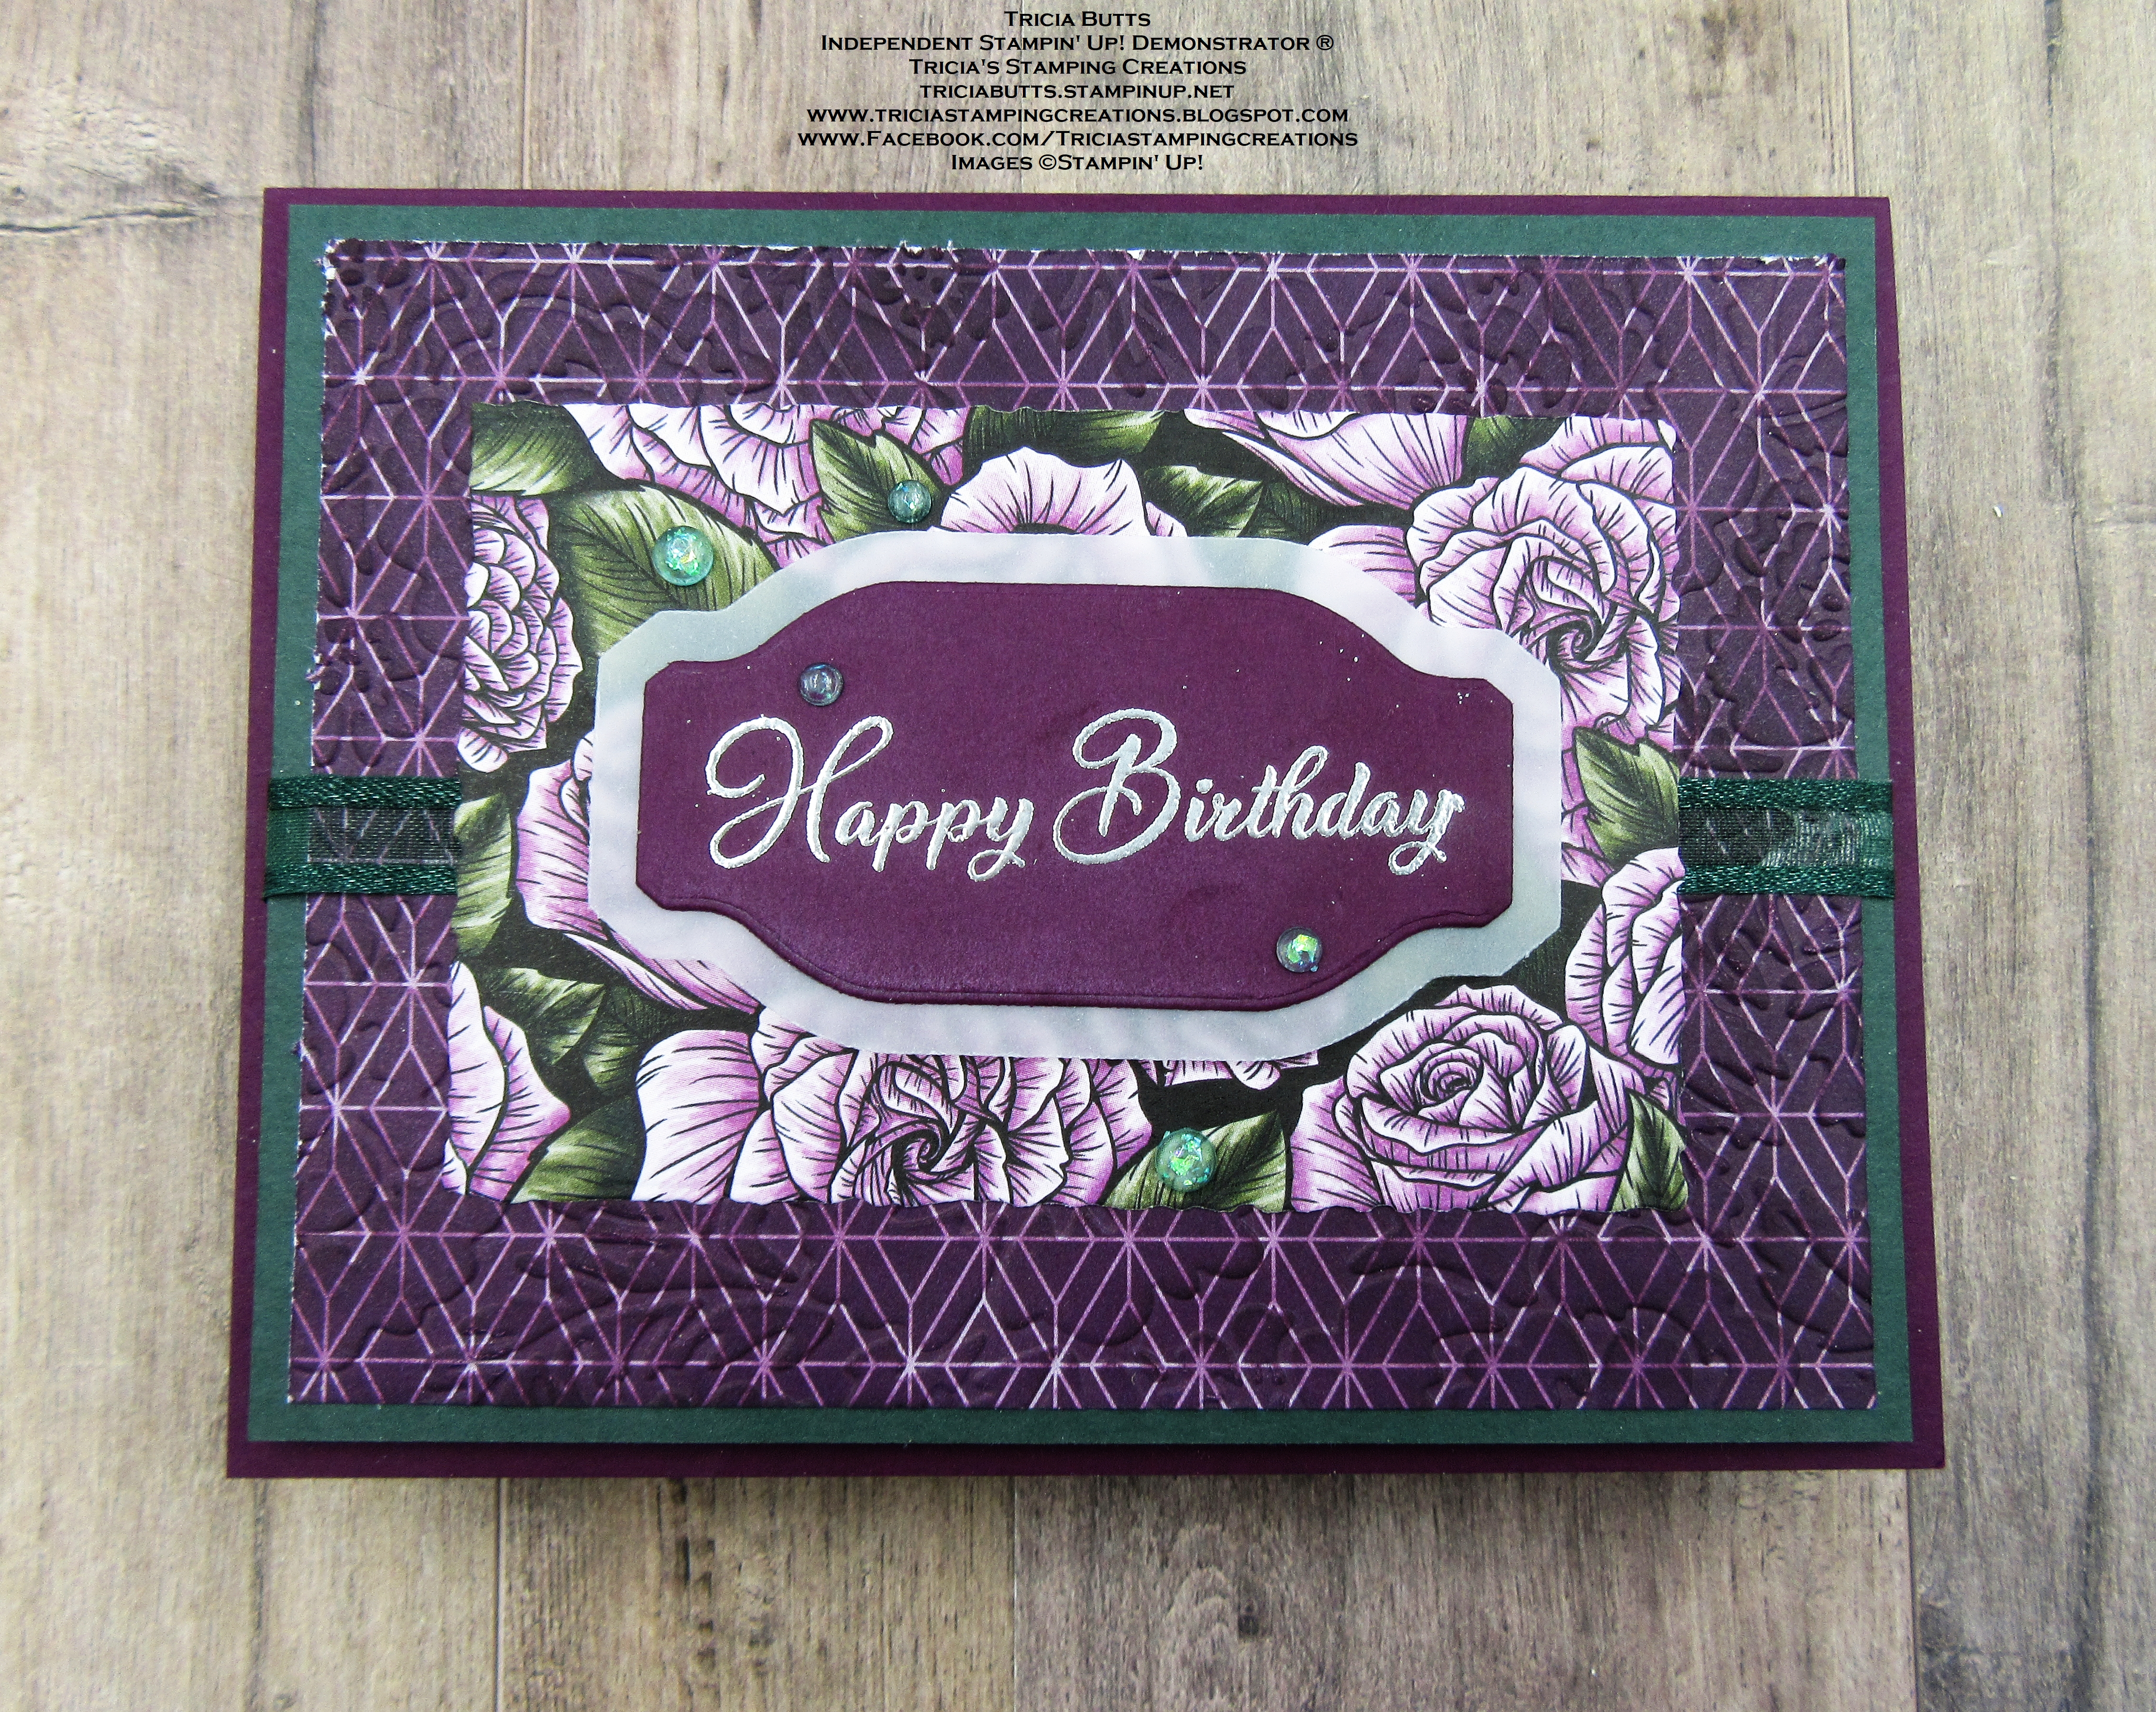
For my card, I chose to use both heat embossing and dry embossing to create my design. I love both techniques and how they bring something special to enhance a clean and simple card design. For the background, I chose to use the beautiful Favored Flowers Designer Series Paper, a Level 1 Sale-a-bration Reward you can earn free with a qualifying order. The sentiment has been framed using the Something Fancy Dies and I love how the vellum layer adds a softness to the card. 
Products Used:
Go To Greetings stamp set (item #158763)
Favored Flowers Designer Series Paper (item #160833) Level 1 Sale-a-bration Reward
Something Fancy Dies (item #160424)
Deckled Rectangles Dies (item #159173)
Pretty Flowers Embossing Folder (item #155428)
Blackberry Bliss Cardstock (item #133675)
Evening Evergreen Cardstock (item #155574)
Lovely Layers 3 3/4" x 5" Vellum (item #158919)
Blackberry Bliss Classic Ink Pad (item #147092)
Versamark Pad (item #102283)
Metallics Embossing Powders (item #155555)
Evening Evergreen 3/8" Open Weave Ribbon (item #155573)
2021-2023 In Color Opal Rounds (item #159185)
Stampin' Dimensionals (item #104430)
Sponge Daubers (item #133773)
Measurements:
Blackberry Bliss Cardstock 
Card Base - 8 1/2" x 5 1/2" (Scored at 4 1/4")
Sentiment Label die cut with the Something Fancy Dies
Evening Evergreen Cardstock
Layer 1 - 5 1/4" x 4"
Favored Flowers Designer Series Paper
Embossed Layer -5" x 4" using the Pretty Flowers Embossing Folder
Focal Layer die cut with the Deckled Rectangles Dies 
Lovely Layers Vellum (plain)
Matte Label Layer die cut with the Something Fancy Dies
This beautiful card design is a great way to showcase the pretty designs in the Favored Flowers Designer Series Paper. The two patterns are actually from one sheet of paper, with the flowers on one side and the geometric design on the other. I embossed the large geometric background panel using the Pretty Flowers embossing folder and then sponged it with Blackberry Bliss Classic ink with a Sponge Dauber to help bring out the detail of the embossing. I then attached it to the Evening Evergreen cardstock layer. I added a piece of the Evening Evergreen Open Weave Ribbon across the center of the panel and attached each end to the back. Next, I added the floral rectangle over the top of the ribbon, centering it on the background panel. I added the panel to the card base with Stampin' Dimensionals. For the sentiment, I heat embossed the Happy Birthday image with Silver embossing powder onto a Blackberry Bliss cardstock label and layered it on top of the vellum label. I attached it to the center of the floral rectangle with Stampin' Dimensionals. For a touch of bling, I added several Soft Succulent Opal Rounds to the card front to complete the card design. I love the beautiful elegance of this card design and how simple it was to create. 
Thank you for taking the time to visit my blog. I hope that my card design will help inspire you to explore the many creative possibilities that embossing can add to your projects. There are so many wonderful Stampin' Up! products to choose from. 
Now it's time to visit Jan's blog and see what she has to share with us. Just click on the Next button below to visit her blog or use the Roll Call List to find your way. We would appreciate it if you would leave us a comment and let us know what you like about our projects. I hope you enjoy your creative journey along our blog hop. 

Roll Call List
If you live in the U.S. and do not have a Stampin' Up! Demonstrator, please contact me and I would be happy to help you with your creative projects. You may also visit my Online Store to place your order and have it shipped to you. 

Until Next Time

Happy Stamping,

Tricia Butts
Independent Stampin' Up! Demonstrator

Like What You See? Visit My Online Store Here

Visit My Facebook Business Page for Updates & Ideas

Click here to Contact Me


Time Is Running Out
To Take Advantage Of Free Sale-a-bration Products
Click Below For More Details


Monday, February 6, 2023

Kylie Bertucci's Monthly International Blog Highlights February 2023

Welcome to Kylie Bertucci's Monthly International Blog Highlights for February. We will be sharing our projects and ideas to help inspire you to create beautiful Thank You cards. Stampin' Up! Demosntrators from around the world are taking part in this wonderful blog hop and their projects are simply amazing. I hope you will take the time to hop along with us this month.
For my card design, I wanted to play with the In The Country stamp set, which is a Level 1 Sale-a-bration Reward you can earn free with a qualifying order. I wanted to a vintage feel to my card with soft colors and the look of worn bricks to give the design an aged look. I used Watercolor Pencils to color the image to add some soft, faded color to the design. This design works well for masculine cards and could be used for other occasions such as a birthday, thinking of you or even a retirement card.
Products Used:
In The Country stamp set (item #160828) Sale-a-bration 
Level 1 Reward
Go To Greetings stamp set (item #158763)
Deckled Rectangles Dies (item #159173)
Something Fancy Dies (item #160424)
Brick & Mortar 3D Embossing Folder (item #149643)
Early Espresso Cardstock (item #119686)
Crumb Cake Classic Ink Pad (item #147116)
Cajun Craze Classic Ink Pad (item #147085)
Very Vanilla Cardstock (item #101650)
Stazon Saddle Brown Pad (item #151508)
Versamark Pad (item #102283)
Metallics Embossing Powders (item #155555)
Watercolor Pencils Assortment 1 (item #141709)
Watercolor Pencils Assortment 2 (item #149014)
Blender Pens (item #102845)
Sponge Daubers (item #133773)
Stampin' Dimensionals (item #104430)
Measurements:
Early Espresso Cardstock
Card Base - 8 1/2" x 5 1/2" (Scored at 4 1/4")
Large Rectangle die cut with the Deckled Rectangles Dies 
Sentiment Label die cut with the Something Fancy Dies 
Very Vanilla Cardstock
Background Layer - 5 1/4" x 4" embossed with the Brick & Mortar 3D Embossing Folder
Focal Layer die cut with the Deckled Rectangles Dies 
This Thank You card features some fun coloring techniques that you can use to add texture and depth to your design. For the background layer, I sponged the embossed areas using Sponge Daubers to add Crumb Cake and Cajun Craze Classic ink to the cardstock. The sponging helps highlight the bricks in the embossing to add a vintage look to this layer. For the focal layer, I stamped the image with Saddle Brown Stazon ink to continue that vintage feel to the design. I colored the image with Watercolor Pencils and smoothed out the pencil lines with a Blender Pen to give the image a soft watercolor look. The sentiment was heat embossed with Gold embossing powder onto an Early Espresso label die cut with the Something Fancy Dies. I used one of the Deckled Rectangles Dies to cut the right side of the label so that it would match up with the edge of the focal layer. I love how the Deckled Rectangles give the illusion of torn edges. I chose not to add any embellishments so that it would have a more rustic feel to the design. 
Thank you for taking the time to visit my blog. I hope that my card design will help inspire you to create your own beautiful Thank You cards. Stampin' Up! has so many wonderful products that you can mix and match to help create your own unique designs. Don't forget to take advantage of Sale-a-bration and earn free products with a qualifying order. 
I would love it if you would take the time to vote for my card design for this month's International Blog Highlights You can click on the Vote button below and click on the heart above the thumb nail image for my card (Card #21). You can vote for up to 5 cards each day for the next week, so please take the time to visit with my fellow Demonstrators and share the love by voting for their projects too. We would also appreciate it if you would leave us a comment and let us know what you enjoyed about our designs.


If you live in the U.S. and do not have a Stampin' Up! Demonstrator, please contact me and I would be happy to help you with your creative projects. You may also visit my Online Store to place your order and have it shipped to you. 

Until Next Time

Happy Stamping,

Tricia Butts
Independent Stampin' Up! Demonstrator

Like What You See? Visit My Online Store Here

Visit My Facebook Business Page for Updates & Ideas

Click here to Contact Me


Take Advantage Of Sale-a-bration
Earn Free Products With A Qualifying Order
Click Below For More Details


Friday, February 3, 2023

Global Stamping Friends February Blog Hop Stamp Free

Welcome to the Global Stamping Friends February Blog Hop as we explore the theme "Stamp Free". This theme can be taken in several different ways, including creating a project with "Free stamps" like the free stamp sets available during Sale-a-bration or perhaps a project which does not use any stamps. Our wonderful Design Team members will be sharing their take on this month's theme to share their projects and ideas to help inspire you to get creative. 
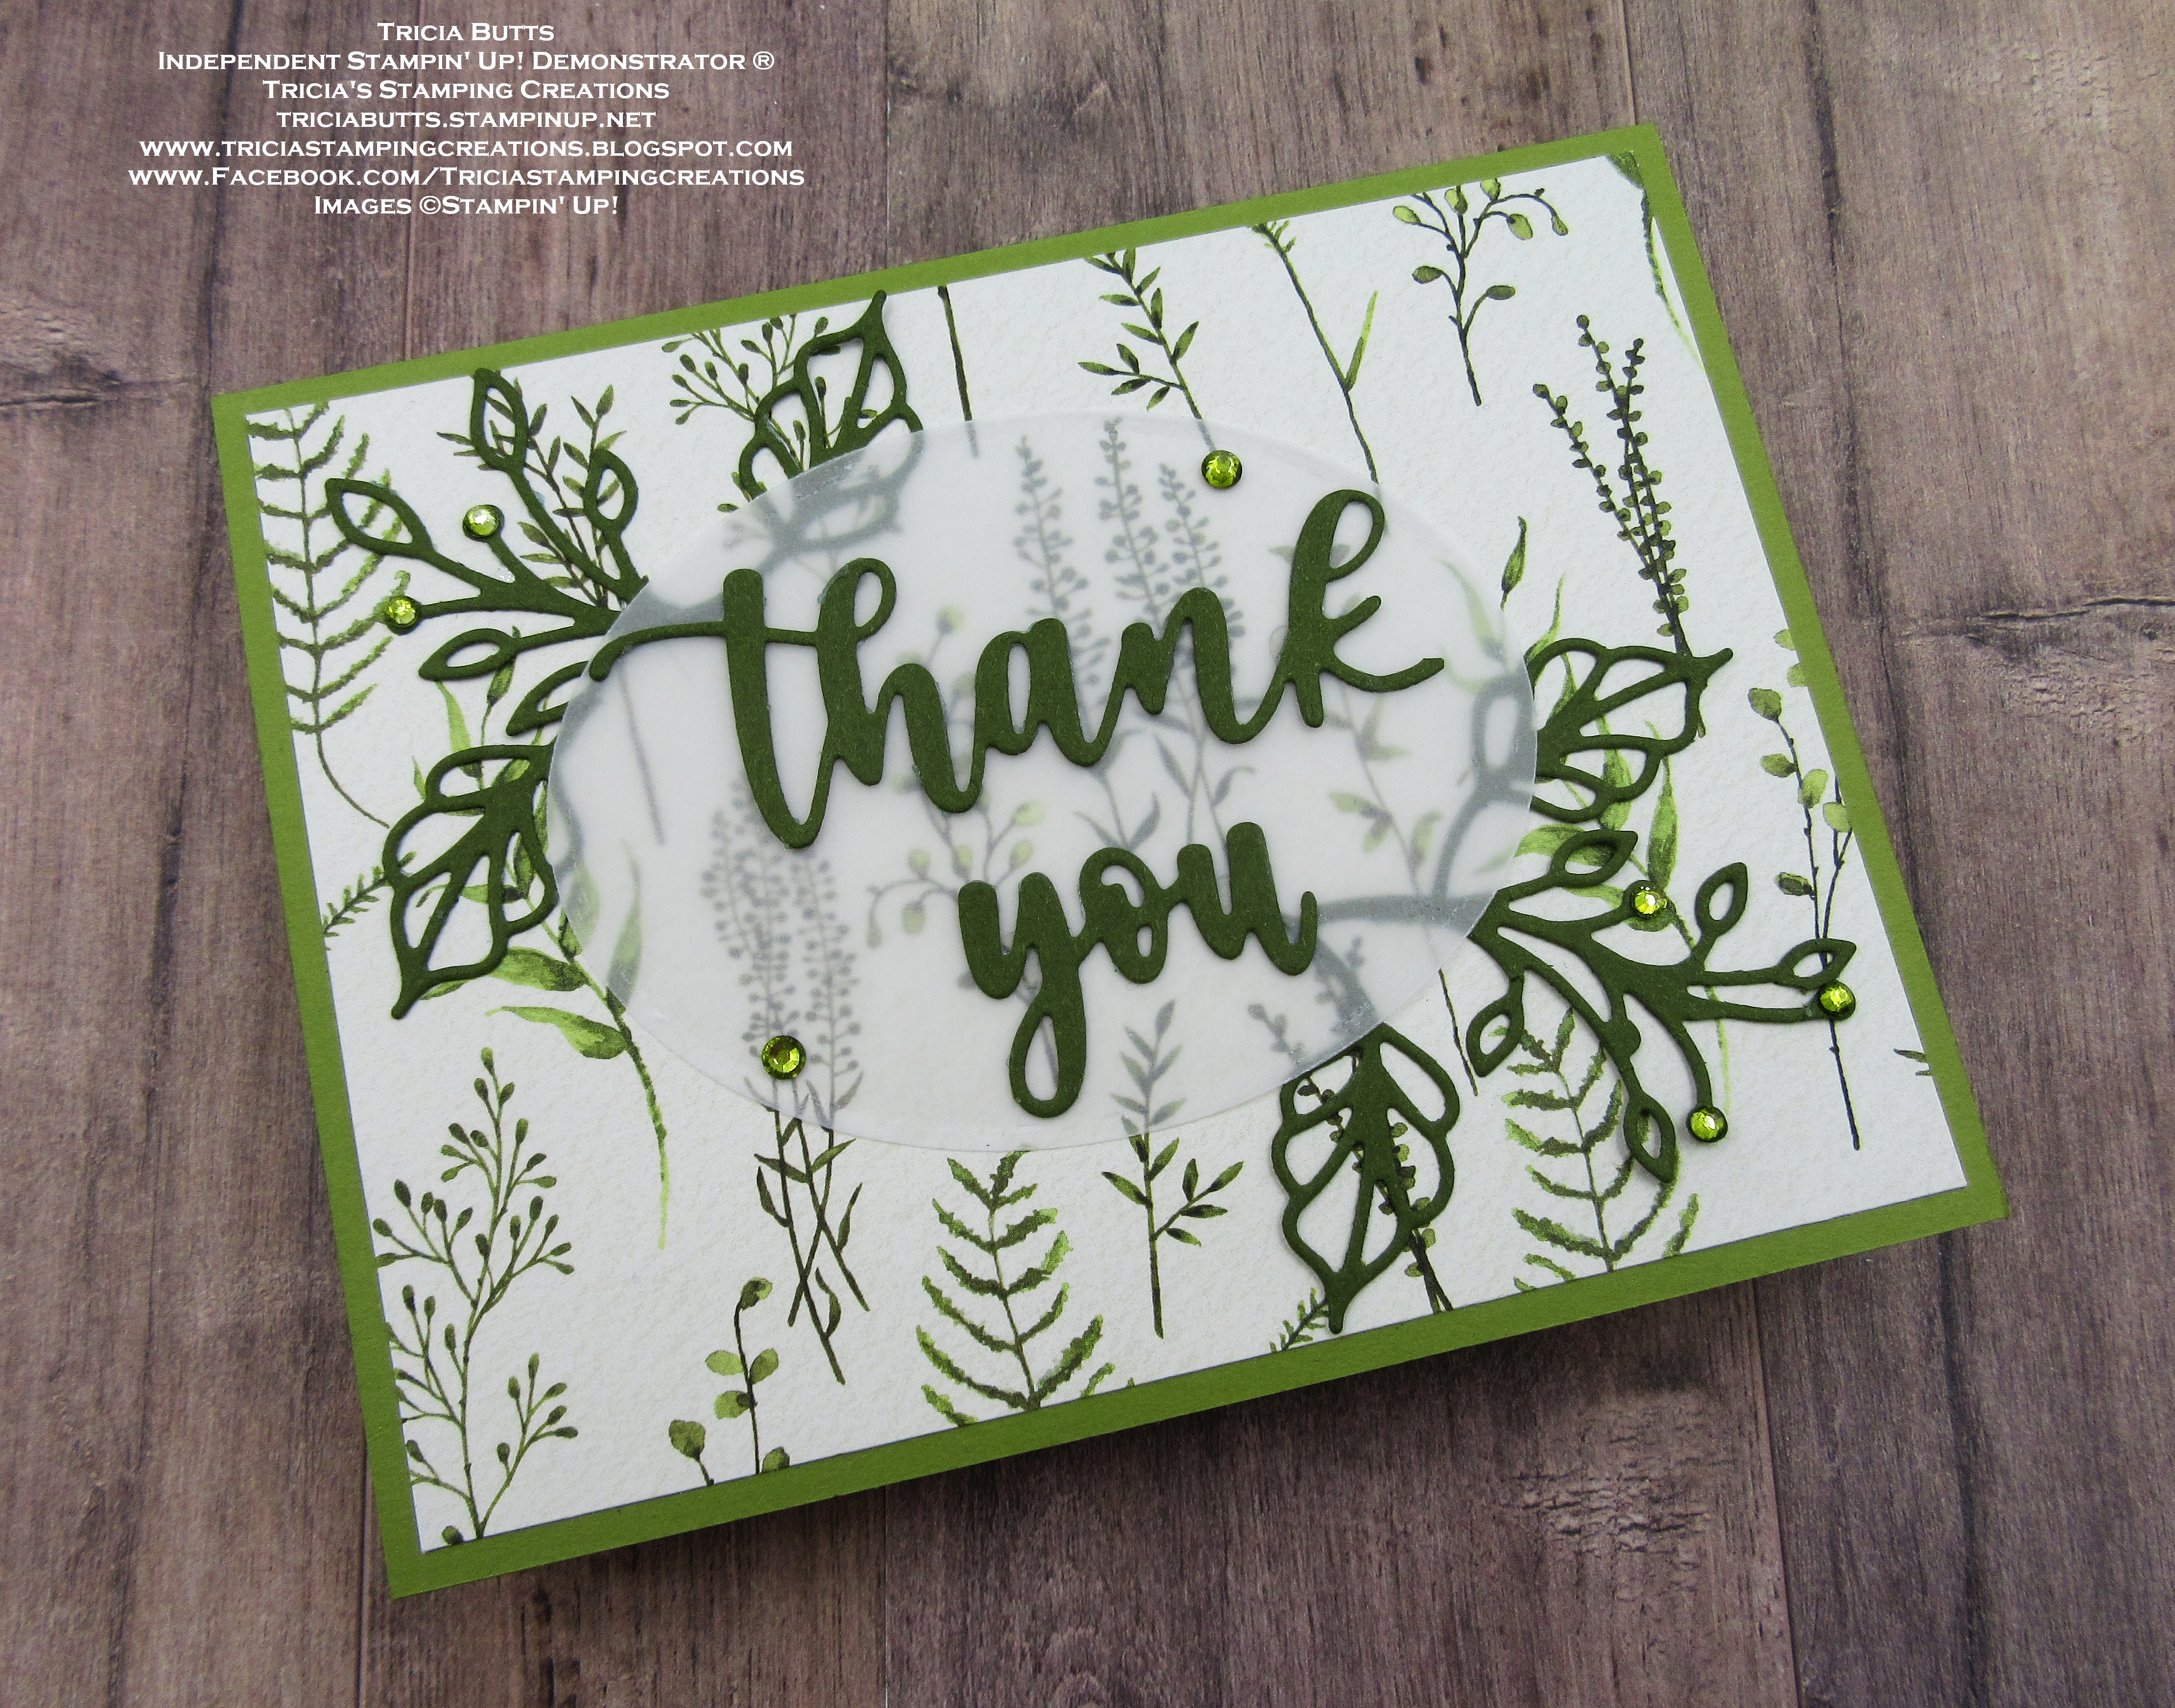
For my card today, I decided to go with a no stamping design using the Amazing Thanks Dies, an old favorite from the 2022-2023 Annual Catalog. I love the flowing script of the words in this die set and I thought they would work well with the pretty designs in the Dainty Flowers Designer Series Paper, a Level 1 Sale-a-bration Reward you can earn free with a qualifying order ($50 in the U.S.) I added a vellum oval to create a soft layer behind the sentiment and some die cut leaves to step up the design. I love the organic feel of this layout and how simple it was to create. 
Products Used:
Amazing Thanks Dies (item #157816)
Framed Florets Dies (item #160523)
Dainty Flowers Designer Series Paper (item #160834) Sale-a-bration Level 1 Reward
Old Olive Cardstock (item #100702)
Mossy Meadow Cardstock (item #133676)
Lovely Layers Vellum 3 3/4" x 5" (item #158919)
Old Olive Stampin' Blends Combo Pack (item #154892)
Basic Rhinestone Jewels (item #144220)
Mini Glue Dots (item #103683)
Measurements:
Old Olive Cardstock
Card Base - 8 1/2" x 5 1/2" (Score at 4 1/4")
Mossy Meadow Cardstock
Sentiment Words die cut with the Amazing Thanks Dies
Assorted Leaves die cut with the Framed Florets Dies
Lovely Layers Vellum - Plain
Large Oval die cut with the Framed Florets Dies
Dainty Flowers Designer Series Paper 
Card Front - 5 1/4" x 4"
This pretty monochromatic card design focuses on the beautiful designer series paper background and the assortment of die cuts that help create the focal design. I chose Mossy Meadow and Old Olive from the colors used in the designer series paper to create this card. I chose to use the Lovely Layers Vellum for the oval because I love the size of the pieces of vellum in this pack. It's a wonderful way to have a supply of vellum on hand ready to use. For the sentiment, I trimmed the Thanks die cut to remove the "s" and then adhered it and the You die cut to the vellum oval. Using Mini Glue Dots, I attached the vellum oval to the designer series paper card front, hiding the Glue Dots behind the letters so that they don't show through the vellum. I added the die cut leaves to the top left and bottom right corners of the vellum oval, hiding the ends of the stems behind the sentiment letters. To complete the design, I colored several Basic Rhinestones with the Dark Old Olive Stampin' Blends Marker and added them to the vellum oval and several of the leaves. This clean and simple Thank You card has an elegant feel to it that would also work for other occasions. 
Thank you for taking the time to visit my blog. I hope that my card design will help inspire you to explore creating projects "stamp free". There are so many wonderful options to choose from. 
Now it's time to visit Jan's blog and see what she has to share with us. Just click on the Next button below to visit her blog. We would love it if you would leave us a comment and let us know what you liked about our projects. I hope you enjoy the rest of our blog hop. 

If you live in the U.S. and do not have a Stampin' Up! Demonstrator, please contact me and I would be happy to help you with your creative projects. You may also visit my Online Store to place your order and have it shipped to you. 

Until Next Time

Happy Stamping,

Tricia Butts
Independent Stampin' Up! Demonstrator

Like What You See? Visit My Online Store Here

Visit My Facebook Business Page for Updates & Ideas

Click here to Contact Me


Take Advantage Of New Sale-a-bration Products
You Can Earn Free With A Qualifying Order
Click Below For More Details

Wednesday, February 1, 2023

We Create February Blog Hop Sale-a-bration Sweetness

Let's start off the new month with the We Create February Blog Hop and a little Sale-a-bration Sweetness. It's the last month to take advantage of Sale-a-bration to earn free products with a qualifying order and it's also the month for love with Valentine's Day coming up soon. Our wonderful Design Team members will be sharing their projects and ideas to help inspire you to get creative for the month ahead. 
Today I created a fun card design with the Thanks A Bunch stamp set, which is a Level 1 Sal-a-bration Reward you can earn free with a qualifying order ($50 in the U.S.) Now I must admit, this stamp set was a bit of a challenge and it took me a while to come up with a design using this stamp set that I thought would make someone smile. So I decided to pair it with the Playing In The Rain Bundle from the January-April 2023 Mini Catalog to create a more non-traditional Valentine's Day card. When I think of carrots, I think of rabbits, so the cute little bunny in this bundle was the perfect size to use with the smallest bunch of carrots from the Thanks A Bunch stamp set. For the background, I chose one of the designs from the Dandy Designs Designer Series Paper, a Level 2 Sale-a-bration Reward that you can earn free with a qualifying order ($100 in the U.S.) For the sentiment, I used the Love You More Than Dies from the 2022-2023 Annual Catalog along with the carrot image from the Thanks A Bunch stamp set. The end result was a sweet Valentine's Day card to brighten someone's day.
Products Used:
Playing In The Rain Bundle (item #160551)
Thanks a Bunch stamp set (item #160816) Sale-a-bration 
Level 1 Reward
Love You More Than Dies (item #152698)
Stylish Shapes Dies (item #159183)
Something Fancy Dies (item #160424)
Dandy Designs Designer Series Paper (item #160836) Sale-a-bration Leve 2 Reward
Gold & Rose Gold 6"x6" Metallic Specialty Paper (item #156844) 
Coastal Cabana Cardstock (item #131297)
Pool Party Cardstock (item #122924)
Basic White Cardstock (item #159276)
Pool Party Classic Ink Pad (item #147107)
Parakeet Party Classic Ink Pad (item #159208)
Pumpkin Pie Classic Ink Pad (item #147086)
Memento Tuxedo Black Pad (item #132708)
Pool Party Stampin' Blends Combo Pack (item #154894)
Flirty Flamingo Stampin' Blends Combo Pack (item #154884)
Smoky Slate Stampin' Blends Combo Pack (item #154904)
Color Lifter (item #144608)
Pastel Adhesive Backed Sequins (item #160387)
Mini Stampin' Dimensionals (item #144108)
Measurements:
Coastal Cabana Cardstock
Card Base - 8 1/2" x 5 1/2" (Scored at 4 1/4")
Pool Party Cardstock
Large Stitched Circle die cut with the Stylish Shapes Dies
Gold Metallic Specialty Paper
Sentiment Words die cut with the Love You More Than Dies
Basic White Cardstock
Stamped and die cut rabbit using the Playing In The Rain Bundle
Sentiment Label die cut with the Something Fancy Dies
Dandy Designs Designer Series Paper
Card Front - 5 1/4" x 4"
This fun card is a combination of a variety of products that helped me achieve the idea I had in my mind. The die cut words were perfect for creating the sentiment and I love how the Gold Metallic Specialty Paper adds some sparkle to the card design. The rabbit was colored with Stampin' Blends Markers and I used the Color Lifter to blend the Light Smoky Slate Stampin' Blend Marker to add some soft color to the white rabbit. For the carrots, I stamped the images onto Basic White cardstock using Pumpkin Pie for the carrots and Parakeet Party for the leaves. I fussy cut out the image with Paper Snips. To assemble the card, I attached the Pool Party Stitched Circle to the bottom left corner of the designer series paper card front and cut away the excess for the left side and bottom to create the corner. I then attached the card front to the card base. I attached the rabbit to the Pool Party circle with Mini Stampin' Dimensionals and then added the bunch of carrots near its paw on the right side. I added the Gold words to the card front, arranging them in order and then added the small Carrots sentiment, tucking it underneath the edge of the circle. To finish off the design, I added some Gold sequins for a touch of bling. It makes me happy to think that this little bunny loves someone more than carrots and I hope that the person who receives this card will see the humor in the design. 
Thank you for taking the time to visit my blog. I hope that my card design will help inspire you to get creative and share the love with the people in your life.
Now it's time to visit Cheryl's blog and see what she has to share with us. Just click on the Next button below to visit her blog. We would love it if you would leave us a comment and let us know what you liked about our projects. I hope you enjoy the rest of our blog hop. 


If you live in the U.S. and do not have a Stampin' Up! Demonstrator, please contact me and I would be happy to help you with your creative projects. You may also visit my Online Store to place your order and have it shipped to you. 

Until Next Time

Happy Stamping,

Tricia Butts
Independent Stampin' Up! Demonstrator

Like What You See? Visit My Online Store Here

Visit My Facebook Business Page for Updates & Ideas

Click here to Contact Me


More Products To Choose From
During Sale-a-bration
Click Below For More Details