Showing posts with label no stamping. Show all posts

Saturday, March 23, 2024

Stamping With Friends March Color Challenge Blog Hop

Let's have some fun with today's Stamping With Friends March Color Challenge Blog Hop. We have been challenged to create a project using at least three of the following colors: Pumpkin Pie, Azure Afternoon, Granny Apple Green, Daffodil Delight and Night of Navy. I am excited to see what our Design Team will be sharing using these bold, beautiful colors. 
For this color challenge, I decided to use all five colors to create a fun scrappy strip birthday card. I love this technique for using up my scraps of designer series paper and I decided to arrange them in rainbow order to create a bold, fun design. I used Night of Navy cardstock for the card base and the sentiment to help make the bright colors pop. This design would be perfect for a masculine birthday card and requires just a few supplies to create. Plus, did you notice there is no stamping? How great is that for creating this clean and simple design.
Products Used:
Wanted To Say Dies (item #161594)
Brights 6"x6" Designer Series Paper (item #161643)
Neutrals 6"x6" Designer Series Paper (item #161641)
Night of Navy Cardstock (item #100867)
Basic White Cardstock (item #159276)
Neutrals Adhesive Backed Sequins (item #161627)
Measurements:
Night of Navy Cardstock
Card Base - 5 1/2" x 8 1/2" (Scored at 4 1/4")
Sentiment Matte Layer die cut with the Wanted To Say Dies
Basic White Cardstock
Card Front Layer - 5 1/4" x 4"
Designer Series Paper Strips
1 each of Pumpkin Pie, Daffodil Delight, Granny Apple Green, Azure Afternoon and Night of Navy - 1" x 4"
Scrappy strip cards are so much fun to create and are simple to assemble. For this card design, I was able to use the Brights 6" x 6" Designer Series Paper for all but Night of Navy to create the focal design (Night of Navy is from the Neutrals 6" x 6" Designer Series Paper) and it was simple to cut 1" x 4" strips from each of the colors using the same pattern for each. I attached them to the Basic White cardstock card front, leaving a very narrow border between the strips and also on each end to create that extra contrast. For the sentiment, I die cut the detailed sentiment from Basic White cardstock and the matte layer from Night of Navy cardstock and layered them to create a bold sentiment. I attached it to the center of the card front layer and then added the card front to the Night of Navy card base. To complete the card design, I added several Gold sequins for a touch of bling, including a small sequin to create the dot for the "i". I love how simple this card was to put together and for this style of card, it doesn't have to be perfectly spaced or lined up. It's part of the charm of a scrappy strip card. 
Thank you for taking the time to visit my blog. I hope that my card design will inspire you to give this color challenge a try and see what wonderful projects you can create using these beautiful colors. There are so many possibilities to explore. 
Please take a journey along our blog hop and visit our Design Team to see their amazing projects. Just click the links in the Roll Call List below to find your way. We would appreciate it if you would leave us a comment and let us know what you liked about our projects.

If you live in the U.S. and do not have a Stampin' Up! Demonstrator, please contact me and I would be happy to help you with your creative projects. You may also visit my Online Store to place your order and have it shipped to you. 

Until Next Time

Happy Stamping,

Tricia Butts
Independent Stampin' Up! Demonstrator

Like What You See? Visit My Online Store Here

Visit My Facebook Business Page for Updates & Ideas

Click here to Contact Me


Explore The Amazing New Products
Just Added To The Online Exclusives
Click Below To View Them In My Online Store

Coming Soon!
Last Chance Product Sale
April 9-30, 2024
Retiring Products Available While Supplies Last


Friday, March 1, 2024

We Create March Blog Hop March To A Different Beat

Welcome to the We Create March Blog Hop and our theme this month is "March To A Different Beat". As we begin this new month, we are already starting to think about Spring and all the wonderful things that come with that season. It's a time for new beginnings as we get ready to shake off the Winter Blues and enjoy the warmer weather. Our wonderful Design Team will be sharing what this month's theme means to them to help inspire you to get creative this month.
When I think of the month of March, I think about the beginning of Spring and here in Colorado we have already started to see the early signs with warm sunny days mixed in with the occasional snow storm, both very common during this season. Then I started to think along the lines of the word beat, and it made me think of wings, which led me to butterflies which will soon start to return. So I decided to create a pretty Spring themed card design using the Sweet Thoughts Memories & More Card Pack and coordinating Cards & Envelopes, with butterflies being a key part of the design. I love that this was a simple card to create and required just a few supplies to make a beautiful design. 
Products Used:
Sweet Thoughts Memories & More Card Pack (item #162930)
Sweet Thoughts Memories & More Cards and Envelopes (item #162931)
Petal Pink Cardstock (item #146985)
Baker's Twine Three Color Pack (item #162759)
Rainbow Adhesive Backed Dots (item #162758)
Basic Rhinestone Jewels (item #144220)
Stampin' Dimensionals (item #104430)
Measurements:
Sweet Thoughts Memories & More Cards and Envelopes
1 Calypso Coral Card Base and coordinating Envelope
Sweet Thoughts Memories & More Card Pack
Dream Big Card - 3"x4"
Assorted Flowers Stickers
Petal Pink Cardstock
Matte Layer - 3 1/4" x 4 1/4"
This fun no-stamping card, is a great way to create a pretty design by just mixing and matching different elements to come up with the finished card. Once I had chosen the card I wanted to use for the focal image, I added a piece of Petal Pink cardstock to create a matte layer to help it pop against the Calypso Coral card base. I added some Lemon Lolly Baker's Twine around the bottom of the layer, wrapping it around twice and then tying a bow on the left side. I added several Petal Pink Dots to the focal card to coordinate with the matte layer and then attached the layer to the card base with Stampin' Dimensionals. To step the design up even further, I added several of the flower stickers to the top left and bottom right corners of the card front, tucking them slightly under the raised focal layer. To complete the design, I added a little more bling to the centers of the small flowers using Basic Rhinestone Jewels. I love how fresh and pretty this card is and how simple it was to create. 
Thank you for taking the time to visit my blog. I hope that my card design will help get you in the mood for Spring and spark your creativity. There are so many wonderful possibilities to explore to create beautiful clean and simple designs.
Now it's time to visit Lisa's blog and see what she has to share with us. Just click on the Next button to visit her blog or use the Roll Call List to find your way along our blog hop. We would love it if you would leave us a comment and let us know what you liked about our projects. I hope you enjoy the rest of our blog hop.

Roll Call List

If you live in the U.S. and do not have a Stampin' Up! Demonstrator, please contact me and I would be happy to help you with your creative projects. You may also visit my Online Store to place your order and have it shipped to you. 

Until Next Time

Happy Stamping,

Tricia Butts
Independent Stampin' Up! Demonstrator

Like What You See? Visit My Online Store Here

Visit My Facebook Business Page for Updates & Ideas

Click here to Contact Me


Get Creative For Spring
With The January-April 2024 Mini Catalog
Click Below To Shop Now

Coming Soon To Online Exclusives
Amazing New Products To Spark Your Creativity
Check Back March 5th To Shop From My Online Store


Wednesday, August 30, 2023

Paper Pumpkin Possibilities August Blog Hop Meaningful Flowers

Welcome to the Paper Pumpkin Possibilities August Blog Hop as we showcase the Meaningful Flowers Kit. Our wonderful Design Team will be sharing alternative projects and ideas to help inspire you to think outside the box. 
My alternative card design today features mainly supplies from the kit and has no stamping. Yes, that's right. I didn't stamp anything on this beautiful card. I fell in love with the definition on the back of the lotus flower card base and wanted to make this my card front for my card design. With just a piece of Orchid Oasis cardstock and some Silver Trim, I was able to create a wonderful card design that is simple, uplifting and inspirational. 
Products Used:
Paper Pumpkin August Kit Meaningful Flowers
Orchid Oasis Cardstock (item #159267)
Gold & Silver 1/8" Trim Combo Pack (item #161633)
Mini Glue Dots (item #103683)
Measurements:
Orchid Oasis Cardstock
Card Base - 5 1/2" x 8 1/2" (Scored at 4 1/4")
Meaning Flowers Kit
Card Front (from back of card base in kit) - 5 1/4" x 4"
Vellum Layer
Lotus Die Cut
Have you ever looked at a kit and had the elements speak to you? That's what happened to me when I opened this kit. Orchid Oasis is my favorite color, so I was immediately drawn to the lotus card base and the inspirational definition on the back. I knew that I wanted that definition to be the focus of my card design. I started by auditioning different pieces to create the design, layering the vellum layer above the definition and the lotus die cut on top of the vellum layer. I was stunned at how the vellum transformed the background and gave the design so much dimension and depth. I trimmed the back of the card base to 5 1/4" x 4" and added the vellum layer to the top section using Mini Glue Dots. Using the Stampin' Dimensionals from the kit, I popped up the lotus die cut and added it on top of the vellum layer so that it appears as though the lotus is floating in a lake. I wanted to add a pop of bling to the design, so I chose to add a piece of Silver Trim around the card front to hide the bottom of the vellum layer, just above the definition. I adhered the card front to the card base and then added several of the clear embellishments from the kit, to give the look of water droplets on the leaves and petal of the flower. To say that I love this card would be an understatement. It combines all my favorite things about this kit and is so simple to create. 
Thank you for taking the time to visit my blog. I hope that my card design will help inspire you to explore creating your own alternate projects with the supplies in the Meaningful Flowers Kit. The refill for this beautiful kit (item #163864) is currently available while supplies last for Paper Pumpkin subscribers to order. This is one of those kits that you will want to have extras to create your own beautiful projects.
Please take the time to visit with the Design Team members by clicking on the links in the Roll Call List. We would love it if you would leave us a comment and let us know what you enjoyed about our alternative projects.

If you live in the U.S. and do not have a Stampin' Up! Demonstrator, please contact me and I would be happy to help you with your creative projects. You may also visit my Online Store to place your order and have it shipped to you. 

Until Next Time

Happy Stamping,

Tricia Butts
Independent Stampin' Up! Demonstrator

Like What You See? Visit My Online Store Here

Visit My Facebook Business Page for Updates & Ideas

Click here to Contact Me


Express Love & Gratitude
With The September From The Heart Kit
Click Below To Subscribe By September 10th

Last Days To Save Up To 30% Off
Kits In The Kits Collection
Click Below To Shop Now

Time Is Running Out To Redeem
Your Bonus Days Coupons
Click Below To Start Shopping


Friday, April 1, 2022

Global Stamping Friends April Blog Hop So Long, Farewell

Welcome to the Global Stamping Friends April Blog Hop as we say So Long, Farewell to our retiring 2021-2022 Annual Catalog. There are so many favorites on the Last Chance Retirement List, so our Design Team is sharing their projects and ideas to showcase these products one last time. 
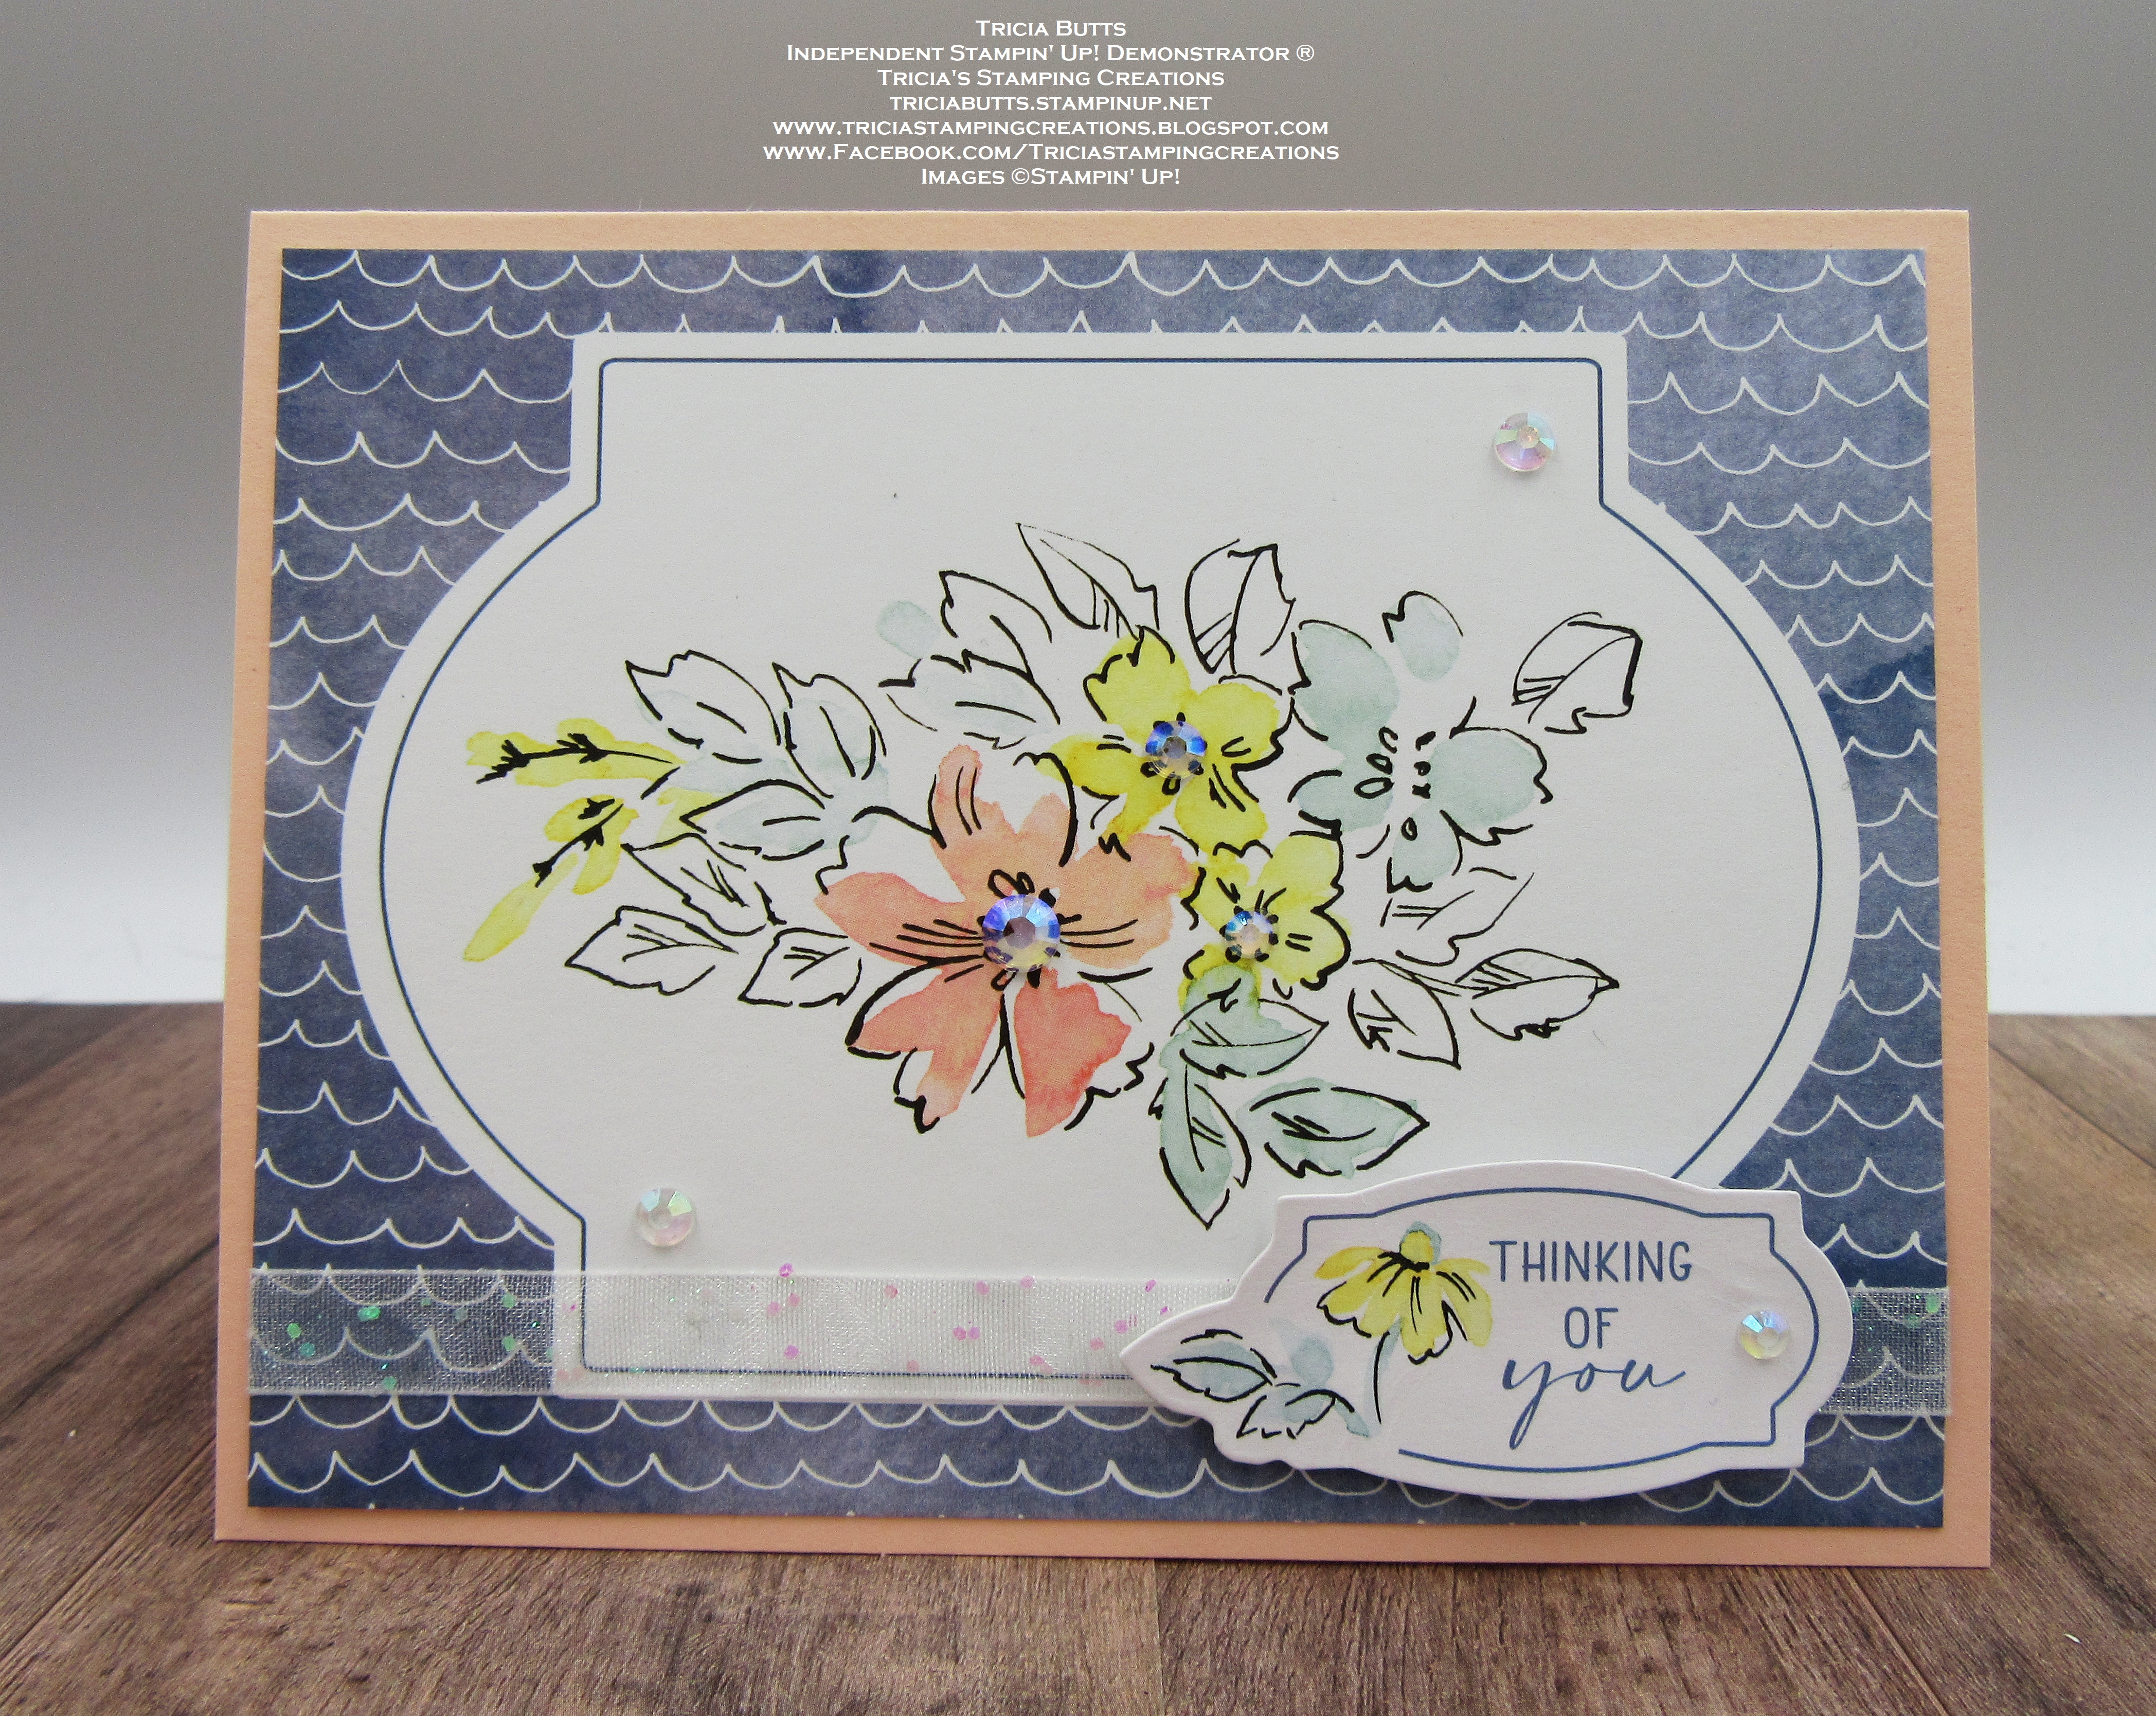
For my card design, I decided to focus on the retiring Hand-Penned Memories & More Card Pack to create a no-stamping design. The card pack contains a variety of cards in sizes 3"x4" and 4"x6" as well as sticker sheets that coordinate. I chose one of the 4"x6" cards and trimmed it down to 4" x 5 1/4" to create a card front for a standard size card. I attached the card to a Petal Pink cardstock card base which really helps the Misty Moonlight on the card front pop. To decorate the card front, I added a piece of White Glittered Organdy Ribbon across the bottom and added one of the sentiment stickers from the card pack to the bottom right side using Mini Stampin' Dimensionals, over the top of the ribbon. To add a touch of bling, I added several Iridescent Rhinestones Basic Jewels to the card front, including the centers of the flowers, and I added a small rhinestone to the sentiment label. This pretty clean and simple card design is so easy to put together and is a great example of how you can put together a beautiful card with a few simple supplies and this beautiful card pack.
Products Used:
Hand-Penned Memories & More Card Pack (item #155505) Retiring
Petal Pink Cardstock (item #146985)
White 3/8" Glittered Organdy Ribbon (item #156408)
Iridescent Rhinestones Basic Jewels (item #158130)
Mini Stampin' Dimensionals (item #144108)
Measurements:
Petal Pink Cardstock
Card Base - 8 1/2" x 5 1/2" (Scored at 4 1/4")
Hand-Penned Memories & More Card Pack
1 4" x 6" card, trimmed to 5 1/4" x 4"
1 sticker sentiment label
Thank you for taking the time to visit my blog. I hope that my card design will help inspire you to take another look at these retiring products and order your favorites before they disappear. Products on the Last Chance Retirement List are available while supplies last, so place your order soon to avoid disappointment. 
Now it's time to visit Jan's wonderful blog and see what she has to share with us. Just click the Next button to visit her blog. We hope you enjoy the rest of our blog hop and would love it if you would leave us a comment and let us know what you liked about our projects.

Global Stamping Friends Blog Hop APRIL 2022 Blog Roll
1. 
Kimberley Morris 
2. June Olsen
3. 
Tricia Butts You Are Here!
4. 
Jan Musselman
5. 
Marieke Bart

If you live in the U.S. and do not have a Stampin' Up! Demonstrator, please contact me and I would be happy to help you with your creative projects. You may also visit my Online Store to place your order and have it shipped to you. 

Until Next Time

Happy Stamping,

Tricia Butts
Independent Stampin' Up! Demonstrator

Like What You See? Visit My Online Store Here

Visit My Facebook Business Page for Updates & Ideas

Click here to Contact Me


Stock Up On Your Favorite Retiring Annual Catalog Products
Available Only While Supplies Last
Click Below To Visit My Online Store

Celebrate New Beginnings
With The April Paper Pumpkin Kit
Click Below To Subscribe By April 10th