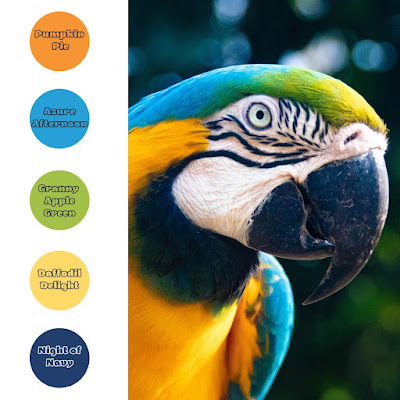
Let's have some fun with today's Stamping With Friends March Color Challenge Blog Hop. We have been challenged to create a project using at least three of the following colors: Pumpkin Pie, Azure Afternoon, Granny Apple Green, Daffodil Delight and Night of Navy. I am excited to see what our Design Team will be sharing using these bold, beautiful colors.
For this color challenge, I decided to use all five colors to create a fun scrappy strip birthday card. I love this technique for using up my scraps of designer series paper and I decided to arrange them in rainbow order to create a bold, fun design. I used Night of Navy cardstock for the card base and the sentiment to help make the bright colors pop. This design would be perfect for a masculine birthday card and requires just a few supplies to create. Plus, did you notice there is no stamping? How great is that for creating this clean and simple design.
Products Used:
Wanted To Say Dies (item #161594)
Brights 6"x6" Designer Series Paper (item #161643)
Neutrals 6"x6" Designer Series Paper (item #161641)
Night of Navy Cardstock (item #100867)
Basic White Cardstock (item #159276)
Neutrals Adhesive Backed Sequins (item #161627)
Measurements:
Night of Navy Cardstock
Card Base - 5 1/2" x 8 1/2" (Scored at 4 1/4")
Sentiment Matte Layer die cut with the Wanted To Say Dies
Basic White Cardstock
Card Front Layer - 5 1/4" x 4"
Designer Series Paper Strips
1 each of Pumpkin Pie, Daffodil Delight, Granny Apple Green, Azure Afternoon and Night of Navy - 1" x 4"
Scrappy strip cards are so much fun to create and are simple to assemble. For this card design, I was able to use the Brights 6" x 6" Designer Series Paper for all but Night of Navy to create the focal design (Night of Navy is from the Neutrals 6" x 6" Designer Series Paper) and it was simple to cut 1" x 4" strips from each of the colors using the same pattern for each. I attached them to the Basic White cardstock card front, leaving a very narrow border between the strips and also on each end to create that extra contrast. For the sentiment, I die cut the detailed sentiment from Basic White cardstock and the matte layer from Night of Navy cardstock and layered them to create a bold sentiment. I attached it to the center of the card front layer and then added the card front to the Night of Navy card base. To complete the card design, I added several Gold sequins for a touch of bling, including a small sequin to create the dot for the "i". I love how simple this card was to put together and for this style of card, it doesn't have to be perfectly spaced or lined up. It's part of the charm of a scrappy strip card. Thank you for taking the time to visit my blog. I hope that my card design will inspire you to give this color challenge a try and see what wonderful projects you can create using these beautiful colors. There are so many possibilities to explore.
Please take a journey along our blog hop and visit our Design Team to see their amazing projects. Just click the links in the Roll Call List below to find your way. We would appreciate it if you would leave us a comment and let us know what you liked about our projects.
If you live in
the U.S. and do not have a Stampin' Up! Demonstrator, please contact me and I
would be happy to help you with your creative projects. You may also visit my
Online Store to place your order and have it shipped to you.
Until Next
Time
Happy
Stamping,
Tricia Butts
Independent Stampin' Up!
Demonstrator
Like What You
See? Visit My Online Store Here
Visit My Facebook Business Page for Updates & Ideas
Click here to Contact Me
Explore The Amazing New Products
Just Added To The Online Exclusives


Great way to use the colors in the challenge.
ReplyDeleteThank you for hopping with us.
Tricia, I absolutely love your card. I'll definitely be casing this design for my birthday club cards; especially with the new colors.
ReplyDeleteSuch a fun card! Great way to showcase bright colors.
ReplyDeleteLove the clean and simple look of your card Tricia x
ReplyDelete