Showing posts with label Winter Meadow Designer Series Paper. Show all posts

Tuesday, November 19, 2024

Tis The Season Blog Hop

Welcome to the Tis The Season Blog Hop as our Design Team showcases their holiday projects and ideas to help you get in the spirit of the season. With Christmas fast approaching, now is the perfect time to create your own handmade cards to send out to family and friends. 
For my Christmas card, I wanted to showcase an elegant, clean and simple design that works well for a masculine card. I chose to use the black and white design from the Winter Meadow Designer Series Paper for my card front and added a tint of color using Blending Brushes and classic inks. I was inspired by the technique used to color black and white photos and I love the way it transformed this beautiful design. 
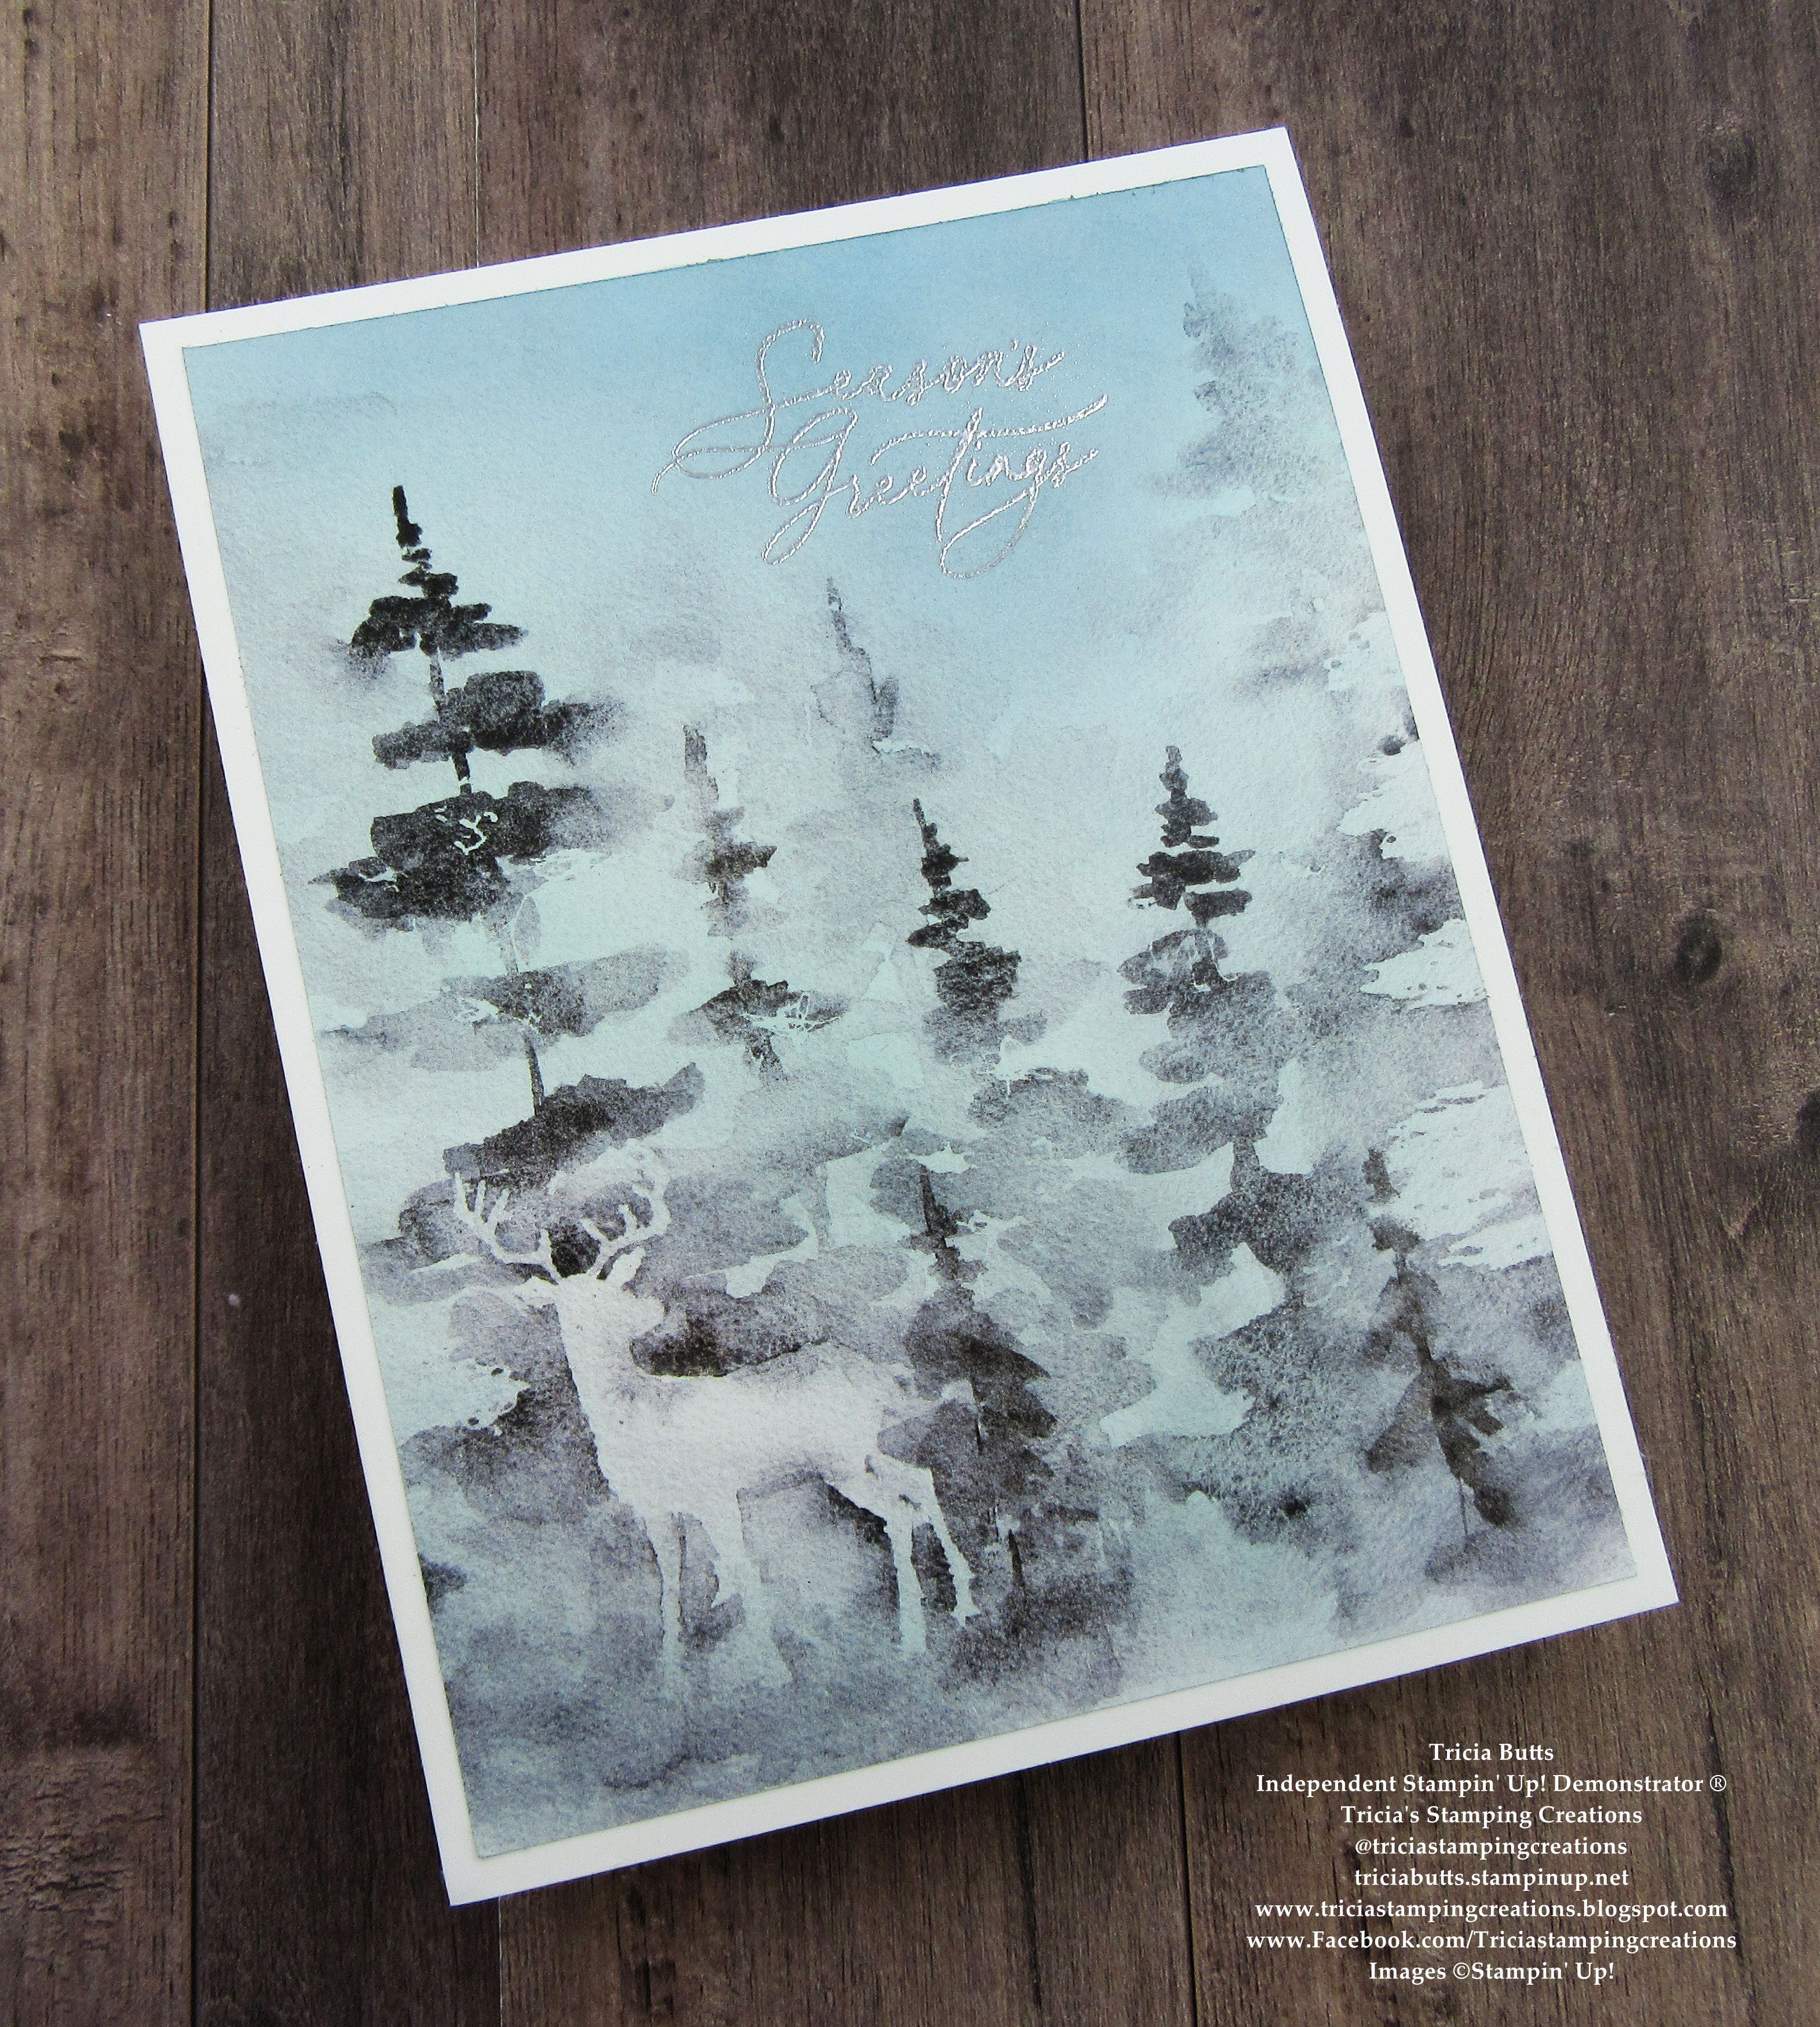
Products Used:
Greetings of the Season stamp set (item #164325)
Winter Meadow Designer Series Paper (item #162133)
Thick Basic White Cardstock (item #159229)
Shaded Spruce Classic Ink Pad (item #147088)
Misty Moonlight Classic Ink Pad (item #153118)
Versamark Pad (item #102283)
Metallics Wow Embossing Powders (item #165678)
Blending Brushes (item #153611)
Measurements:
Thick Basic White Cardstock
Card Base - 4 1/4" x 11" (Scored at 5 1/2")
Winter Meadows Designer Series Paper
Card Front - 5 1/4" x 4"
This clean and simple Christmas card is simple to create and is perfect for mailing. I chose to use Shaded Spruce and Misty Moonlight Classic inks to add a touch of color to the trees and sky of the black and white design, to give it a pale, frosty feeling. The hint of color helps make the deer image in the foreground stand out while still giving the card a wonderful wintery look. For the sentiment, I heat embossed the image directly onto the card front with Silver embossing powder to add a touch of elegance. I decided not to add any embellishments to the design, choosing to keep the design as simple as possible. The contrast between the pale colors of the card front and the Thick Basic White card base gives the card an almost photographic quality that I love. 
Thank you for taking the time to visit my blog. I hope that my Christmas card will help put you in the mood to create your own beautiful holiday projects to share with family and friends. Using designer series paper to create clean and simple cards can open up so many possibilities to explore your creativity and a wonderful way to show the people in your life how much you love them. 
Please take the time to visit with our amazing Design Team and see all their incredible holiday projects to help you get into the spirit of the season. Just click on the links in the Roll Call List below to visit their blogs. We would appreciate it if you would leave us a comment and let us know what you liked about our projects.

If you live in the U.S. and do not have a Stampin' Up! Demonstrator, please contact me and I would be happy to help you with your creative projects. You may also visit my Online Store to place your order and have it shipped to you. 

Until Next Time

Happy Stamping,

Tricia Butts
Independent Stampin' Up! Demonstrator

Like What You See? Visit My Online Store Here

Visit My Facebook Business Page for Updates & Ideas

Click here to Contact Me


Monday, November 27, 2023

Kylie Bertucci's International Highlights Winners Blog Hop November 2023

Today I am honored to be taking part in Kylie Bertucci's International Blog Highlights Winners Blog Hop for November. I am so grateful to all of you who voted for my card design this month, which you can see in this post
You will have the opportunity to visit with the Top 10 Winners and see what they have created with the theme "Thanks" to help inspire you to get creative. 
Over the past few days we have had cold, snowy weather and I managed to get sick with the latest virus going around. So I decided to create a clean and simple Thank You card using the beautiful Winter Meadow Designer Series Paper. The design I chose reminds me of how it looks here in Colorado in the Winter months and I love the colors in this pretty paper. For the sentiment, I chose to use the Charming Sentiments stamp set and die cut it out using the coordinating Sentiment Silhouettes Dies to step up the card design. A little ribbon and bling and you have a beautiful Thank You card to send to brighten someone's day.
Products Used:
Charming Sentiments stamp set (item #159985)
Sentiment Silhouettes Dies (item #158733)
Nested Essentials Dies (item #161597)
Winter Meadow Designer Series Paper (item #162133)
Misty Moonlight Cardstock (item #153081)
Versamark Pad (item #102283)
Lost Lagoon Stampin' Blends Combo Pack (item #161680)
Basics Embossing Powders (item #155554)
White 1/2" Iridescent Ribbon (item #161955)
Tinsel Gems Three-Pack (item #161624)
Mini Glue Dots (item #103683)
Mini Stampin' Dimensionals (item #144108)
Measurements:
Misty Moonlight Cardstock
Card Base - 8 1/2" x 5 1/2" (Scored at 4 1/4")
Sentiment - stamped & die cut using Charming Sentiments stamp set & Sentiment Silhouettes Dies
Matte Layer - die cut with the Nested Essentials Dies
I love the designs in the Winter Meadow Designer Series Paper and the hardest part was choosing which design to use for my card. In the end, I chose one of the soft botanical prints for the card front and layered it onto a Misty Moonlight card base. For the sentiment, I heat embossed the image with White embossing powder and die cut it out with the coordinating die. I popped it up with Mini Stampin' Dimensionals and attached it to the Misty Moonlight label to frame it. To add a pop of color, I used the Light Lost Lagoon Stampin' Blends Marker to color a piece of White Iridescent Ribbon and attached it behind the Misty Moonlight label with Mini Glue Dots and then attached it to the card front with Mini Stampin' Dimensionals. To complete the card design, I added several Misty Moonlight Gems for a touch of bling. I love using designer series paper to create beautiful card designs. It's the perfect way to create lovely clean and simple cards. 
Thank you for taking the time to visit my blog. I hope that my card design will help inspire you to create your own wonderful cards to send to family and friends.
Please take a journey along our blog hop today by clicking on the links in the Roll Call List, to view the other wonderful projects shared by the November winners. We would appreciate it if you would leave us a comment and let us know what you enjoyed about our projects.

If you live in the U.S. and do not have a Stampin' Up! Demonstrator, please contact me and I would be happy to help you with your creative projects. You may also visit my Online Store to place your order and have it shipped to you. 

Until Next Time

Happy Stamping,

Tricia Butts
Independent Stampin' Up! Demonstrator

Like What You See? Visit My Online Store Here

Visit My Facebook Business Page for Updates & Ideas

Click here to Contact Me


Stock Up On Your Favorite Retiring Products
From The September-December 2023 Mini Catalog
Click Below To Shop Now

New Online Exclusives Products
Now Available While Supplies Last
Click Below To Visit My Online Store


Sunday, November 26, 2023

Share It Sunday November Blog Hop

Welcome to the Share It Sunday November Blog Hop as we share what projects we have been creating. Our Design Team will be sharing their projects and ideas and hopefully you will see something that will inspire you to get creative and play with paper, stamps and ink to create your own wonderful projects.
Lately I have been working on Christmas cards and projects for the holidays. I recently had my first in person card class at my studio and we had so much fun creating the card I am going to share with you today. I love sharing how to create simple fun fold designs and this Book Binding Fun Fold is easy to create and has so many wonderful options for decorating to personalize it for any occasion. I chose to use the beautiful Winter Meadow Designer Series Paper as a pretty non-traditional color option for Christmas. 
Products Used:
Very Best Occasions stamp set (item #159871)
Joy Of Noel stamp set (item #161959)
Winter Meadow Designer Series Paper (item #162133)
2 3/8" Circle Punch (item #161354)
Blueberry Bushel Cardstock (item #146968)
Basic White Cardstock (item #159276)
Blueberry Bushel Classic Ink Pad (item #147138)
Versamark Pad (item #102283)
Basics Embossing Powders (item #155554)
White 1/2" Iridescent Ribbon (item #161955)
Festive Pearls (item #159963)
Stampin' Dimensionals (item #104430)
Measurements:
Blueberry Bushel Cardstock
Card Base - 4 1/4" x 11" (Scored at 5 1/2" & 6 3/4")
Sentiment Circle punched out with the 2 3/8" Circle Punch
Winter Meadow Designer Series Paper
Card Front - 4"x4"
Side Panel - 1" x 4"
Basic White Cardstock
Inside Panel - 4"x4"
The Book Binding Fun Fold is simple to create and is a wonderful way to step up your cards. I chose to use one of the designs from the Winter Meadow Designer Series Paper and used both sides to decorate the front panels. For the side strip, I used the Blueberry Bushel design and for the main panel, I chose the pretty print that coordinates perfectly. For the sentiment, I heat embossed the image with White embossing powder onto Blueberry Bushel cardstock and punched out with the 2 3/8" Circle Punch. To create the "spine" of the book fold, I added 2 strips of Tear & Tape Adhesive on either side of the narrow panel of the card base and then added a piece of Iridescent Ribbon and tied a knot on the front. I then removed the backing from the adhesive strips and adhered it down to create the binding for the card design. For the inside panel, I stamped the small berry branch twice and colored the berries with Blueberry Bushel Classic ink using a Blender Pen. To finish off the design, I added Silver Festive Pearls for a touch of bling.
Thank you for taking the time to visit my blog. I hope that my pretty fun fold design will help spark your creativity and inspire you to create your own beautiful Christmas cards. There are so many wonderful options to explore in the September-December 2023 Mini Catalog. 
Please take a moment to visit with the other Design Team members and view their wonderful projects, by clicking on the links in the Roll Call List below. We would appreciate it if you would leave us a comment and let us know what you enjoyed about our projects. 

If you live in the U.S. and do not have a Stampin' Up! Demonstrator, please contact me and I would be happy to help you with your creative projects. You may also visit my Online Store to place your order and have it shipped to you. 


Until Next Time

Happy Stamping,

Tricia Butts
Independent Stampin' Up! Demonstrator

Like What You See? Visit My Online Store Here

Visit My Facebook Business Page for Updates & Ideas

Click here to Contact Me


New Online Exclusives Products
Now Available While Supplies Last
Click Below To Visit My Online Store

Stock Up On Your Favorite Retiring Products
From The September-December 2023 Mini Catalog
Click Below To Shop Now