Showing posts with label Holly Jolly Wishes stamp set. Show all posts

Saturday, December 11, 2021

Stamping Inkspirations December Blog Hop The Sounds Of Christmas

Welcome to the Stamping Inkspirations December Blog Hop as we showcase projects with this month's theme, The Sounds of Christmas. You will be visiting with creative crafters from around the world as they share their wonderful projects and ideas to help inspire you for the holidays.
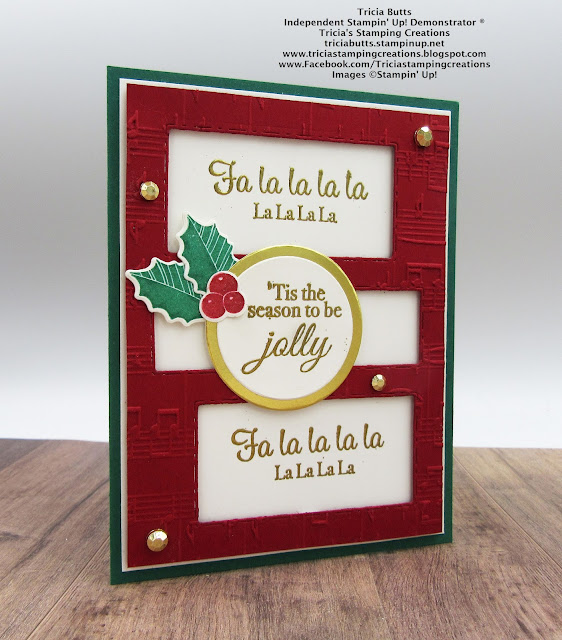
This month's theme was so much fun and had me singing more than one Christmas carol as I designed my card for this blog hop. The Holly Jolly Wishes stamp set has a wonderful variety of sentiments with lines from different Christmas carols and the hardest part was choosing which one I wanted to use. In the end, I went with two sentiments that went together and I partnered them with the Picture This Dies to create the windows to frame the song lyrics. I also used the Merry Melody 3D Embossing Folder to add texture to the card and I love the way the musical notes tie in with this theme. For my color palette, I went with more traditional colors including Cherry Cobbler, Shaded Spruce, Basic White and Gold. To create the holly, I used the Merriest Moments Bundle with Shaded Spruce and Cherry Cobbler Classic ink. I love the clean and simple look of this design with the touch of elegance created with the Gold accents.  
Products Used:
Holly Jolly Wishes stamp set (item #156362) - Retiring
Merriest Moments Bundle (item #156783)
Picture This Dies (item #155559)
Layering Circles Dies (item #151770)
Merry Melody 3D Embossing Folder (item #156392)
Cherry Cobbler Cardstock (item #119685)
Shaded Spruce Cardstock (item #146981)
Basic White Cardstock (item #159276)
Gold Foil Sheets (item #132622)
Versamark Pad (item #102283)
Metallics Embossing Powders (item #155555)
Shaded Spruce Classic Ink Pad (item #147088)
Cherry Cobbler Classic Ink Pad (item #147083)
Gilded Gems (item #152478)
Mini Stampin' Dimensionals (item #144108)
Measurements:
Shaded Spruce Cardstock
Card Base - 8 1/2" x 5 1/2" (Scored at 4 1/4")
Cherry Cobbler Cardstock
Card Front - 5 1/8" x 3 7/8" 
Basic White Cardstock 
Layer 1 - 5 1/4" x 4"
Medium Circle die cut with Layering Circles Dies 
Holly Leaves & Berries stamped and die cut with the Merriest Moments Bundle
Gold Foil
Medium Circle die cut with Layering Circles Dies
For my card design, I wanted the sentiments to read like you would sing in the song "Deck The Halls". So I decided to use the Picture This Dies to create the openings for the sentiments. I embossed the Cherry Cobbler cardstock layer first with the Merry Melody 3D Embossing Folder and then die cut the openings with the rectangle Picture This Die. I lined up the Cherry Cobbler cardstock layer over the top of the Basic White cardstock layer and used a pencil to mark where the openings would be to line up the sentiments. I stamped the sentiment image with Versamark ink onto the Basic White cardstock at the top and bottom area where it would line up with the openings. I heat embossed the sentiments with Gold embossing powder. I also heat embossed the second sentiment onto the Basic White cardstock circle with Gold embossing powder and layered it onto the Gold Foil circle. I attached the Cherry Cobbler layer to the Basic White cardstock layer with Mini Stampin' Dimensionals so that it lined up over the embossed sentiments. I then attached this layer to the Shaded Spruce card base with adhesive. For the Holly leaves and berries, I stamped two leaves with Shaded Spruce Classic ink and one of the berry cluster with Cherry Cobbler Classic ink onto a scrap of Basic White cardstock and die cut them with the coordinating dies, all from the Merriest Moments Bundle. I attached the circle sentiment label to the center of the card with Mini Stampin' Dimensionals and added the leaves and berries to embellish the top left side of the sentiment circle. I colored the leaves and berries with Clear Wink of Stella to add a touch of shimmer. To finish off the card design, I added some Gilded Gems to the Cherry Cobbler layer for a touch of bling. 
Thank you for visiting my blog today. I hope that my card design will help inspire you to create your own projects with this festive theme to share with family and friends. There are so many wonderful products in the July-December 2021 Mini Catalog to choose from to help spark your creativity.
Now it's time to visit Elaine's wonderful blog and see what she has created. Just click on the Next button to visit her blog or use the Roll Call List below to find your way. We would appreciate it if you would leave us a comment and let us know what you enjoyed about our projects. I hope you enjoy the rest of our blog hop. 

Roll Call List

If you live in the U.S. and do not have a Stampin' Up! Demonstrator, please contact me and I would be happy to help you with your creative projects. You may also visit my Online Store to place your order and have it shipped to you. Make sure to take advantage of the Last Chance Sale and stock up on your favorite retiring products from the July-December 2021 Mini Catalog before they disappear. 

Until Next Time

Happy Stamping,

Tricia Butts
Independent Stampin' Up! Demonstrator

Like What You See? Visit My Online Store Here

Visit My Facebook Business Page for Updates & Ideas

Click here to Contact Me


Stock Up On Your Favorite Retiring Products
From The July-December 2021 Mini Catalog
Click Below To Visit My Online Store


Wednesday, November 17, 2021

New At SU November Blog Hop Happy Holidays

Welcome to the New At SU November Blog Hop as we showcase projects celebrating the Holidays. Thanksgiving is coming up fast and Christmas is just over a month away, as well as all the other holidays in between, You will be visiting with our talented Design Team Members as they share their projects and ideas to help inspire you.
As we get closer to Christmas, we are often looking for quick and easy ways to create fun Christmas cards to mail out to family and friends. When our time gets limited, clean and simple card designs are the best way to create a lot of cards in a short amount of time while still creating beautiful cards. For my card today, I chose the Be Jolly stamp set and paired it with the Holly Jolly Wishes stamp set to create my card. I used a piece of the Tidings Of Christmas 6"x6" Designer Series Paper to create the background and colored my cute Santa image with Stampin' Blends Markers. The design is flat so it is easy to mail without worrying about extra postage. 
Products Used:
Be Jolly stamp set (item #156370)
Holly Jolly Wishes stamp set (item #156362)
Layering Circles Dies (item #151770)
Stitched So Sweetly Dies (item #151690)
Tidings Of Christmas 6"x6" Designer Series Paper (item #155718)
Cherry Cobbler Cardstock (item #119685)
Basic White Cardstock (item #159276)
Versamark Pad (item #102283)
Metallics Embossing Powders (item #155555)
Memento Tuxedo Black Pad (item #132708)
Cherry Cobbler Stampin' Blends Combo Pack (item #154880)
Basic Black Stampin' Blends Combo Pack (item #154843)
Smoky Slate Stampin' Blends Combo Pack (item #154904)
Daffodil Delight Stampin' Blends Combo Pack (item #154883)
Petal Pink Stampin' Blends Combo Pack (item #154893)
Clear Wink of Stella Glitter Brush (item #141897)
Measurements:
Cherry Cobbler Cardstock
Card Base - 8 1/2" x 5 1/2" (Scored at 4 1/4")
Basic White Cardstock
Layer 1 -5 1/4" x 4"
Large Circle die cut with Layering Circles Dies
Sentiment Label die cut with Stitched So Sweetly Dies
Tidings Of Christmas Designer Series Paper
Card Front - 5" x 3 3/4"
This card design has a wonderful layout that is simple to duplicate to create multiple cards. With the Tidings of Christmas Designer Series Paper, you can create a variety of card designs using the different patterns in this pack along with the variety of images and sentiments in both stamp sets. I decided not to add any embellishments to keep the design simple and to make sure that the were easy to mail. I added some Clear Wink of Stella to the white areas on the Santa to add a touch of sparkle and I heat embossed the sentiment with Gold embossing powder to step up the design. Both the Layering Circles Dies and Stitched So Sweetly Dies are currently on sale during the Seasonal Sale, November 16-18, and they are a great addition to your crafting supplies. 
Thank you for taking the time to visit my blog. I hope that my Christmas card design will help inspire you to create your own fun projects for the holidays. There are so many wonderful products available to help you get creative.
Now it's time to visit Deb's wonderful blog and see what she has to share with us. Just click on the Next button to visit her blog or use the Roll Call List below to find your way. We would love it if you would leave us a comment and let us know what you like about our projects. I hope you enjoy the rest of our blog hop.

If you live in the U.S. and do not have a Stampin' Up! Demonstrator, please contact me and I would be happy to help you with your creative projects. You may also visit my Online Store to place your order and have it shipped to you. 

Until Next Time

Happy Stamping,

Tricia Butts
Independent Stampin' Up! Demonstrator

Like What You See? Visit My Online Store Here

Visit My Facebook Business Page for Updates & Ideas

Click here to Contact Me


Explore The Beautiful Eden's Garden Collection
Click Below For More Details


Stock Up On Your Favorite Products
During The Seasonal Sale November 16-18
Click Below To Visit My Online Store


Tuesday, November 9, 2021

Inspire Create Share November Blog Hop Christmas Is Coming

Welcome to the Inspire Create Share November Blog Hop as we showcase projects with the theme "Christmas Is Coming". It's hard to believe it's November already and Christmas is just weeks away. Now is the perfect time to create your Christmas cards to send to friends and family. You will be visiting with our talented Design Team Members as they share their projects and ideas to help inspire you to get creative for the holidays.
There are so many different types of Christmas cards that it is difficult to choose just one design. Sometimes we want a design that is cute and fun while other times we want something that is more classic and elegant. My card today fits the latter category and I chose products from the new Eden's Garden Collection, which is a special early release promotion, to create this beautiful design. I love the Gold accents in the Ever Eden Specialty Designer Series Paper that help step up this card design and the wonderful detail in the coordinating Eden Dies.  For the sentiment, I chose to use the Holly Jolly Wishes stamp set, which has a wonderful collection of sentiments to choose from. 
Products Used:
Eden's Garden Collection (item #160849) which includes
Ever Eden Specialty Designer Series Paper (item #159996)
Eden Dies (item #157831)
Garden Gems (item #159277)
Holly Jolly stamp set (item #156362)
Stitched So Sweetly Dies (item #151690)
Evening Evergreen Cardstock (item #155574)
Basic White Cardstock (item #159276)
Gold Foil Sheets (item #132622)
Vesamark Pad (item #102283)
Metallics Embossing Powders (item #155555)
Gold 3/8" Fine Art Ribbon (item #154561)
Stampin' Dimensionals (item #104430)
Mini Glue Dots (item #103683)
Measurements:
Evening Evergreen Cardstock
Card Base - 8 1/2" x 5 1/2" (Scored at 4 1/4")
Detailed Label die cut with the Eden Dies
Basic White Cardstock
Sentiment Label die cut with the Stitched So Sweetly Dies
Gold Foil Sheet
2 Detailed Leaves die cut with the Eden Dies
This beautiful Christmas card showcases the versatility of the Eden's Garden Collection. I love how the different products coordinate to create the pretty background and help the sentiment label pop. I heat embossed the sentiment with Gold embossing powder to coordinate with the designer series paper and the Gold Foil leaves. I added two pieces of Gold Fine Art Ribbon underneath the sentiment label by folding them in half and attaching them under the label with a Mini Glue Dot. The pretty Garden Gems add a touch of bling to finish off the card design. 
Thank you for taking the time to visit my blog. I hope that my Christmas card design will help inspire you to create your own beautiful Christmas cards to send out to family and friends. The Eden's Garden Collection is such a versatile suite of products and can be used for the holidays as well as all occasion projects. The Ever Eden Specialty Designer Series Paper and Garden Gems are only available while supplies last, so don't wait too long to place your order for these wonderful products.
Now it's time to visit Joni's blog and see what wonderful ideas she has to share with us. Just click on the Next button below to visit her blog. We would love it if you would leave us a comment and let us know what you enjoyed about our projects. I hope you enjoy the rest of our blog hop. 


If you live in the U.S. and do not have a Stampin' Up! Demonstrator, please contact me and I would be happy to help you with your creative projects. You may also visit my Online Store to place your order and have it shipped to you.

Until Next Time

Happy Stamping,

Tricia Butts
Independent Stampin' Up! Demonstrator

Like What You See? Visit My Online Store Here

Visit My Facebook Business Page for Updates & Ideas

Click here to Contact Me


Time Is Running Out
To Order Your Gifts Galore November Paper Pumpkin Kit
Click Below To Subscribe By 11:50pm MST November 10th

Explore The Eden's Garden Collection
Click Below For More Details