Showing posts with label Circle Sayings Bundle. Show all posts

Friday, March 1, 2024

Global Stamping Friends March Blog Hop Time Marches On


It's time to hop along with the Global Stamping Friends March Blog Hop and this month our theme is "Time Marches On". As Spring approaches there are so many wonderful events to celebrate which means so many new projects to create. Our small but mighty Design Team will be sharing their wonderful projects to help get you in the spirit to create your own wonderful projects to celebrate the new season.
For my card, I decided to create a fun St Patrick's Day themed design. I love being able to play with the different greens that Stampin' Up! has to offer and for this design I chose to use Shaded Spruce and Granny Apple Green. St Patrick's Day is very popular here in Colorado and we have a parade and celebrations to celebrate the day when everyone is Irish. I decided to incorporate the celebration with the traditional shamrock design to create a fun, clean and simple design. 
Products Used:
Circle Sayings Bundle (item #161355)
Stylish Shapes Dies (item #159183)
Bee Builder Punch (item #162553)
Shaded Spruce Cardstock (item #146981)
Regals 6"x6" Designer Series Paper (item #161642)
Granny Apple Green Cardstock (item #146990)
Basic White Cardstock (item #159276)
Shaded Spruce Classic Ink Pad (item #147088)
Brights Stampin' Write Marker Assortments (item #161696)
Tinsel Gems Four-Pack (item #161623)
Stampin' Dimensionals (item #104430)
Measurements:
Shaded Spruce Cardstock
Card Base - 8 1/2" x 5 1/2" (Scored at 4 1/4")
Large Circle die cut with the Stylish Shapes Dies
Basic White Cardstock
Medium Circle punched out with the 2 3/8" Circle
Sentiment Label die cut with the Stylish Labels Dies
Granny Apple Green Cardstock
4 Small Hearts punched out with the Bee Builder Punch
Label die cut with the Stylish Shapes Dies cut in half
Shaded Spruce Designer Series Paper
Card Front - 5 1/4" x 4"
I chose to use the Circle Sayings Bundle for the sentiments for the focal design and sentiment label. I used the coordinating 2 3/8" Circle Punch from the bundle to punch out the stamped Celebrate circle and layered it onto a Shaded Spruce circle I die cut using the Stylish Shapes Dies, using Stampin' Dimensionals to pop it up. To create the shamrock in the center, I punched out 4 of the small hearts from Granny Apple Green cardstock using the Bee Builder Punch and arranged them in the center of the circle. I used the Granny Apple Green Stampin' Write Marker to draw in the stem. For the sentiment, I stamped the image onto Basic White cardstock using Shaded Spruce Classic ink and die cut it out with the Stylish Shapes Dies. I framed it with the Granny Apple Green Label cut in half and attached to the ends on the back of the sentiment label. I attached the designer series paper card front to the card base and then added the focal image and sentiment to the card front to create the design. To complete the card, I added several of the Tinsel Gems Four Pack to add a touch of bling. The Pretty Peacock gems are a close match to the Shaded Spruce and help finish off the design. I love how fun and fresh this card design looks and I think it's a great way to help brighten someone's day.
Thank you for taking the time to visit my blog. I hope that my card design will help get you in the mood to create your own wonderful Spring projects to help celebrate all the wonderful events coming up this month. There are so many options to explore to help spark your creativity.
Now it's time to visit Jan's blog and see what she has created to share this month. Just click on the Next button to visit her blog or use the Roll Call List to find your way. We would appreciate it if you would leave us a comment and let us know what you enjoyed about our projects.
Roll Call List

If you live in the U.S. and do not have a Stampin' Up! Demonstrator, please contact me and I would be happy to help you with your creative projects. You may also visit my Online Store to place your order and have it shipped to you. 

Until Next Time

Happy Stamping,

Tricia Butts
Independent Stampin' Up! Demonstrator

Like What You See? Visit My Online Store Here

Visit My Facebook Business Page for Updates & Ideas

Click here to Contact Me


Coming Soon!
New Online Exclusives Arriving March 5th
To Spark Your Creativity

Get Creative For Spring
With The January-April 2024 Mini Catalog
Click Below To Shop Now


Saturday, August 12, 2023

Stamping Inkspirations August Blog Hop Paper Piecing Technique

Welcome to the Stamping Inkspirations August Blog Hop and this month we have been challenged to use the Paper Piecing technique. This fun technique is a great way to use up your scraps of designer series paper to step up your projects. Our talented Design Team will be sharing their projects and ideas to help inspire you to give this wonderful technique a try. 
For my card design, I chose to create a clean and simple birthday card using the Circle Sayings Bundle and the Bright & Beautiful 6"x6" Designer Series Paper. I chose to paper piece the cupcake image using different designs from the designer series paper to create the colorful look of the cupcake. To step up the design, I heat embossed the images of the cupcake and the sentiment with Gold embossing powder. The die cut Gold stars added the perfect finishing touch for this pretty birthday card. 
Products Used:
Circle Sayings Bundle (item #161355)
Beautiful Balloons Dies (item #161456)
Bright & Beautiful 6"x6" Designer Series Paper (item #161449)
Berry Burst Cardstock (item #144243)
Basic White Cardstock (item #159276)
Gold Foil Sheets (item #132622)
Memento Tuxedo Black Pad (item #132708)
Versamark Pad (item #102283)
Metallics Embossing Powders (item #155555)
Stampin' Dimensionals (item #104430)
Measurements:
Berry Burst Cardstock
Card Base - 8 1/2" x 5 1/2" (Scored at 4 1/4")
Bright & Beautiful Designer Series Paper
Card Front - 5 1/4" x 4"
Stamped top of Cupcake image heat embossed & fussy cut
Stamped bottom of Cupcake image heat embossed & fussy cut
Basic White Cardstock
Large Circle punched out with the 2 3/8" Circle Punch
Cupcake image stamped and fussy cut
Gold Foil
Small Stars die cut with the Beautiful Balloons Dies
This really is a very simple birthday card to create and the Bright & Beautiful Designer Series Paper helps create the wonderful colors in the focal cupcake image. I heat embossed the sentiment image with Gold embossing powder onto Basic White cardstock and then punched it out with the 2 3/8" Circle Punch. I stamped the cupcake image using Memento Tuxedo Black ink onto a scrap of Basic White cardstock and fussy cut it out with Paper Snips. I then stamped the top of the cupcake on one design of designer series paper and the bottom of the cupcake on a different design and heat embossed them both with Gold embossing powder to help the images stand out. I then fussy cut both of the images and adhered them to the stamped cupcake image on the Basic White cardstock. I attached the cupcake to the center of the sentiment circle with Stampin' Dimensionals and adhered it to the center of the card front. To embellish the card front, I added several Gold stars of different sizes that I die cut using the Beautiful Balloons Dies. I love the texture and color that the designer series paper adds to this card design. Paper Piecing is a fun technique and a great alternative to traditionally coloring your images.
Thank you for taking the time to visit my blog. I hope that my card design will help inspire you to give this fun technique a try and see what beautiful projects you can create with it. Paper Piecing is a wonderful way to use your designer series paper to add some color and texture to your designs.
Now it's time to visit Karen's blog and see what she has created to share with us. Just click on the Next button below or use the Roll Call List to find your way. We would love it if you would leave us a comment and let us know what you liked about our projects. I hope you enjoy the rest of our blog hop. 

Roll Call List

If you live in the U.S. and do not have a Stampin' Up! Demonstrator, please contact me and I would be happy to help you with your creative projects. You may also visit my Online Store to place your order and have it shipped to you. 

Until Next Time

Happy Stamping,

Tricia Butts
Independent Stampin' Up! Demonstrator

Like What You See? Visit My Online Store Here

Visit My Facebook Business Page for Updates & Ideas

Click here to Contact Me


Save Up To 30% On Kits
In The Kits Collection During August
Click Below To Shop From My Online Store

Redeem Your Bonus Days Coupons & Save
During The Month Of August
Click Below To Start Shopping


Sunday, July 16, 2023

Stamptastic Friends July Blog Hop Color Challenge: New & Returning Colors

Welcome to the Stamptastic Friends July Blog Hop as we explore the new and returning colors recently added as part of Stampin' Up!'s recent Color Refresh. Our wonderful Design Team members will be sharing their projects and ideas to show you how to mix and match these beautiful colors to create your own unique projects. 
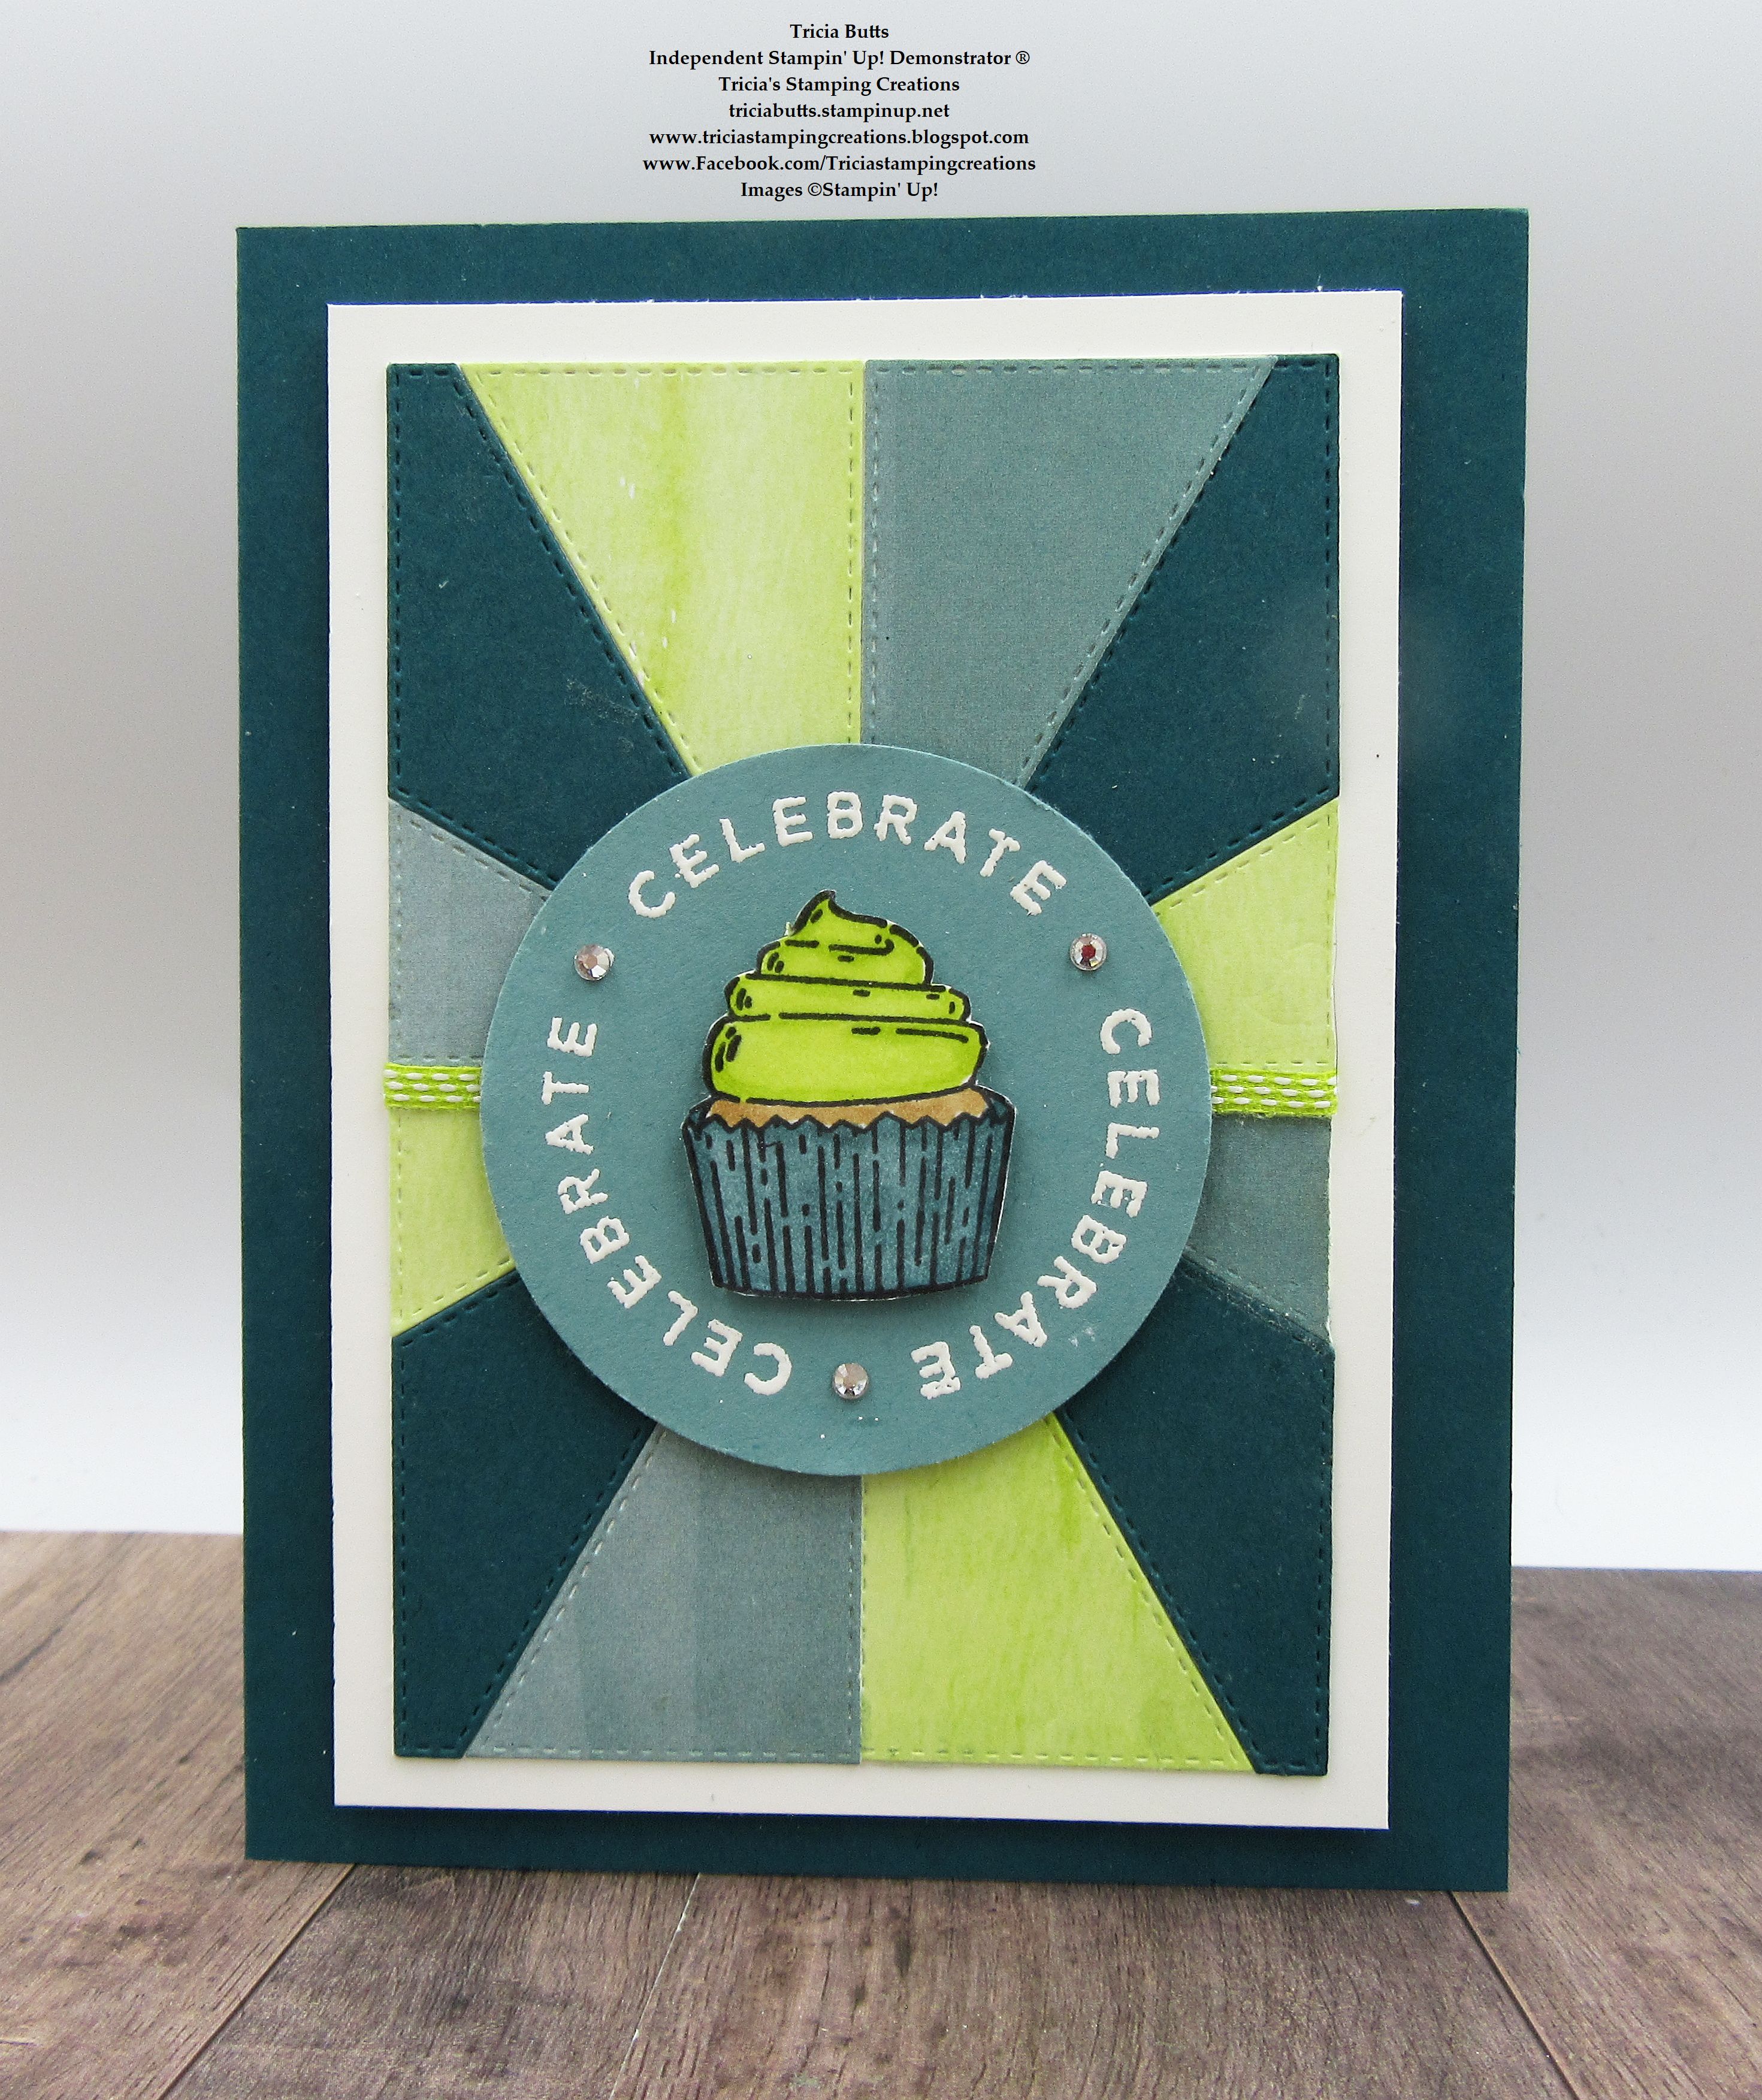
For this card design, I chose to use Lost Lagoon, Pretty Peacock and Lemon Lime Twist to create a fun birthday card using the Patchwork Pieces Dies. I love the way these three colors look together and I thought the die cut background would work well with the Circle Sayings Bundle. For the Lemon Lime Twist and Lost Lagoon pieces, I used designs from the Bright & Beautiful 6"x6" Designer Series Paper to add some subtle texture to the background. This style of design is a great way to showcase different color combinations to create bold, beautiful cards. 
Products Used:
Circle Sayings Bundle (item #161355)
Patchwork Pieces Dies (item #161592)
Bright & Beautiful 6"x6" Designer Series Paper (item #161449)
Pretty Peacock Cardstock (item #150880)
Lost Lagoon Cardstock (item #133679)
Basic White Cardstock (item #159276)
Memento Tuxedo Black Pad (item #132708)
Versamark Pad (item #102283)
Basics Embossing Powders (item #155554)
Pretty Peacock Stampin' Blends Combo Pack (item #161676)
Lemon Lime Twist Stampin' Blends Combo Pack (item #161682)
Pecan Pie Stampin' Blends Combo Pack (item #161674)
Clear Wink of Stella Glitter Brush (item #141897)
Ribbon Duo Combo Pack (item #161318)
Rhinestone Basic Jewels (item #144220)
Stampin' Dimensionals (item #104430)
Measurements:
Pretty Peacock Cardstock
Card Base - 8 1/2" x 5 1/2" (Scored at 4 1/4")
3 1/4" x 4 3/4" Piece die cut with the Patchwork Pieces Dies
Lost Lagoon Cardstock
Circle punched out with the 2 3/8" Circle Punch
Basic White Cardstock
Layer 1 - 5" x 3 1/2"
Background Base piece - 3 1/4" x 4 3/4" (Trimmed down after die cut pieces attached to 3 1/8" x 4 5/8")
Cup Cake stamped and fussy cut with Paper Snips
Bright & Beautiful Designer Series Paper
1 piece Lemon Lime Twist - 3 1/4" x 4 3/4" die cut with the Patchwork Pieces Dies
1 piece Lost Lagoon - 3 1/4" x 4 3/4" die cut with the Patchwork Pieces Dies
This fun card design is a great way to play with paper piecing. I die cut each of the three colors with the Patchwork Pieces Dies and then alternated the colors to create my final design. The great thing is that you have enough pieces to create three different backgrounds so you are actually getting three cards from one set of supplies. I used Tombow Liquid Glue to attach the pieces to a piece of Basic White cardstock that is slightly larger than the finished piece. Once I had all the pieces arranged on the cardstock, I trimmed it down to the finished 3 1/8" x 4 5/8" size with my Paper Trimmer. I added a piece of Lemon Lime Twist Ribbon around the center of the layer to add some texture. For the sentiment, I heat embossed the Celebrate image with White embossing powder onto a Lost Lagoon Circle that I punched out with the 2 3/8" Circle Punch. For the cupcake, I stamped the image with Memento Tuxedo Black ink and colored the wrapper with Pretty Peacock Stampin' Blends Markers, the frosting with Lemon Lime Twist Stampin' Blends Markers and the cake with the Light Pecan Pie Stampin' Blends Marker. I fussy cut the cupcake with Paper Snips and attached it to the center of the sentiment circle with Stampin' Dimensionals. I attached the sentiment circle to the center of the focal layer with Stampin' Dimensionals ahtne then adhered the focal layer to the Basic White layer. To complete the card, I attached the Basic White layer to the Pretty Peacock card base with Stampin' Dimensionals. For a touch of bling, I added several small Basic Rhinestone Jewels to the dots on the sentiment circle and colored the cupcake with Clear Wink of Stella for a touch of shimmer. 
Thank you for taking the time to visit my blog. I hope that my card design will inspire you to mix and match these wonderful colors to create your own beautiful projects. There are so many amazing options to choose from.
Please take the time to visit with my fellow Design Team members to see their wonderful projects. Just click on the links in the Roll Call List below to visit their blogs. We would love it if you would leave us a comment and let us know what you enjoyed about our projects and what new and returning colors you are excited to try. 

If you live in the U.S. and do not have a Stampin' Up! Demonstrator, please contact me and I would be happy to help you with your creative projects. You may also visit my Online Store to place your order and have it shipped to you. 

Until Next Time

Happy Stamping,

Tricia Butts
Independent Stampin' Up! Demonstrator

Like What You See? Visit My Online Store Here

Visit My Facebook Business Page for Updates & Ideas

Click here to Contact Me


Bonus Coupons Are Here
Earn A $5 Coupon For Every $50 You Spend In July
Redeem Your Coupons In August 
Click Below To Start Shopping

New Online Exclusives
Now Available While Supplies Last
Click Below To Visit My Online Store


Saturday, May 20, 2023

Stamping With Friends May Blog Hop 2023-2024 Annual Catalog

Welcome to the Stamping With Friends May Blog Hop as we celebrate the new 2023-2024 Annual Catalog and all the amazing new products inside. Our wonderful Design Team members will be sharing their projects and ideas to help you get excited about the wonderful new products and colors in the new catalog.
Today I am sharing a pretty card I designed using the new Circle Sayings Bundle for a recent 2023-2024 Annual Catalog Swap. I love the images and sentiments in the stamp set and I am so excited to have a new coordinating circle punch. For the background, I used the new Countryside Blossoms Embossing Folder to add some wonderful texture. This is a wonderful clean and simple birthday card design using a soft and pretty color combination of Highland Heather with the returning Fresh Freesia and Basic White. 
Products Used:
Circle Sayings Bundle (item #161355)
Countryside Blossoms Embossing Folder (item #161473)
Stylish Shapes Dies (item #159183)
Fresh Freesia Cardstock (item #155613)
Highland Heather Cardstock (item #146986)
Basic White Cardstock (item #159276)
Thick Basic White Cardstock (item #159229)
Versamark Pad (item #102283)
Basics Embossing Powders (item #155554)
Basic Rhinestone Jewels (item #144220)
Stampin' Dimensionals (item #104430)
Measurements:
Thick Basic White Cardstock
Card Base - 5 1/2" x 8 1/2" (Scored at 4 1/4")
Basic White Cardstock
Medium Circle die cut with the Stylish Shapes Dies
Fresh Freesia Cardstock
Card Front - 5 1/4" x 4" Embossed with the Countryside Blossoms Embossing Folder
Circle punched out with the 2 3/8" Circle Punch
Highland Heather Cardstock
Large Stitched Circle die cut with the Stylish Shapes Dies 
This beautiful birthday card is simple to create and I love how the focal circles pop against the embossed background. Highland Heather and Fresh Freesia look so pretty together and I love how the layers of circles help make the embossed focal image pop. I chose to use White embossing powder for the embossing on the Fresh Freesia circle and added some Basic Rhinestones for a touch of bling. The new 2 3/8" Circle Punch layers beautifully with the circle dies in the Stylish Shapes Dies set. This color combination is perfect for a soft and pretty birthday card but you could easily transform this design into a masculine card, just by changing the colors. The Circle Sayings Bundle is so versatile and a great addition to your crafting collection. 
Thank you for taking the time to visit my blog. I hope that my card design will help inspire you to explore the wonderful new products in the 2023-2024 Annual Catalog to create your own beautiful projects. There are so many amazing possibilities to explore.
Please take the time to visit with my fellow Design Team members to see their wonderful projects. Just click on the links in the Roll Call List below to visit their blogs. I hope you will leave us a comment and let us know how we inspired you to get creative. 
If you live in the U.S. and do not have a Stampin' Up! Demonstrator, please contact me and I would be happy to help you with your creative projects. You may also visit my Online Store to place your order and have it shipped to you. 

Until Next Time

Happy Stamping,

Tricia Butts
Independent Stampin' Up! Demonstrator

Like What You See? Visit My Online Store Here

Visit My Facebook Business Page for Updates & Ideas

Click here to Contact Me


Get Creative For The Summer
With The New 2023-2024 Annual Catalog
Click Below To Visit My Online Store

Introducing The Amazing New
2023-2025 In Colors 
Click Below To Visit My Online Store