Showing posts with label Countryside Blossoms Embossing Folder. Show all posts

Monday, June 5, 2023

Kylie Bertucci's Monthly International Blog Highlights June 2023

Welcome to Kylie Bertucci's Monthly International Blog Highlights for June as we share our cards inspired by this month's theme of "Thank You". Talented Stampin' Up! Demonstrators from around the world are sharing their beautiful projects to help inspire you and encourage you to get creative.
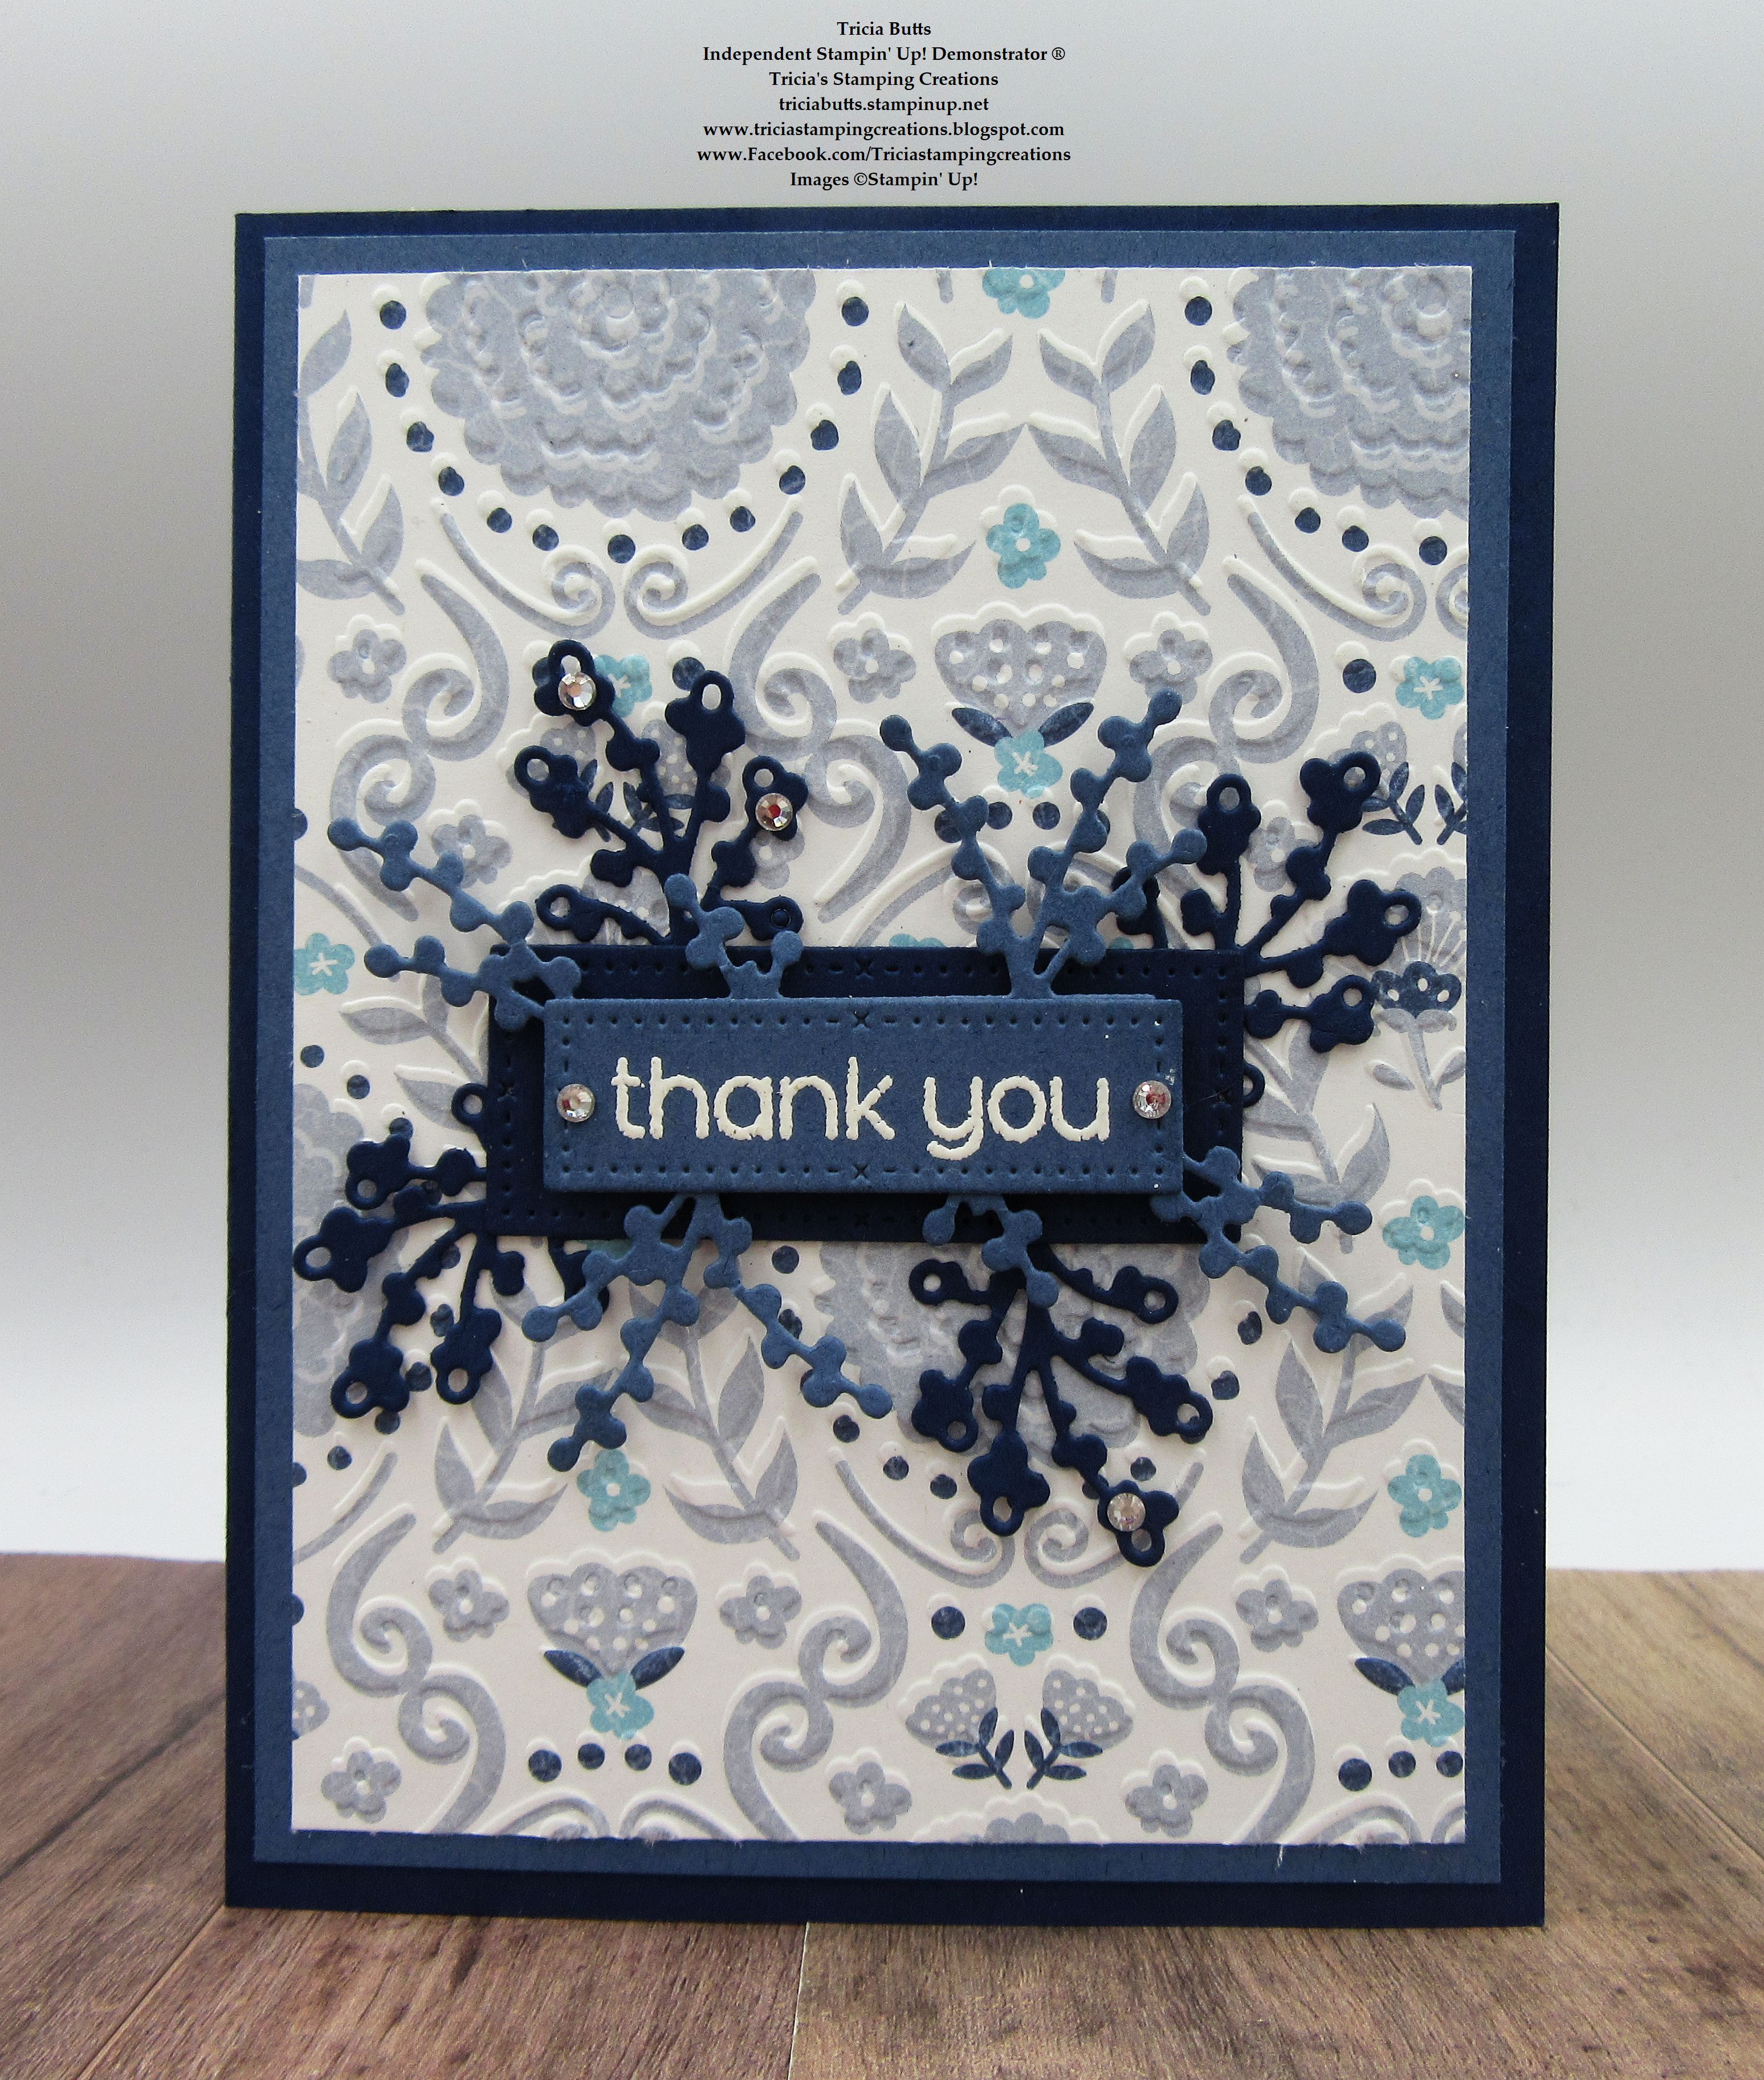
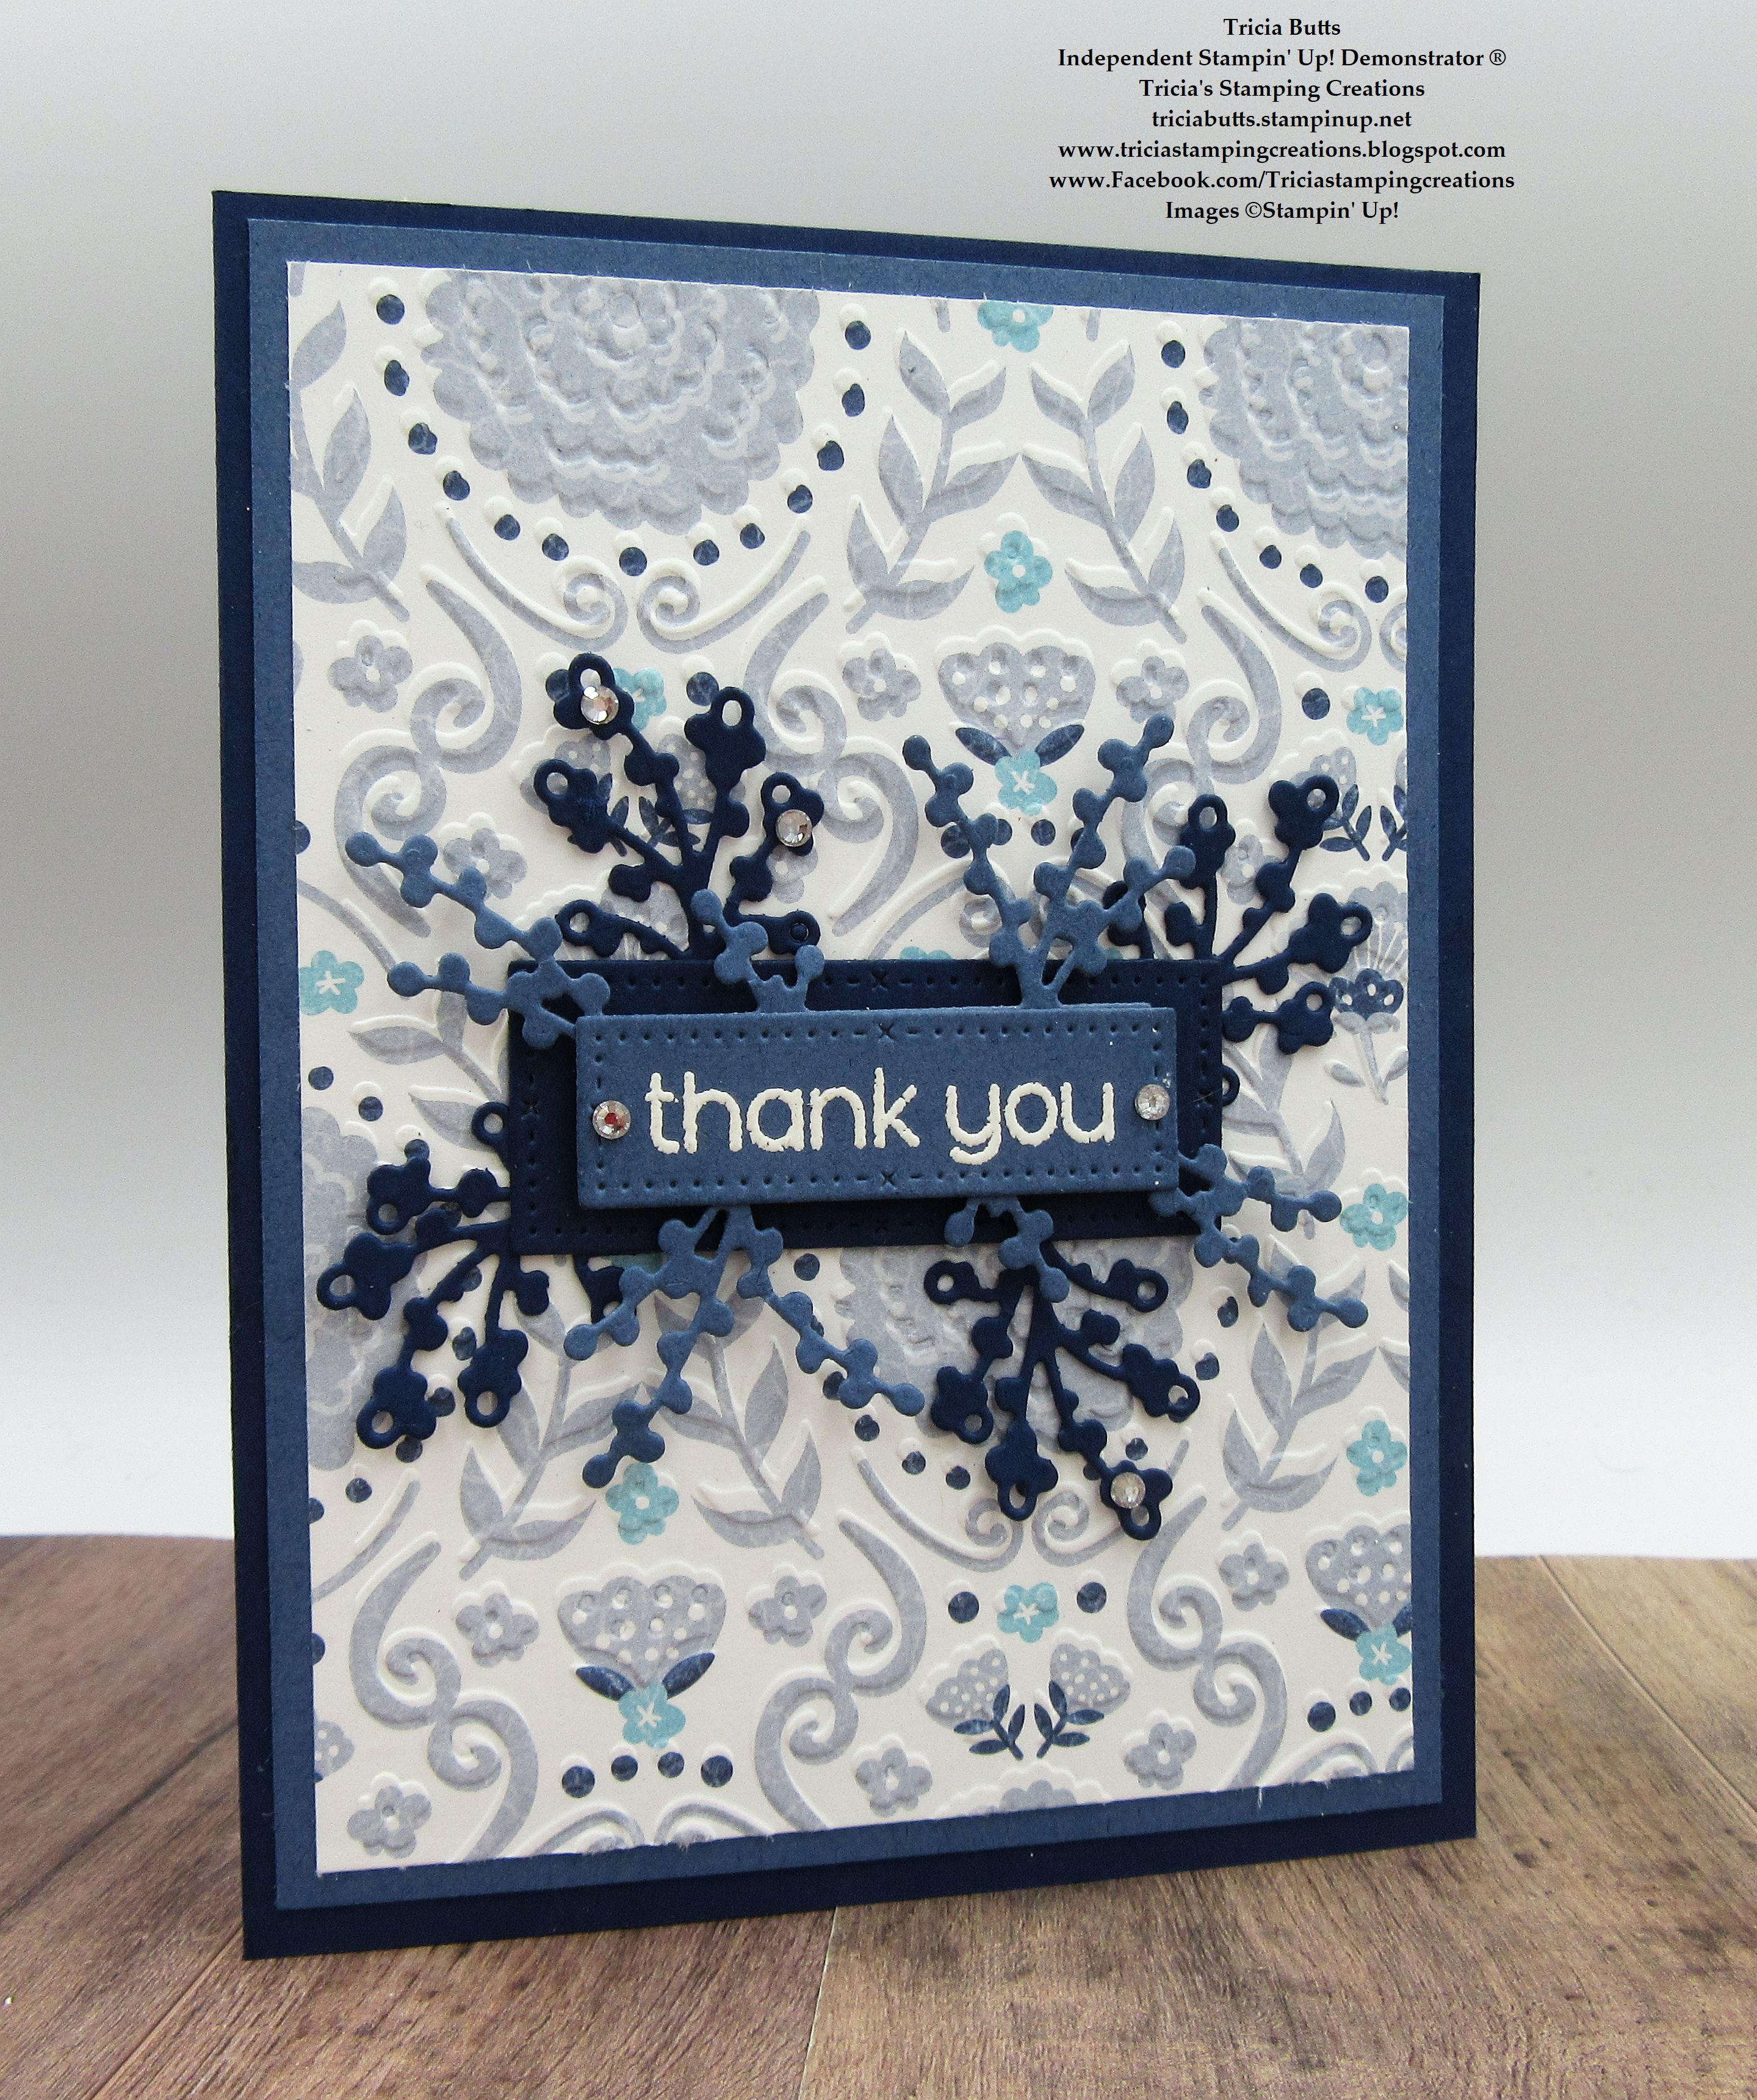
I love using designer series paper to create thank you cards, so today I thought I would showcase the Countryside Inn Designer Series Paper for my card design. The design I chose coordinates with the Countryside Blossoms Embossing Folder, which I used to emboss the paper to add texture to the card design. It is possible, with a little patience, to line up the design on the paper with the design on the embossing folder for extra effect. For the sentiment, I used one of my favorite new bundles, Timeless Arrangements, to add some detail and texture to the card front while still allowing the background design to show through. 
Products Used:
Timeless Arrangements Bundle (item #161525)
Countryside Blossoms Embossing Folder (item #161473)
Countryside Inn Designer Series Paper (item #161467)
Night of Navy Cardstock (item #100867)
Misty Moonlight Cardstock (item #153081)
Versamark Pad (item #102283)
Basics Embossing Powders (item #155554)
Basic Rhinestone Jewels (item #144220)
Mini Stampin' Dimensionals (item #144108)
Measurements:
Night of Navy Cardstock
Card Base - 8 1/2" x 5 1/2" (Scored at 4 1/4")
Sentiment Label die cut with the Timeless Arrangements Dies
2 Detailed Floral Accents die cut with the Timeless Arrangements Dies
Misty Moonlight Cardstock
Layer 1 - 5 1/4" x 4" 
Sentiment Label die cut with the Timeless Arrangements Dies
2 Detailed Floral Accents die cut with the Timeless Arrangements Dies
Countryside Inn Designer Series Paper
Card Front - 5" x 3 3/4" (Embossed with the Countryside Blossoms Embossing Folder)
Blue is my favorite color, so I had a lot of fun creating this card design using some of my favorite blues included in the designer series paper. I matted the embossed card front with a layer of Misty Moonlight cardstock to create a frame against the Night of Navy card base. For the sentiment, I heat embossed the Thank You image with White embossing powder onto the Misty Moonlight label and then added the two detailed floral elements to the back of the sentiment label. To create a frame for the sentiment, I die cut a slightly larger label and two detailed floral die cuts from Night of Navy cardstock and added the detailed die cuts to the back of the label. Using Mini Stampin' Dimensionals, I added the Misty Moonlight sentiment label to the center of the Night of Navy label and then added it to the center of the embossed card front. For a touch of bling, I added some small Basic Rhinestone Jewels to finish off the design. I love how delicate and pretty this card looks and how the blues work together to bring out the detail in the designer series paper. 
Thank you for taking the time to visit my blog. I hope that my card design will help inspire you to create your own beautiful Thank You cards to send to family and friends. 
Please take a moment to vote for my card design as part of this month's International Blog Highlights by clicking the Vote button below. Just click on the small heart above my card (#17) to vote. You can vote for up to 5 cards each day over the next week, so please share the love with my fellow Stampin' Up! Demonstrators and visit their blogs to see their beautiful projects. We would appreciate it if you would leave us a comment and let us know what you liked about our designs. I hope you enjoy this month's International Blog Highlights. 


If you live in the U.S. and do not have a Stampin' Up! Demonstrator, please contact me and I would be happy to help you with your creative projects. You may also visit my Online Store to place your order and have it shipped to you. 

Until Next Time

Happy Stamping,

Tricia Butts
Independent Stampin' Up! Demonstrator

Like What You See? Visit My Online Store Here

Visit My Facebook Business Page for Updates & Ideas

Click here to Contact Me


Save 15% On Select Designer Series Paper
During The Month Of June
Click Below To Shop From My Online Store
Explore Your Creativity
With The 2023-2024 Annual Catalog
Click Below To Visit My Online Store


Friday, June 2, 2023

Global Stamping Friends June Blog Hop Coordination Is Key

Welcome to the Global Stamping Friends June Blog Hop as explore the theme, "Coordination is Key". One of my favorite things about Stampin' Up! is the way their products coordinate to make creating simple and stress-free. Our wonderful Design Team will be sharing their projects and ideas to help inspire you to take a look through the 2023-2024 Annual Catalog and see all the wonderful possibilities inside. 
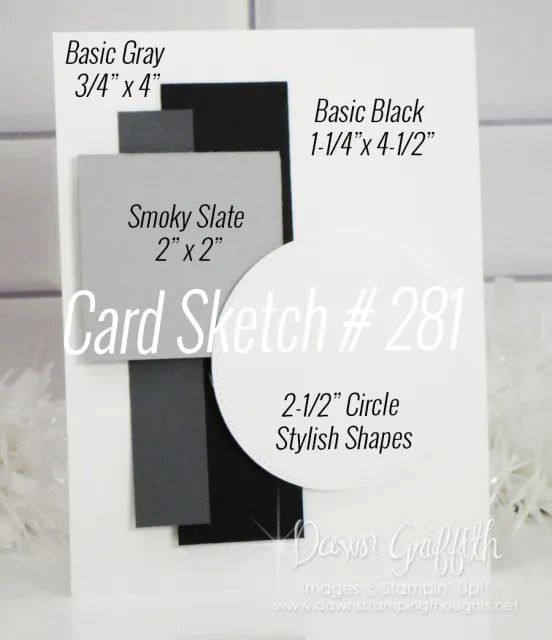
For my card design today, I wanted to share the benefits of color coordinating products as well as how bundles can make your creative life so much easier. I used a Sketch created by fellow Stampin' Up! Demonstrator, Dawn Griffith, for my card layout and I love that she provided measurements for the different elements. 
The color combination for this card features Berry Burst, Bubble Bath and Basic White with a splash of color for the dancing leopard image. You may notice that the cardstock, designer series paper and colors for the skirt on the leopard all coordinate. This is because Stampin' Up! has coordinating ink, paper and embellishments to take the stress out of creating. They also have bundles, in this case the Zany Zoo Bundle, which has a stamp set and coordinating die set to make life easier. No need to fussy cut the individual stamped images plus there are additional dies that add elements to decorate your projects, such as the cute flowers that decorate the card front. 
Products Used:
Zany Zoo Bundle (item #161315)
Go To Greetings stamp set (item #158763)
Stylish Shapes (item #159183)
Decorative Circle Punch (item #159174)
2 3/8" Circle Punch (item #161354)
Countryside Blossoms Embossing Folder (item #161473)
Brights 6"x6" Designer Series Paper (item #161643)
Berry Burst Cardstock (item #144243)
Bubble Bath Cardstock (item #161718)
Basic White Cardstock (item #159276)
Memento Tuxedo Black Pad (item #132708)
Versamark Pad (item #102283)
Metallics Embossing Powders (item #155555)
Pumpkin Pie Stampin' Blends Combo Pack (item #154897)
Daffodil Delight Stampin' Blends Combo Pack (item #154883)
Bubble Bath Stampin' Blends Combo Pack (item #161675)
Berry Burst Stampin' Blends Combo Pack (item #161681)
Basic Rhinestone Jewels (item #144220)
Stampin' Dimensionals (item #104430)
Measurements:
Berry Burst Cardstock
Card Base - 8 1/2" x 5 1/2" (Scored at 4 1/4")
Strip - 1 1/4" x 4 1/2" Embossed with the Countryside Blossoms Embossing Folder
Large Circle punched out with the 2 3/8" Circle Punch
3 Flowers die cut with the Zany Zoo Bundle
Bubble Bath Cardstock
Card Front - 5 1/4" x 4"
Basic White Cardstock
Decorative Circle punched out with the Decorative Circle Punch
Dancing Leopard image stamped and die cut with the Zany Zoo Bundle
Inside Layer - 5 2/4" x 4"
Sentiment Label die cut with the Stylish Shapes Dies
Berry Burst Designer Series Paper
Pattern 1 Strip - 3/4" x 4"
Pattern 1 Strip 0 1/2" x 4" (Decorative strip for inside panel)
Pattern 2 Square - 2"x 2"
This sweet and pretty card showcases how you can take designer series paper, cardstock and some ink (in this case Stampin' Blends Markers) to create a beautiful design. I love the way the Berry Burst layers pop against the Bubble Bath card front. The cute leopard image has been colored with a variety of Stampin' Blends Markers, including Bubble Bath and Berry Burst, to tie in the image with the color combination for the card design. I used the Zany Zoo stamp set to stamp the image with Tuxedo Black ink and die cut it out with the coordinating Zany Zoo Dies. When you order the Zany Zoo Bundle, you get both of these products together and save 10%, which is great for your crafting budget. 
I used the Countryside Blossoms Embossing Folder to add some texture to the Berry Burst cardstock strip and I love how the embossed flowers coordinate with the die cut flowers that I used in the background. These flowers were die cut using the Zany Zoo Dies. Did you notice that the Decorative Circle layer fits inside the 2 3/8" Circle? Once again, Stampin' Up! has thought of ways to help us layer elements for our projects to make life easier. To decorate the inside of the card, I added a small strip of the Berry Burst Designer Series Paper to the inside layer to coordinate with the front design. Whether you love playing with color or having fun combining products to create your design, Stampin' Up! offers so many wonderful ways for you to get creative.
Thank you for taking the time to visit my blog. I hope that my card design will inspire you to explore the wonderful coordinating products in the new 2023-2024 Annual Catalog. 
Now it's time to visit Jan's blog and see what beautiful projects she has to share with us. Just click on the Next button below to visit her blog. We would appreciate it if you would leave us a comment and let us know what you liked about our projects. I hope you enjoy the rest of our blog hop. 


If you live in the U.S. and do not have a Stampin' Up! Demonstrator, please contact me and I would be happy to help you with your creative projects. You may also visit my Online Store to place your order and have it shipped to you. 

Until Next Time

Happy Stamping,

Tricia Butts
Independent Stampin' Up! Demonstrator

Like What You See? Visit My Online Store Here

Visit My Facebook Business Page for Updates & Ideas

Click here to Contact Me


Save 15% On Select Designer Series Paper
In The 2023-2024 Annual Catalog
Click Below To Shop and Place Your Order

Explore Your Creativity
With The 2023-2024 Annual Catalog
Click Below To Visit My Online Store


Saturday, May 20, 2023

Stamping With Friends May Blog Hop 2023-2024 Annual Catalog

Welcome to the Stamping With Friends May Blog Hop as we celebrate the new 2023-2024 Annual Catalog and all the amazing new products inside. Our wonderful Design Team members will be sharing their projects and ideas to help you get excited about the wonderful new products and colors in the new catalog.
Today I am sharing a pretty card I designed using the new Circle Sayings Bundle for a recent 2023-2024 Annual Catalog Swap. I love the images and sentiments in the stamp set and I am so excited to have a new coordinating circle punch. For the background, I used the new Countryside Blossoms Embossing Folder to add some wonderful texture. This is a wonderful clean and simple birthday card design using a soft and pretty color combination of Highland Heather with the returning Fresh Freesia and Basic White. 
Products Used:
Circle Sayings Bundle (item #161355)
Countryside Blossoms Embossing Folder (item #161473)
Stylish Shapes Dies (item #159183)
Fresh Freesia Cardstock (item #155613)
Highland Heather Cardstock (item #146986)
Basic White Cardstock (item #159276)
Thick Basic White Cardstock (item #159229)
Versamark Pad (item #102283)
Basics Embossing Powders (item #155554)
Basic Rhinestone Jewels (item #144220)
Stampin' Dimensionals (item #104430)
Measurements:
Thick Basic White Cardstock
Card Base - 5 1/2" x 8 1/2" (Scored at 4 1/4")
Basic White Cardstock
Medium Circle die cut with the Stylish Shapes Dies
Fresh Freesia Cardstock
Card Front - 5 1/4" x 4" Embossed with the Countryside Blossoms Embossing Folder
Circle punched out with the 2 3/8" Circle Punch
Highland Heather Cardstock
Large Stitched Circle die cut with the Stylish Shapes Dies 
This beautiful birthday card is simple to create and I love how the focal circles pop against the embossed background. Highland Heather and Fresh Freesia look so pretty together and I love how the layers of circles help make the embossed focal image pop. I chose to use White embossing powder for the embossing on the Fresh Freesia circle and added some Basic Rhinestones for a touch of bling. The new 2 3/8" Circle Punch layers beautifully with the circle dies in the Stylish Shapes Dies set. This color combination is perfect for a soft and pretty birthday card but you could easily transform this design into a masculine card, just by changing the colors. The Circle Sayings Bundle is so versatile and a great addition to your crafting collection. 
Thank you for taking the time to visit my blog. I hope that my card design will help inspire you to explore the wonderful new products in the 2023-2024 Annual Catalog to create your own beautiful projects. There are so many amazing possibilities to explore.
Please take the time to visit with my fellow Design Team members to see their wonderful projects. Just click on the links in the Roll Call List below to visit their blogs. I hope you will leave us a comment and let us know how we inspired you to get creative. 
If you live in the U.S. and do not have a Stampin' Up! Demonstrator, please contact me and I would be happy to help you with your creative projects. You may also visit my Online Store to place your order and have it shipped to you. 

Until Next Time

Happy Stamping,

Tricia Butts
Independent Stampin' Up! Demonstrator

Like What You See? Visit My Online Store Here

Visit My Facebook Business Page for Updates & Ideas

Click here to Contact Me


Get Creative For The Summer
With The New 2023-2024 Annual Catalog
Click Below To Visit My Online Store

Introducing The Amazing New
2023-2025 In Colors 
Click Below To Visit My Online Store

Saturday, May 13, 2023

Stamping Inkspirations May Blog Hop Sketch Challenge

It's Sketch Challenge time for the Stamping Inkspirations May Blog Hop and our Design Team members will be sharing their projects and ideas to help inspire you. Sketches are a wonderful way to spark your creativity, especially if you are experiencing a creative block. Think of it as a road map to guide you as you create your own beautiful projects.
It took me a little time to work out my card design for this month's Sketch Challenge. In the end, I came up with a bit of a twist on the original sketch to create a card that worked for me. I chose to use the Timeless Arrangements Bundle with the Stylish Shapes to create my card and I also used the Countryside Blossoms Embossing Folder to add some texture to the design. This pretty Spring themed Thank You card has a soft and pretty color palette including Fresh Freesia, Highland Heather, Pool Party and Basic White. This card design features several different techniques including masking, sponging, both dry and heat embossing and a little die cutting. I can honestly say that this card had me stepping outside my comfort zone but I love how it turned out in the end. 
Products Used:
Timeless Arrangements Bundle (item #161526)
Stylish Shapes Dies (item #159183)
Countryside Blossoms Embossing Folder (item #161473)
Fresh Freesia Cardstock (item #155613)
Highland Heather Cardstock (item #146986)
Pool Party Cardstock (item #122924)
Basic White Cardstock (item #159276)
Highland Heather Classic Ink Pad (item #147103)
Fresh Freesia Classic Ink Pad (item #155611)
Versamark Pad (item #102283)
Basics Embossing Powders (item #155554)
Pool Party 3/8" Grosgrain Ribbon (item #160430)]
Basic Rhinestone Jewels (item #144220)
Blending Brushes (item #153611)
Stampin' Dimensionals (item #104430)
Measurements:
Fresh Freesia Cardstock 
Card Base - 5 1/2" x 8 1/2" (Scored at 4 1/4")
Sentiment Label die cut with the Stylish Shapes Dies
Highland Heather Cardstock
Large Stitched Circle die cut with the Stylish Shapes Dies & embossed with the Countryside Blossoms Embossing Folder
Large Label die cut with the Stylish Shapes Dies
2 Small Florals die cut with the Timeless Arrangements Dies 
Pool Party Cardstock 
4 Leaves die cut with the Timeless Arrangements
Basic White Cardstock
Card Front - 5 1/4" x 4"
When you look at this card design, you see that I used quarter circles to create the "corners" for my card design. I chose to cut the large Highland Heather Circle into quarters to create a curved version of the sketch and I love how the Countryside Blossoms embossing folder adds beautiful texture to this design. For the card front, I masked off a strip in the center and gently sponged the area with Fresh Freesia Classic ink using a Blending Brush. While the mask was still in place, I stamped the leaves and flowers from the Timeless Arrangements stamp set onto the sponged background using Fresh Freesia Classic ink. I love the tone on tone design this technique creates. I then stamped the "Thanks" image randomly on the floral background using Highland Heather Classic ink to complete the design, before removing the mask. For the sentiment label, I heat embossed the image with White embossing powder onto the Fresh Freesia Label and added it to the larger Highland Heather Label. 
To assemble the card, I attached the four quarter circles to the card front. I added a piece of Pool Party Grosgrain Ribbon around the center of the card front and added the sentiment label over the top using Stampin' Dimensionals. I added for sprigs of leaves die cut from Pool Party cardstock with the Timeless Arrangements Dies, so that the ends tucked underneath the sentiment label. I also added two small floral sprigs die cut from Highland Heather cardstock. To complete the card design, I attached the card front to the Fresh Freesia card base and added two small Basic Rhinestones to the sentiment label for a touch of bling. This is such a sweet design and I love the combination of textures and layers.
Thank you for taking the time to visit my blog. I hope my card design will help inspire you to give this Sketch Challenge a try. There are so many wonderful possibilities to explore using paper, ink and stamps to create your own beautiful card design. 
Now it's time to visit Mo's wonderful blog and see what she has created with this month's sketch challenge. Just click on the Next button below to visit her blog or use the Roll Call List to find your way. We would love it if you would leave us a comment and let us know what you liked about our projects. I hope you enjoy the rest of our blog hop. 


If you live in the U.S. and do not have a Stampin' Up! Demonstrator, please contact me and I would be happy to help you with your creative projects. You may also visit my Online Store to place your order and have it shipped to you. 

Until Next Time

Happy Stamping,

Tricia Butts
Independent Stampin' Up! Demonstrator

Like What You See? Visit My Online Store Here

Visit My Facebook Business Page for Updates & Ideas

Click here to Contact Me


Explore Your Creativity
With The New 2023-2024 Annual Catalog
Click Below To Visit My Online Store


Monday, May 8, 2023

Kylie Bertucci's Monthly International Blog Highlights May 2023

Welcome to Kylie Bertucci's Monthly International Blog Highlights for May as we showcase amazing Stampin' Up! Demonstrators from around the world. We will be sharing our projects and ideas with the theme "Thank You" to help inspire you to create your own beautiful projects to send to family and friends. A hand made card is a wonderful way to show the people in your life how much you appreciate them.
With the launch of the new 2023-2024 Annual Catalog this month, I thought I would design a Thank You card using the beautiful Timeless Arrangements Bundle. This wonderful bundle is so versatile and I love the combination of sentiment images and coordinating dies to help create pretty card designs. I paired this bundle with the new Countryside Blossoms Embossing Folder, which adds wonderful texture to the background and I think coordinates with the die cuts in this bundle. With the new Color Refresh, I thought this would be a perfect opportunity to explore new color combinations and I really love how Soft Sea Foam and the new Bubble Bath coordinate with the pretty Moody Mauve. This lovely design has the look of Spring wildflowers similar to the ones starting to bloom in the mountains here in Colorado. 
Products Used:
Timeless Arrangements Bundle (item #161525)
Countryside Blossoms Embossing Folder (item #161473)
Moody Mauve Cardstock (item #161723)
Soft Sea Foam Cardstock (item #146988)
Bubble Bath Cardstock (item #161718)
Thick Basic White Cardstock (item #159229)
Moody Mauve Classic Ink Pad (item #161649)
Sweet Sorbet 1/8" Metallic Woven Ribbon (item #159200)
Stampin' Dimensionals (item #104430)
Measurements:
Thick Basic White Cardstock'
Card Base - 8 1/2" x 5 1/2" (Scored at 4 1/4")
Moody Mauve Cardstock
Card Front - 5 1/4" x 4" Embossed with the Countryside Blossoms Embossing Folder
Basic White Cardstock
Sentiment Label die cut with the Timeless Arrangements Dies
Soft Sea Foam Cardstock
2 Detailed Leaves corners die cut with the Timeless Arrangements Dies
Bubble Bath Cardstock
2 Detailed Floral Corners die cut with the Timeless Arrangements Dies
This pretty Spring Thank You card requires minimal stamping and I love how the layers of die cuts provide the look of Spring flowers growing from behind the sentiment label. I stamped the Thank You sentiment using Moody Mauve Classic ink onto the Basic White label to create the focal image for the card. I added the leaves and flowers behind the sentiment label, offsetting them so that the flowers fit in between the leaves. The card front has been embossed using the Countryside Blossoms Embossing Folder and I love the wonderful texture it adds to the background. I attached the sentiment label to the card front using Stampin' Dimensionals, making sure to center it. To embellish the card design, I added a small bow to the top left corner using the Sweet Sorbet Metallic Woven Ribbon. I love that this ribbon works beautifully with this color combination. 
Thank you for taking the time to visit my blog. I hope that my Thank You card will inspire you to get creative and come up with your own beautiful project designs. There are so many possibilities to explore in the new 2023-2024 Annual Catalog. 
I would appreciate it if you would vote for my card design as part of this month's International Blog Highlights by clicking the Vote button below. To vote, just click on the small heart for my card (#13). You can vote for up to 5 cards each day over the next week, so please share the love with my fellow demonstrators and take the time to visit their blogs. We would love it if you would leave us a comment and let us know what you liked about our projects. 


If you live in the U.S. and do not have a Stampin' Up! Demonstrator, please contact me and I would be happy to help you with your creative projects. You may also visit my Online Store to place your order and have it shipped to you. 

Until Next Time

Happy Stamping,

Tricia Butts
Independent Stampin' Up! Demonstrator

Like What You See? Visit My Online Store Here

Visit My Facebook Business Page for Updates & Ideas

Click here to Contact Me


Explore The Wonderful New Products
In The 2023-2024 Annual Catalog
Click Below To Visit My Online Store

Explore The New 2023-2025 In Colors
With The May Paper Pumpkin Kit
Click Below To Subscribe By May 10th