Showing posts with label Aspen Trees Dies. Show all posts

Friday, February 2, 2024

Crafty Collaborations Monochromatic Color Challenge Week 5 Pebbled Path

Welcome back to Week 5 of the Crafty Collaborations Monochromatic Color Challenge and this week we are showcasing Pebbled Path, one of the 2023-2025 In Colors. I love this bold, dark neutral that is a wonderful alternative to Basic Gray or Basic Black when creating your projects. 
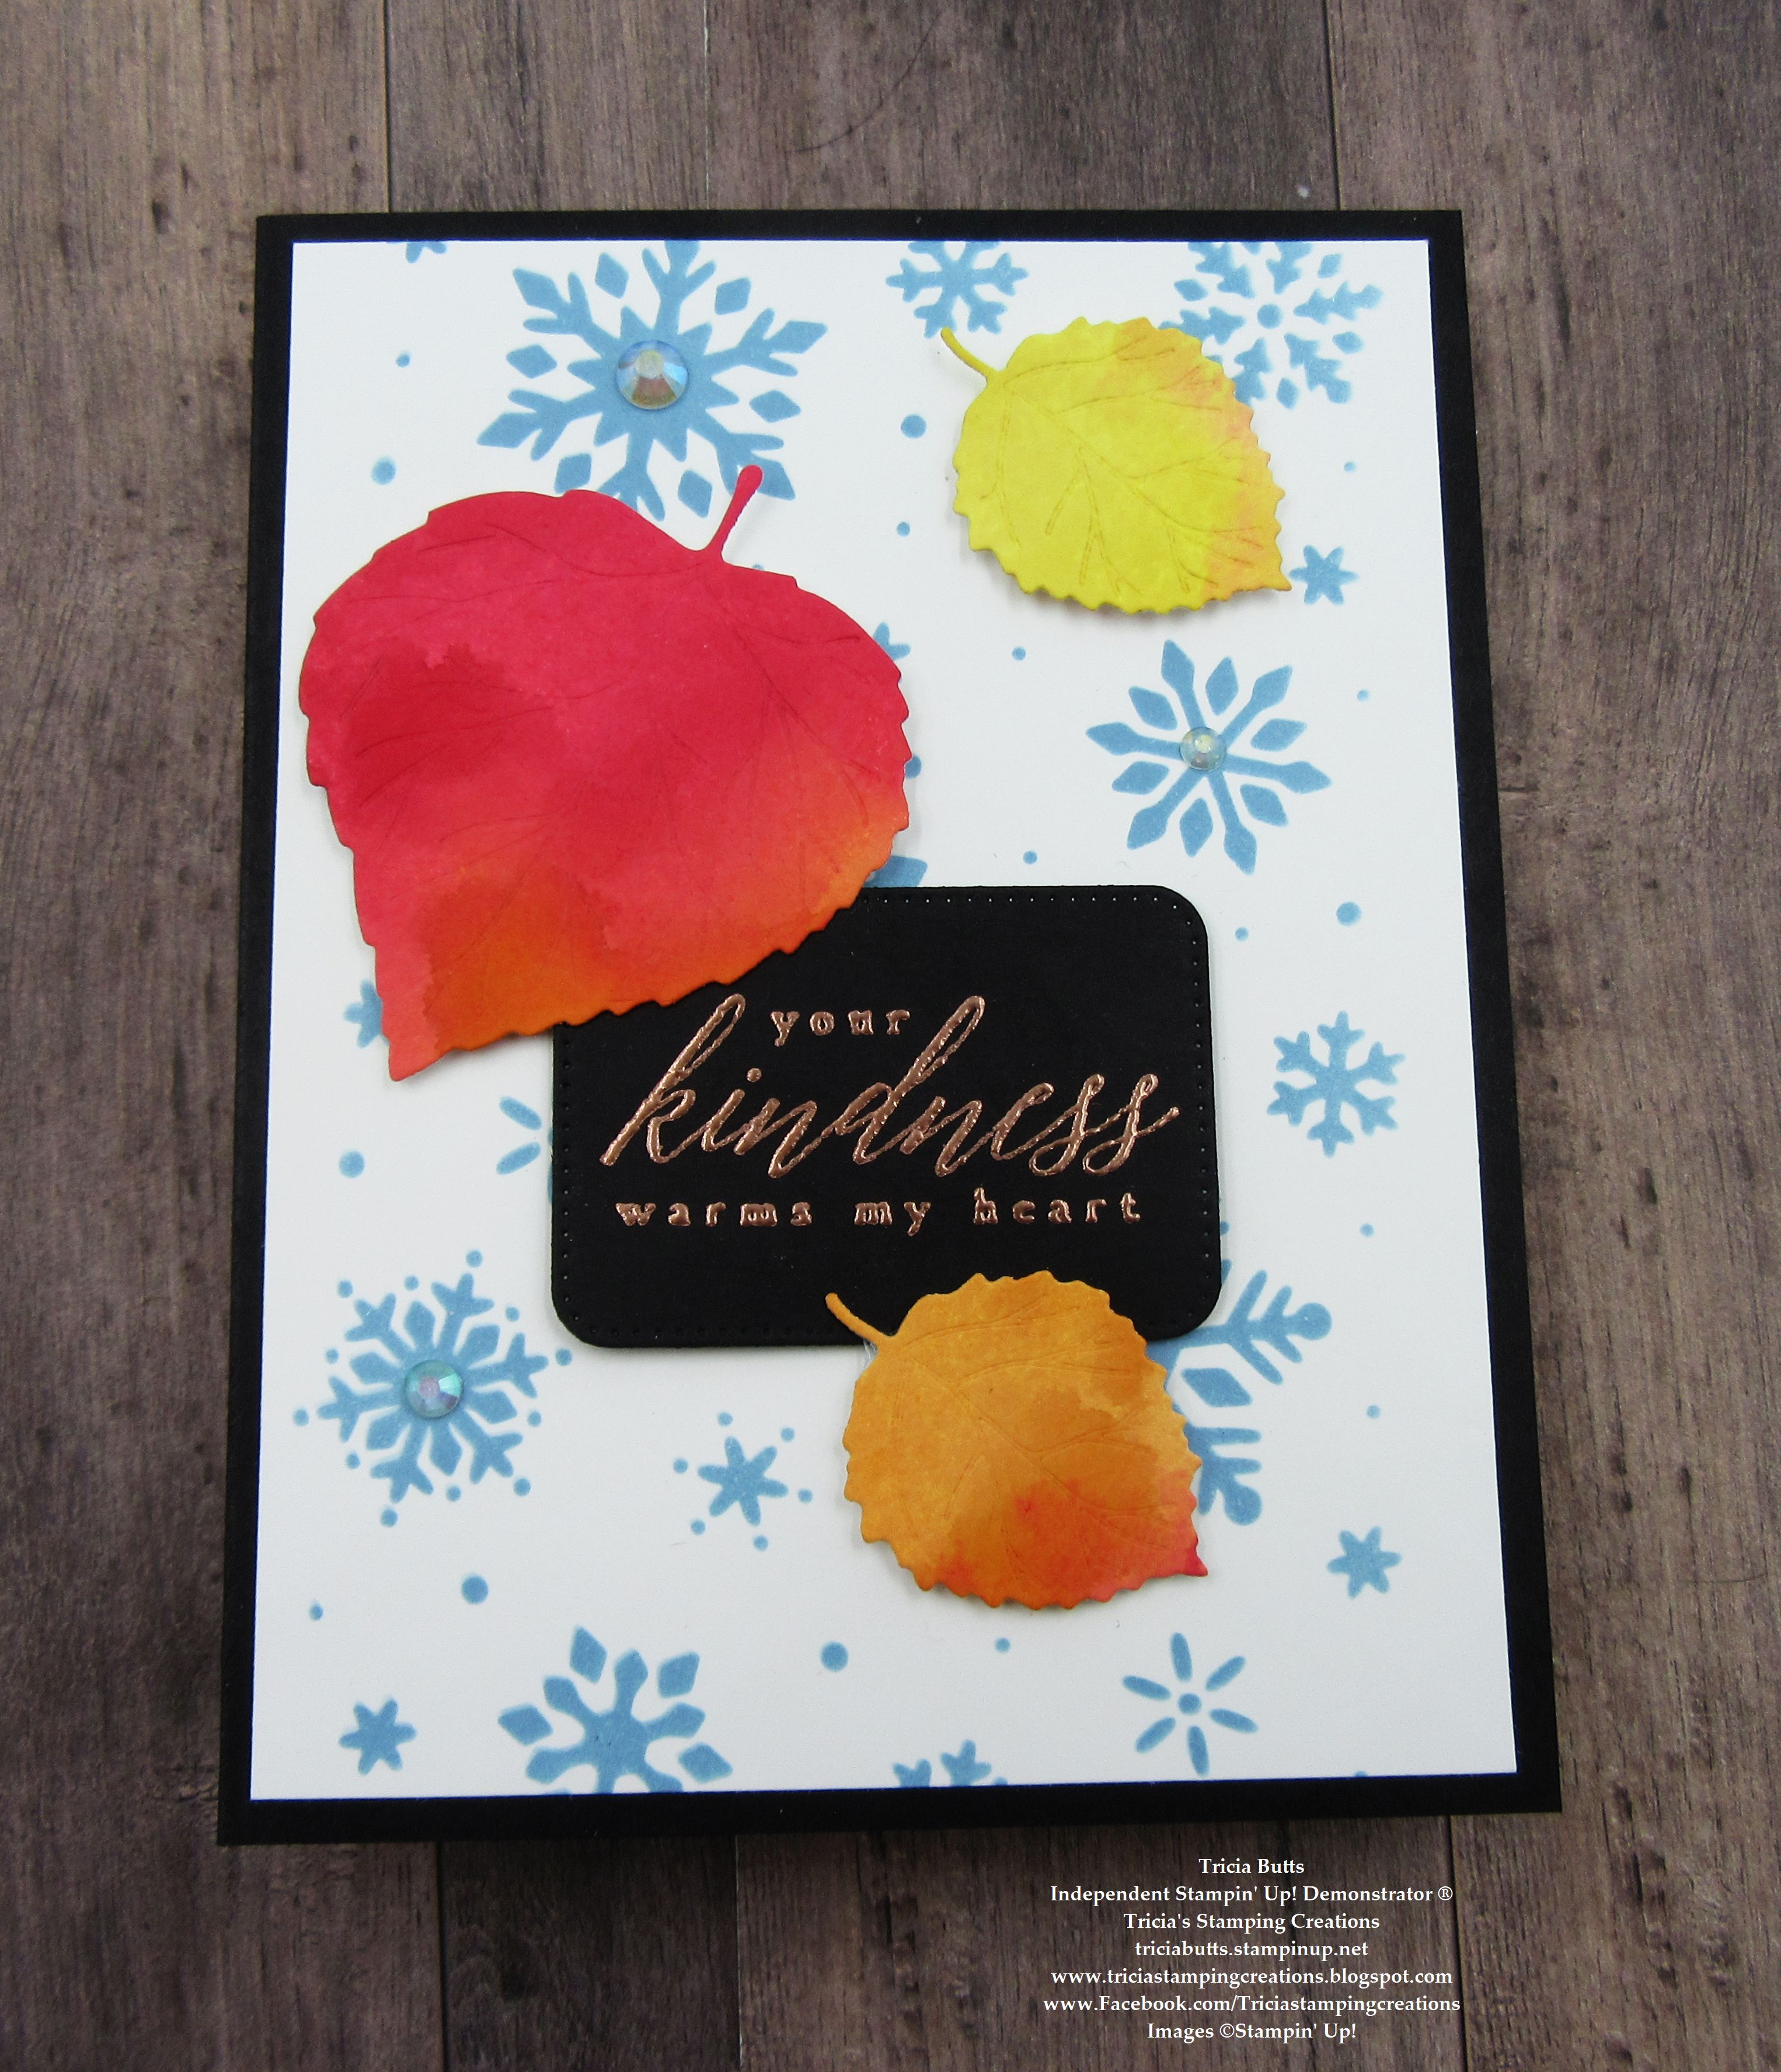
Today I thought I would show some love to some old favorites from the 2023-2024 Annual Catalog to create a Winter themed design. I used the Aspen Trees Dies to create the silhouette background and used Very Vanilla cardstock as the contrast for this card design. I used Gold accents to help lift the design and add a touch of elegance. The bird image has been colored using a Blender Pen and Pebbled Path Classic ink to give the look and texture of feathers. The sentiment label was created with my favorite Tailor Made Tags Dies to complete the design. This design would work well for so many occasions and would be a great masculine card design.
Products Used:
Perched In A Tree stamp set (item #159791)
Aspen Trees Dies (item #159798)
Tailor Made Tags Dies (item #155563)
Pebbled Path Cardstock (item #161722)
Very Vanilla Cardstock (item #101650)
Pebbled Path Classic Ink Pad (item #161648)
Versamark Pad (item #102283)
Metallics Embossing Powders (item #155555)
Gold & Silver 1/8" Trim Combo Pack (item #161633)
Pastel Adhesive Backed Sequins (item #160387)
Blending Brushes (item #153611)
Blender Pens (item #102845)
Stampin' Dimensionals (item #104430)
Measurements:
Pebbled Path Cardstock
Card Base - 8 1/2" x 5 1/2" (Scored at 4 1/4")
Card Front - 5 1/8" x 3 7/8" die cut with the Aspen Trees Dies
Tag die cut with the Tailor Made Tags Dies
Very Vanilla Cardstock
Background Layer - 5 1/4" x 4"
Bird image die cut with the Aspen Trees Dies
Sentiment Tag die cut with the Tailor Made Tags Dies
It took me a little while to come up with this card design. I wanted to showcase this wonderful color without having it be to overpowering and dull. I love the contrast between the Pebbled Path and Very Vanilla layers and the hints of Gold just help add that little sparkle that completes the design. The detailed die cut layer makes a great background silhouette. For the bird, I stamped the image with Pebbled Path Classic ink onto Very Vanilla cardstock and colored the image using a Blender Pen with Pebbled Path Classic ink to give the look and texture of feathers. To add some texture to the die cut layer, I blended Pebble Path Classic ink around the edges and over sections of the trees using a Blending Brush. I then stamped a speckled background on several sections of this layer with Versamark and heat embossed with Gold embossing powder to give the appearance of falling snow. For the sentiment, I heat embossed the image onto the Very Vanilla tag label with Gold embossing powder and layered it with a Pebbled Path tag, slightly off setting them at an angle. I added a piece of Gold Trim to the sentiment tag to coordinate with the Gold embossing. For a touch of bling, I added several Gold Pastel Adhesive Backed Sequins to finish off the design. So, what do you think? Have I convinced you to give Pebbled Path a try? I would love to hear what you think about his wonderful neutral color.
Thank you for taking the time to visit my blog. I hope that my card design will help inspire you to explore using Pebbled Path when creating your own projects. It really is a wonderful neutral and it works so well with so many other colors. 
Please take a moment to visit this week's Monochromatic Insta Hop over on Instagram here and see all the other amazing projects that my fellow Stampin' Up! Demonstrators have created. 

If you live in the U.S. and do not have a Stampin' Up! Demonstrator, please contact me and I would be happy to help you with your creative projects. You may also visit my Online Store to place your order and have it shipped to you. 

Until Next Time

Happy Stamping,

Tricia Butts
Independent Stampin' Up! Demonstrator

Like What You See? Visit My Online Store Here

Visit My Facebook Business Page for Updates & Ideas

Click here to Contact Me


More Sale-a-bration Products Available
For You To Earn Free With A Qualifying Order
Click Below For Details

Explore Your Creativity In 2024
With The January-April 2024 Mini Catalog
Click Below To Shop Now


Wednesday, November 8, 2023

Around The World On Wednesday November Blog Hop Fall Color Challenge


Welcome to the Around The World On Wednesday November Blog Hop and this month we have a color challenge to share with you. We have been challenged to create our project using colors from the beautiful Fall image below. Our wonderful Design Team will be sharing their projects and ideas to showcase the colors they chose from this design. 
For my card design, I chose to use the Balmy Blue, Real Red, Pumpkin Pie, Crushed Curry, Basic White and Basic Black from the challenge image. I wanted to show what Fall can be like here in Colorado. I chose to combine the snowflakes from the Abundant Beauty Decorative Masks with the die cut leaves from the Aspen Trees Dies to represent the beautiful Fall leaves and the unexpected snowstorms we can have here during this unpredictable season. 
Products Used:
Perched In A Tree stamp set (item #159791)
Aspen Trees Dies (item #159798)
Nested Essentials Dies (item #161597)
Abundant Beauty Decorative Masks (item #162331)
Basic Black Cardstock (item #121045)
Basic White Cardstock (item #159276)
Balmy Blue Classic Ink Pad (item #147105)
Real Red Classic Ink Pad (item #147084)
Pumpkin Pie Classic Ink Pad (item #147086)
Crushed Curry Classic Ink Pad (item #147087)
Versamark Pad (item #102283)
Metallics Embossing Powders (item #155555)
Blending Brushes (item #153611)
Stampin' Spritzers (item #126185)
Iridescent Rhinestones Basic Jewels (item #158130)
Stampin' Dimensionals (item #104430)
Measurements:
Basic Black Cardstock
Card Base - 8 1/2" x 5 1/2" (Scored at 4 1/4")
Sentiment Label die cut with the Nested Essentials Dies
Basic White Cardstock
Card Front - 5 1/4" x 4" Snowflakes added with Abundant Beauty Decorative Masks
Leaves die cut with the Aspen Trees Dies
This card design is a combination of different techniques. For the leaves, I used a Watercolor Smoosh technique, combining Real Red, Pumpkin Pie and Crushed Curry Classic inks and spritzing them with water to create an intense background on Basic White cardstock. After drying the cardstock with my heat tool, I die cut the leaves to create the beautiful Fall colors from the challenge image. For the background of my card design, I chose to use Balmy Blue Classic ink to represent the blue sky from the challenge image. I used the snowflakes mask with a Blending Brush to create the feeling of falling snow, which is not uncommon here in Colorado in the Fall. The sentiment was heat embossed with Copper embossing powder onto a Basic Black label die cut with the Nested Essentials Dies. For me, the Copper represented the metal frame of the Eiffel Tower. The Iridescent Rhinestones add a touch of bling to the snowflakes to create the reflection of the sunlight. This was a fun challenge and I loved taking the different colors from the challenge design to help create my card design. 
Thank you for taking the time to visit my blog. I hope that my card design will help inspire you to try creating your own beautiful projects using this color challenge. There are so many colors to choose from to help you create your own work of art. 
Now it's time to visit Theresa's blog and see what she has created for this month's Fall Color Challenge. Just click the Next button below to visit her blog or use the Roll Call List to find your way. We would love it if you would leave us a comment and let us know what you liked about our projects. I hope you enjoy the rest of our blog hop. 

Roll Call List

If you live in the U.S. and do not have a Stampin' Up! Demonstrator, please contact me and I would be happy to help you with your creative projects. You may also visit my Online Store to place your order and have it shipped to you. 

Until Next Time

Happy Stamping,

Tricia Butts
Independent Stampin' Up! Demonstrator

Like What You See? Visit My Online Store Here

Visit My Facebook Business Page for Updates & Ideas

Click here to Contact Me


New Online Exclusives Products
Now Available While Supplies Last
Click Below To Visit My Online Store

Send Holiday Treats
With The Warm Wishes Paper Pumpkin Kit
Click Below To Subscribe By November 10th

Get Creative For The Holidays
With The September-December 2023 Mini Catalog
Click Below To Visit My Online Store


Saturday, September 9, 2023

Stamping Inkspirations September Blog Hop Tic-Tac-Toe Challenge

 Welcome everyone to the Stamping Inkspirations September Blog Hop as we explore this month's Tic-Tac-Toe Challenge. With so many wonderful possibilities to choose from, I am excited to see what our Design Team has come up with to inspire you to get creative.
When I looked at this Tic-Tac-Toe board, it definitely put me in the mood for Fall. I chose to use the middle vertical row with Red, Leaves and Emboss but I must admit, I did add some of the other elements that were mentioned in other rows because I was having so much fun. My Fall themed card is a combination of beautiful colors and wonderful textures with a hint of Gold embossing to add an elegant touch.
Products Used:
Perched In A Tree stamp set (item #159791)
Aspen Tree Dies (item #159798)
Nested Essentials Dies (item #161597)
Abundant Beauty Decorative Masks (item #162331)*
Distressed Tile 3D Embossing Folder (item #162189)*
Early Espresso Cardstock (item #119686)
Crumb Cake Cardstock (item #120953)
Cherry Cobbler Cardstock (item #119685)
Pumpkin Pie Cardstock (item #105117)
Crushed Curry Cardstock (item #131199)
Early Espresso Classic Ink Pad (item #119686)
Crumb Cake Classic Ink Pad (item #147116)
Crushed Curry Classic Ink Pad (item #147087)
Pumpkin Pie Classic Ink Pad (item #147086)
Old Olive Classic Ink Pad (item #147090)
Cherry Cobbler Classic Ink Pad (item #147083)
Versamark Pad (item #102283)
Metallics Embossing Powders (item #155555)
Blending Brushes (item #153611)
Sponge Daubers (item #133773)
Linen Thread (item #104199)
Brushed Metallic Dots (item #156506)
Stampin' Dimensionals (item #104430)
Mini Glue Dots (item #103683)
*New Products in the September-December 2023 Mini Catalog
Measurements:
Early Espresso Cardstock
Card Base - 8 1/2" x 5 1/2" (Scored at 4 1/4")
Sentiment Label die cut with the Nested Essentials Dies
Crumb Cake Cardstock
Card Front - 5 1/4" x 4" Embossed with the Distressed Tile 3D Embossing Folder
Cherry Cobbler Cardstock
Large Leaf die cut with the Aspen Trees Dies
Crushed Curry Cardstock 
2 Small Leaves die cut with the Aspen Trees Dies
Pumpkin Pie Cardstock
2 Small Leaves die cut with the Aspen Trees Dies
I don't know about you, but I am ready for Fall. I love the beautiful colors associated with this season and I decided to go all out for this card design and have some fun. My color palette includes Cherry Cobbler, Pumpkin Pie, Crushed Curry, Old Olive, Crumb Cake and Early Espresso. For the card front, I started by using the leaves mask from the Abundant Beauty Decorative Masks and created a subtle background design using Crumb Cake Classic ink with a Blending Brush. I then randomly stamped over the background using the detailed dots image from the Perched In A Tree stamp set with Old Olive Classic ink, stamped off once. Next, I embossed this layer with the new Distressed Tile 3D Embossing Folder to add some wonderful texture. To bring out some of the embossed detail, I used a Sponge Dauber to apply some Early Espresso Classic ink over the raised embossing and around the edges. I love how this gives the background a vintage, distressed look. 
To create the focal design, I die cut the leaves and then used Sponge Daubers to add color around the edges and to help bring out the detail in the die cuts. I used Cherry Cobbler Classic ink on the large Cherry Cobbler leaf to deepen the color around the top and edges of the leaf. For the Crushed Curry leaves, I added Crushed Curry Classic ink to one of the leaves and Old Olive to the other leaf to create that wonderful variation of color you get as the leaves change in the Fall. For the Pumpkin Pie leaves, I sponged Pumpkin Pie Classic ink around the edge of one leaf and Cherry Cobbler around the edge of the other leaf to continue the variations in colors. The sentiment label was heat embossed using Gold embossing powder and I added it to the center of the card front with Stampin' Dimensionals. The leaves have been arranged to appear like they are falling off a tree and I layered the large Cherry Cobbler leaf over the bottom of the sentiment label and the Crushed Curry leaf slightly over the top edge to tie everything together. For embellishments, I wanted to keep it very simple, so I added a double bow tied with Linen Thread to the stems of the top leaves and Gold Brushed Metallic Dots to the sentiment label to finish off the design. I am so happy with how this card design turned out and can't wait to create more Fall projects with these beautiful colors and products. 
Thank you for taking the time to visit my blog. I hope that my card design will help inspire you try this Tic-Tac-Toe challenge and get excited about creating for Fall. There are so many wonderful options to choose from to help spark your creativity. 
Now it's time to visit Aurelie's wonderful blog and see what she has created with this month's challenge. Just click the Next button below or use the Roll Call List to find your way. We would appreciate it if you would leave us a comment and let us know how our projects inspired you. I hope you enjoy the rest of our blog hop. 

Roll Call List

If you live in the U.S. and do not have a Stampin' Up! Demonstrator, please contact me and I would be happy to help you with your creative projects. You may also visit my Online Store to place your order and have it shipped to you. 

Until Next Time

Happy Stamping,

Tricia Butts
Independent Stampin' Up! Demonstrator

Like What You See? Visit My Online Store Here

Visit My Facebook Business Page for Updates & Ideas

Click here to Contact Me


Get Creative For The Holidays & Beyond
With The September-December 2023 Mini Catalog
Click Below To Visit My Online Store


Monday, November 7, 2022

Kylie Bertucci's International Blog Highlights November 2022

Welcome to Kylie's International Blog Highlights for November as we share our projects and ideas to help inspire you. Our theme is Thank You cards and my fellow Stampin' Up! Demonstrators will be sharing some amazing cards to help spark your creativity and encourage you to send cards out to the people you appreciate in your life. 
Here in Colorado, we have experienced our first snow for the season and it briefly turned our neighborhood into a Winter Wonderland. It was so pretty to look at and thankfully, the sun came out soon afterwards and melted it all away, so I didn't have to drive in it. The beautiful scene of snow covering everything was my inspiration for today's card design. I chose to use the All Bundle Up stamp set with the adorable raccoon image and paired it with the Aspen Trees Dies to create my background. The snowy background is a piece of Storybook Gnomes Designer Series Paper and I love how the different shades of blue snowflakes peek between the trees. This fun card design is perfect for all ages and is sure to make someone smile.
Products Used:
All Bundled Up stamp set (item #159824)
Ranunculus Romance stamp set (item #157968)
Aspen Trees Dies (item #159798)
Essential Tag Punch (item #153607)
Storybook Gnomes Designer Series Paper (item #159615)
Night of Navy Cardstock (item #100867)
Basic White Cardstock (item #159276)
Smoky Slate Classic Ink Pad (item #147113)
Balmy Blue Classic Ink Pad (item #147105)
Pacific Point Classic Ink Pad (item #147098)
Balmy Blue Stampin' Blends Combo Pack (item #154830)
Smoky Slate Stampin' Blends Combo Pack (item #154904)
Basic Black Stampin' Blends Combo Pack (item #154843)
Tahitian Tide Stampin' Blends Combo Pack (item #159221)
Versamark Pad (item #102283)
Basics Embossing Powders (item #155554)
Clear Wink of Stella Glitter Brush (item #141897)
Heart Pearls (item #159190)
Sponge Daubers (item #133773)
Mini Stampin' Dimensionals (item #144108)
Measurements:
Night of Navy Cardstock 
Card Base - 8 1/2" x 5 1/2" (Scored at 4 1/4")
Sentiment Label punched out with the Essential Tag Punch
Basic White Cardstock
Card Front - 5 1/4" x 4" die cut using the Aspen Trees Dies
Card Layer - 5 1/8" x 3 7/8"
Story Book Gnomes Designer Series Paper
Background Layer - 5 1/8" x 3 7/8"
This pretty card design is made up several layers, which gives it depth and adds dimension to the design. For the die cut card front, I gently sponged the edges of the trees using Sponge Daubers and a combination of Smoky Slate, Balmy Blue and Pacific Point Classic inks to add some contrast color to the trees. I added the layer of designer series paper behind the die cut card front using Mini Stampin' Dimensionals, adding them to the trees and corners on the back of the card front. To add strength and stability, I added a layer of Basic White cardstock behind the layer of designer series paper and then attached the layers to the Night of Navy card base. The cute raccoon was stamped with Memento Tuxedo Black ink onto a scrap of Basic White cardstock and I used Stampin' Blends Markers to color it in. I fussy cut the raccoon out with Paper Snips and added it to the bottom right corner of the card front with adhesive. The sentiment tag was created by heat embossing the sentiment from the Ranunculus Romance stamp set with White embossing powder and I attached it to the left side of the card front with adhesive. To step up the card design, I added several of the Heart Pearls to the sentiment tag and I colored the hat and scarf with Clear Wink of Stella for a touch of shimmer. I love the frosty feeling that this color combination gives this card design and I think it is perfect for a Winter Thank You. 
Thank you for taking the time to visit my blog. I hope that my card design will help inspire you to create your own beautiful Thank You cards and send them out to family and friends. It's a wonderful way to show people how much you appreciate them.
I would love it if you would vote for my card design as part of this month's International Blog Highlights. Just click the Vote button below and click on the heart for my card (# 19) to choose my design. You can vote for up to 5 cards each day over the next week, so please come back and visit and share the love with my fellow Stampin' Up! Demonstrators.  We appreciate your support. 


If you live in the U.S. and do not have a Stampin' Up! Demonstrator, please contact me and I would be happy to help you with your creative projects. You may also visit my Online Store to place your order and have it shipped to you. 

Until Next Time

Happy Stamping,

Tricia Butts
Independent Stampin' Up! Demonstrator

Like What You See? Visit My Online Store Here

Visit My Facebook Business Page for Updates & Ideas

Click here to Contact Me


Get Creative For The Holidays
With The July-December 2022 Mini Catalog
Click Below To Visit My Online Store

Add A Touch Of Elegance To Your Projects
With The Fitting Florets Collection Available For A Limited Time
Click Below For More Details