Showing posts with label Adorable Owls stamp set. Show all posts

Tuesday, January 31, 2023

Paper Pumpkin Possibilities January Blog Hop Key To My Heart


Welcome to the Paper Pumpkin Possibilities January Blog Hop as we share alternate projects created with the Key To My Heart Kit. Our talented Design Team members are excited to share with you how they have used the supplies in this wonderful kit to create projects to help inspire you to think outside the box. 
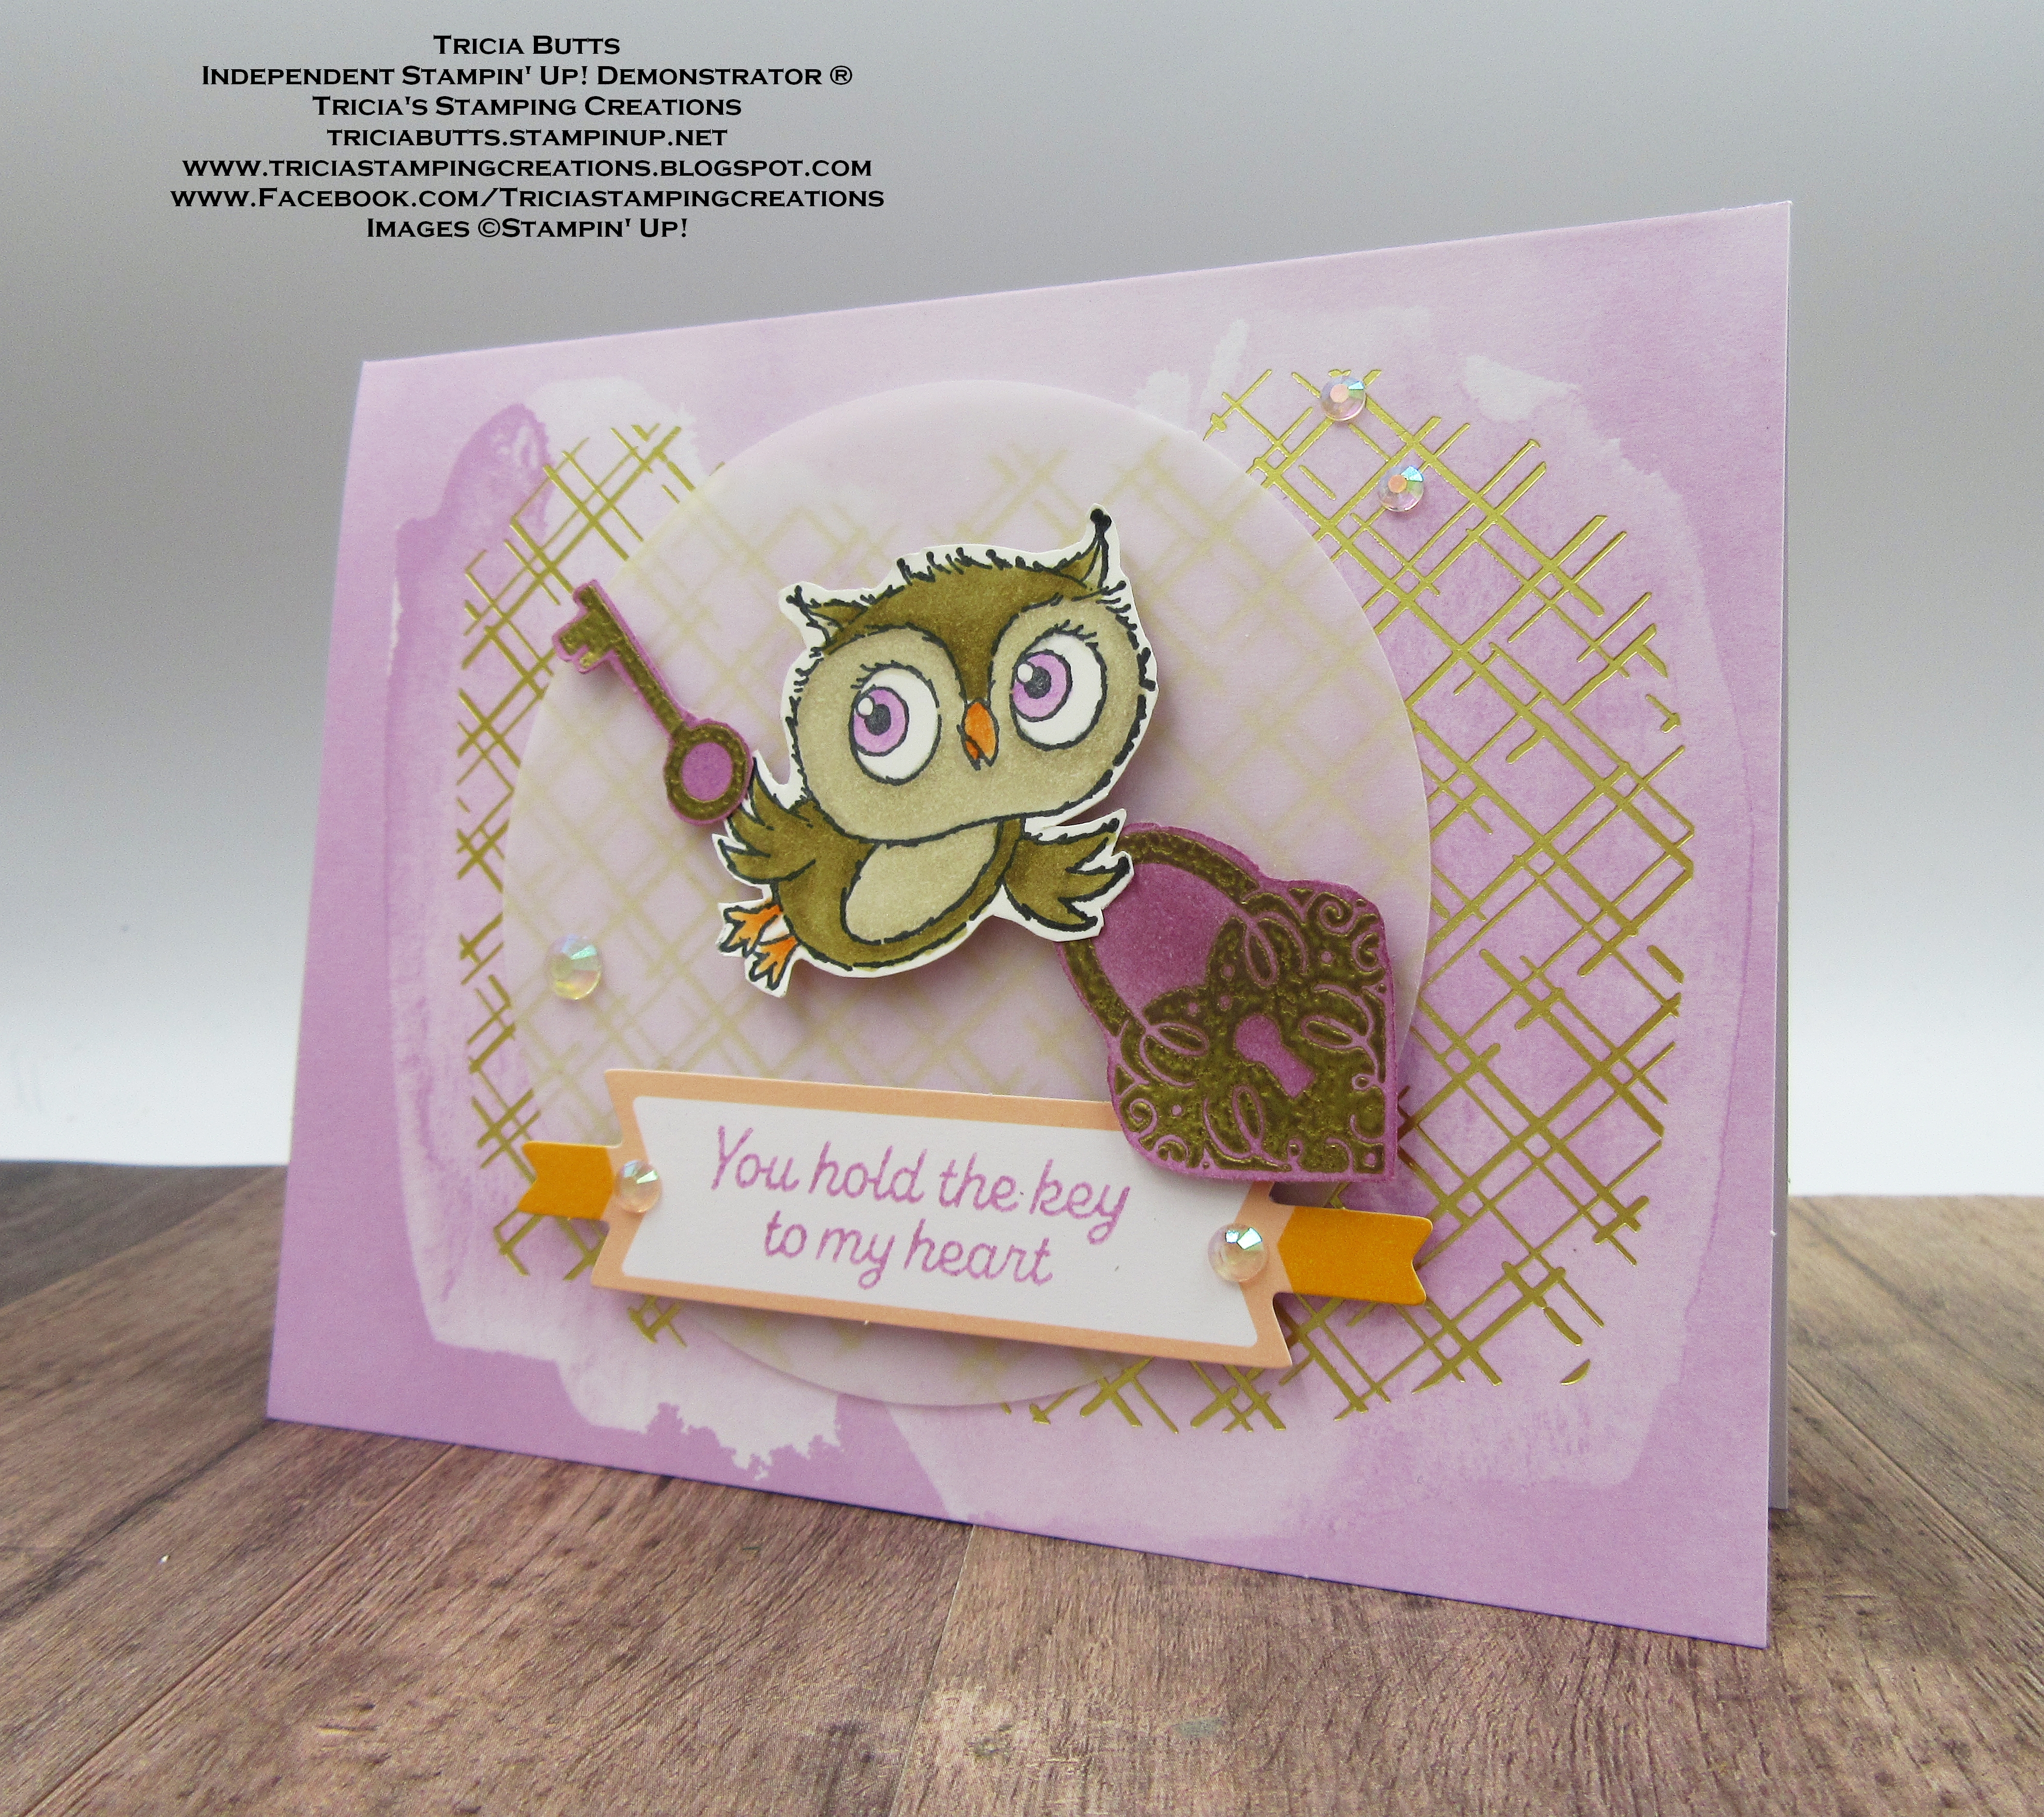
For my alternative card design, I decided to pair the Adorable Owls stamp set (Level 1 Sale-a-bration Reward) with the supplies in the Key To My Heart Kit. I love the whimsy of this cute stamp set, which you can earn free during Sale-a-bration with a qualifying order, and thought it would fit perfectly with the pretty Fresh Freesia card base in the kit. Most of the supplies I used came from the kit and I chose to heat emboss two of the images from the exclusive stamp set with Gold embossing powder. 
Products Used:
Paper Pumpkin January 2023 Kit
Adorable Owls stamp set (item #160269) Sale-a-bration 
Level 1 Reward
Versamark Pad (item #102283)
Metallics Embossing Powders (item #155555)
Memento Tuxedo Black Pad (item #132708)
Crumb Cake Stampin' Blends Combo Pack (item #154882)
Soft Suede Stampin' Blends Combo Pack (item #154906)
Pumpkin Pie Stampin' Blends Combo Pack (item #154897)
Fresh Freesia Stampin' Blends Combo Pack (item #155518)
Sponge Daubers (item #133773)
Iridescent Rhinestones Basic Jewels (item #158130)
Measurements:
From The Paper Pumpkin Kit
Fresh Freesia Card Base
Large Vellum Circle
Sentiment Label
Basic White Cardstock
Stamped Owl image from the Adorable Owls stamp set fussy cut
Fresh Freesia Cardstock
Stamped and heat embossed heart and key images from the exclusive stamp set in the kit, fussy cut
To create this card design, I added the large vellum circle to the center of the card front using several of the Mini Glue Dots from the kit. I stamped the owl image using Memento Tuxedo Black ink onto a scrap of Basic White cardstock and colored the image with Stampin' Blends Markers. I then fussy cut the image out with Paper Snips. For the heart shaped lock and key, I stamped the images onto a scrap of Fresh Freesia cardstock with Versamark ink and heat embossed the images with Gold embossing powder, before fussy cutting the images out. I then used the Fresh Freesia ink spot from the kit with a Sponge Dauber and gently sponged over the the lock and key to add some shading. For the sentiment, I stamped the image using the Fresh Freesia ink spot onto one of the labels from the kit. to assemble the kit, I added Stampin' Dimensionals to the back of the owl, lock and key and attached them to the Vellum circle, with the lock and key placed slightly under each of the wings. For the sentiment label, I attached it to the bottom of the Vellum circle with Stampin' Dimensionals, centering it on the front of the card. For a touch of bling, I added several Iridescent Rhinestones Basic Jewels to the card front to finish off the design. I love how soft and pretty this card design looks and how well this stamp set combines with this kit. If you wanted to, you could choose to use one of the sentiments from the Adorable Owls stamp set as an option for this card design.
Thank you for taking the time to visit my blog. I hope that my card design will help inspire you to explore this amazing kit and create your own unique alternative projects. There are so many ways to mix and match other products with this kit to create fun designs. 
Now it's time to visit Debbi's blog and see what she has created with this kit. Just click the Next button below to visit her blog. We would love it if you would leave us a comment and let us know what you liked about our alternative projects. I hope you enjoy the rest of our blog hop. 

If you live in the U.S. and do not have a Stampin' Up! Demonstrator, please contact me and I would be happy to help you with your creative projects. You may also visit my Online Store to place your order and have it shipped to you. Not a Paper Pumpkin subscriber? Click on the link below this post to sign up to receive the February Sunshine & Smiles Kit by February 10th. This sweet kit coordinates with the Rain or Shine Suite Collection in the January-April 2023 Mini Catalog for even more creative options. 

Until Next Time

Happy Stamping,

Tricia Butts
Independent Stampin' Up! Demonstrator

Like What You See? Visit My Online Store Here

Visit My Facebook Business Page for Updates & Ideas

Click here to Contact Me


Send A Little Sunshine
With The Sunshine & Smiles Paper Pumpkin Kit
Click Below To Subscribe By February 10th

Earn Free Sale-a-bration Products
With Qualifying Prepaid Paper Pumpkin Subscriptions
Click Below For More Details


Saturday, January 14, 2023

Stamping Inkspiration January Blog Hop Glimmer & Shine Sketch Challenge


Welcome to the Stamping Inkspiration January Blog Hop as we start off 2023 with a Sketch Challenge with some Glimmer and Shine. Our wonderful Design Team members will be sharing their projects and ideas to help inspire you to get creative for the New Year. We will each be using the sketch below to create our projects as well as incorporating some glimmer and shine to add some bling. 

For my card design today, I thought I would have some fun with two of the new Sale-a-bration Rewards available to earn free with a qualifying order. The Adorable Owls stamp set (Level 1 Reward) is so much fun to create with and pairs beautifully with the Dandy Designs Designer Series Paper (Level 2 Reward). I decided to create a fun birthday card using today's sketch and add some bling using Gold embossing, Gold Metallic Specialty Paper and the new Iridescent Pastel Gems in the new January-April 2023 Mini Catalog. This sweet card design is perfect for people of all ages and is sure to bring a smile to the recipient's face. 
Products Used:
Adorable Owls stamp set (item #160269) Sale-a-bration Level 1 Reward
Dandy Designs Designer Series Paper (item #160836) Level 2 Reward 
Stylish Shapes Dies (item #159183)
Gold & Rose Gold 6"x6" Metallic Specialty Paper (item #156844)
Coastal Cabana Cardstock (item #131297)
Balmy Blue Cardstock (item #146982)
Basic White Cardstock (item #159276)
Versamark Pad (item #102283)
Metallics Embossing Powders (item #155555)
Crumb Cake Stampin' Blends Combo Pack (item #154882)
Soft Suede Stampin' Blends Combo Pack (item #154906)
Balmy Blue Stampin' Blends Combo Pack (item #154830)
Pool Party Stampin' Blends Combo Pack (item #154894)
Pale Papaya Stampin' Blends Combo Pack (item #155519)
Clear Wink of Stella Glitter Brush (item #141897)
Mini Stampin' Dimensionals (item #144108)
Iridescent Pastel Gems (item #160429)
Measurements:
Coastal Cabana Cardstock
Card Base - 8 1/2" x 5 1/2" (Scored at 4 1/4")
Large Stitched Square die cut with the Stylish Shapes Dies
Balmy Blue Cardstock
Small Stitched Label die cut with the Stylish Shapes Dies
Basic White Cardstock
Medium Stitched Square die cut with the Stylish Shapes Dies
Owl heat embossed and fussy cut from the Adorable Owls stamp set
Dandy Designs Designer Series Paper
Card Front - 5 1/4" x 4"
Gold Metallic Specialty Paper
Strip - 1" x 5 1/4"
This cute card design is easy to assemble and would work well for a variety of occasions. I chose the colors for my card design from the piece of designer series paper from the Dandy Designs Designer Series Paper. I attached the piece of designer series paper to the card front and then added the strip of Gold Metallic Specialty Paper to the card front, lining it up slightly off center, using the dots in the paper design. For the focal layers, I adhered the Basic White square to the Coastal Cabana Square and added it to the card front with Mini Stampin' Dimensionals, lining up the corners with the Gold paper. 
To create the owl, I heat embossed the image with Gold embossing powder onto a scrap of Basic White cardstock and colored it in with Stampin' Blends Markers. I then fussy cut the owl out and adhered it to the center of the Basic White square. For the sentiment, I heat embossed the image onto a scrap of Balmy Blue cardstock and die cut it out with the smallest sentiment die from the Stylish Shapes Dies. I attached the sentiment die using Mini Stampin' Dimensionals. Using the Clear Wink of Stella, I colored in the owl's eyes and party hat to give them a touch of shimmer and I added several of the Iridescent Pastel Gems for a little bling. I love how this cute card turned out and how the different elements add that touch of glimmer and shine to the card design. 
Thank you for taking the time to visit my blog. I hope that my card design will help inspire you to get creative and add a little bling to your projects. There are so many wonderful options to explore with the new January-April 2023 Mini Catalog. Don't forget to earn your favorite Sale-a-bration Rewards for free with a qualifying order. 
Now it's time to visit Karen's blog and see what she has created with this month's challenge. Just click the Next button below to visit her blog or use the Roll Call List to find your way. We would appreciate it if you would leave us a comment and let us know how our projects inspired you. I hope you enjoy the rest of our blog hop. 
If you live in the U.S. and do not have a Stampin' Up! Demonstrator, please contact me and I would be happy to help you with your creative projects. You may also visit my Online Store to place your order and have it shipped to you. 

Until Next Time

Happy Stamping,

Tricia Butts
Independent Stampin' Up! Demonstrator

Like What You See? Visit My Online Store Here

Visit My Facebook Business Page for Updates & Ideas

Click here to Contact Me


Celebrate The New Year
With The January-April 2023 Mini Catalog
Click Below To Visit My Online Store

Earn Exclusive Free Products
During Sale-a-bration
Click Below For More Details

Join The Stampin' Up! Family
Choose From 3 Amazing Options
Click Below For More Information