Thursday, May 20, 2010

Simply Elegant Gift Box

Hi Everyone,
Well, it is another crazy day so this will be a quick post and I will hopefully be back later to post another card share for Saturday's Creative Card Buffet. My eldest son has a doctor's appointment this afternoon and I have no idea how long it might take.
So, today I thought I would share with you a 3D project that I made in preparation for Mother's Day. This sweet little box would be perfect for anyone making Teacher Gifts ready for the end of year and you can place notecards inside it or chocolate as a sweet treat.
The top and bottom shape of the box are creating using the Big Shot and the Top Note die (exclusive to Stampin' Up) and I embossed the top piece again using the Big Shot but this time with the Finial Press Textured Impressions Embossing Folder (another Stampin' Up exclusive).
I decorated the top with a pretty 3 dimensional flower created using two scalloped circles punched with the Scalloped Circle punch. I used the faux suede method to separate the layers of each of the scalloped circles so that I had 4 pieces altogether. I then inked the edges of each of the circles and poked a hole through the center of each one with my Paper Piercer. Next I placed a gold brad through the center of all 4 scalloped circles and folded the legs back to anchor it. To create the dimension of the flower, I scrunched each scalloped circle up around the brad to create a blossom similar to a carnation. The leaves were created with the Little Leaves Sizzlit with the Big Shot.
To create the box, I used the tutorial here on Splitcoast Stampers by Angie Tieman. The wonderful thing about this tutorial is that not only does it provide you with written instructions and photos, but it also has a short video clip at the bottom of the page if you are a visual learner (like me).
This gift box can be personalized to suit any occasion and is a wonderful way to surprise someone special.
I hope you enjoyed this project share for today. As you can see, paper crafting is not limited to just cards and scrapbook pages. There are so many possibilities out there and I hope this one helped to inspire you to try making one for yourself.
Until Next Time.
Tricia Butts

Wednesday, May 19, 2010

Creative Card Buffet: Day 3 Card Share

Hi Everyone,
I am back to share with you two more card designs that will be available to make during Saturday's Creative Card Buffet. Once again, these cards demonstrate how different colors and designs can suit different occasions and how you can create cards to suit the special people in your life.
The first card is bold, bright and happy. With this card design you will get the opportunity to try out the new Stampin' Around Builder Wheels that are in the new Summer Mini Catalog. This new product allows you to mix and match these new wheels to create your own personal design to suit your card. The two wheels we will be using in this card are So Many Stars and Candle Crazy, and they can be used with the Wheel Spindle and Spacers kit with the Stampin' Around Jumbo Wheel Handle. These Builder Wheels are also great for creating borders and backgrounds for your scrapbook pages.
The Texture for this card is created with the new Square Lattice Textured Impressions Embossing Folder with the Big Shot. I just love this new embossing folder and it is fun to experiment with using the embossed and debossed sides for different effects.
The second card is soft, subtle and serene. Unfortunately the photo just doesn't do this card justice, but no matter how I tried I just couldn't seem to capture the beauty of this card. The card design is created with the new Elements of Style stamp set from the new Summer Mini Catalog and the images are heat embossed using Bashful Blue Craft ink and Clear Embossing powder. The subtle color to the floral design is achieved using the Stampin' Pastels. If you have never used Stampin' Up's Pastels before, you will love using them with this card.
So there you have it. I hope you have enjoyed today's peek at Saturday's Creative Card Buffet. I hope you will come and join me for a fun and relaxed time with me in my home studio. Please contact me to reserve your spot.
Until Next Time.
Happy Stampin',
Tricia Butts

Saying Goodbye to Color Favorites

Hi Everyone,
Today I wanted to share a card that I created using one of my favorite colors, Barely Banana, which will be retiring as of June 30th. I love this shade of yellow and I was so happy with how this card turned out. I also used Crushed Curry Classic Ink which is one of the current In Colors that will also be retiring June 30th and I loved the way the two tones of yellow combined to create this sunny card.
The card is a traditional 4 1/4 x 5 1/2 size and I used Barely Banana cardstock to create the card base. I then stamped the background with the En Francais Background stamp (item #109521) using the Crushed Curry Classic ink. Next I took a piece of Whisper White cardstock and I used the Scallop Trim Border punch (hopefully you got this during Sale-a-bration) and created the border on both sides. To add some texture to the cardstock, I then used the Finial Press Textured Impressions Embossing Folder with my Big Shot to emboss the Whisper White cardstock.
The focal point of the card was created with Barely Banana cardstock using the Cherry Blossom Embosslit with my Big Shot, which does an amazing job of cutting and embossing the flower at the same time. I then used a sponge dauber and applied Crushed Curry Classic ink to the edges of the flower and also in the center embossed area to give it depth.
Next I took my paper piercer and poked a hole in the center and added my gold brad. Then I decided my flower need a little sparkle and bling. I used my two way glue pen and traced around the outer edge of the flower petals and the center of the flower and sprinkled the flower with Dazzling Diamonds.
Now it's assembly time! Using Snail adhesive I attached the embossed Whisper White cardstock to my card base and then added my glittery, embossed flower to the center of the Whisper White cardstock using a glue dot.
The final finishing touch is the sentiment and I chose my favorite stamp set, Teeny Tiny Wishes and stamped the Happy Birthday in Barely Banana Classic ink on Whisper White cardstock. I then punched it out using the Small Oval Punch and adhered it to the lower part of the card with Snail adhesive.
This is a relatively quick and easy card to put together and it would look great using other color combinations. The elements of this card could also be used to create a wonderful look for your scrapbook pages by providing dimension and texture without a lot of bulky embellishments.
I hope you have enjoyed today's card share and I hope it will help to inspire you with your crafting projects. Remember, Stampin' Up is retiring 30 of its colors June 30th, so hurry and place your order now before they disappear.  There has already been a huge demand for a lot of the items and as of June 1st, it will they will be available while supplies last, so please don't leave your order until the last minute and be disappointed.
Contact me today to place your order or visit my Online Store to place your order. To see the list of retiring colors click here to download the PDF file or click on the icon in my sidebar.  You can also find the PDF file with the details of the new color collections for the new catalog here and also in my sidebar.
Until Next Time.
Happy Stampin',
Tricia Butts


Tuesday, May 18, 2010

Creative Card Buffet: Day 2 Card Share

Hi Everyone,
As promised, I have returned with another card share showcasing this Saturday's Card Buffet. Today I have decided to share two of the card designs that will be available to help show you the variety of cards that I provide with my classes.
With Father's Day just around the corner, I thought it would be a great opportunity to share a card design that is perfect for the men in our lives. This card is created with the Motorcycle stamp from the new Summer Mini catalog and the textured background is created with the new Lattice Square Textured Impressions Embossing folder. You can personalize this card with the sentiment of your choice to suit the occasion.
The second card I want to share with you today is as feminine as the first card is masculine. This pretty pink card is created using the new Watercolor Trio stamp set from the Summer Mini Catalog. The tone on tone look gives the card a soft and pretty look. This card design works well for many occasions whether it is a birthday, Friendship or even a Get Well card. The choice is yours.
I hope you have enjoyed today's Card Buffet card shares and would love to have you join me this Saturday for a fun and relaxed class. Visit here to for details. Please contact me today to reserve your spot. I look forward to seeing you soon.
Until Next Time.
Stampin' Hugs,
Tricia Butts
P.S. Don't forget to visit tomorrow to see more card designs available at this month's Creative Card Buffet.


Motorcycle 117657 Price: $8.95

Set Quantity: 1

Watercolor Trio -
Clear-Mount Stamp 120084

Price: $16.95
Wood Mount Stamp 117050

Price: $22.95
Set Quantity: 7

Fellowship with Crafts

Hi Everyone,
Hope you are all enjoying a beautiful Spring day. It is a gloomy, overcast sort of day here in Northglenn but at least it is not cold, so I am happy. Colorado weather tends to be like a yo-yo, constantly up and down, but never one for very long before it changes again. I think it reflects my life at the moment, lol.
Today I wanted to share with you some simple card designs that I came up with last week. We will be creating these cards at our Church's Womens Group Meeting tonight and I am so excited to share them with the group. We are making early preparations for our Holiday Craft Bazaar in the Fall and we will be taking turns in creating items with different crafts to sell at the Bazaar.
The first card is created using the Medallion stamp as the focal point of the card. The sentiment is from my favorite set, Teeny Tiny Wishes. This card is so versatile and can be created in a variety of colors and what ever sentiment you would like to create a simple card set.
The second card I have to share today is created with the new stamp set, Elements of Style, that can be found in the new Summer Mini Catalog. This set is already a favorite of mine and I am enjoying experimenting with all the different ways that I can use this stamp set. To add some texture to the card, I embossed the stamped image with the new Sizzix Square Lattice Textured Impressions Embossing folder (available exclusively from Stampin' Up) using the Big Shot and it gives the white cardstock the look of woven fabric. The sentiment is from another new stamp set, Watercolor Trio, which can also be found in the Summer Mini Catalog.
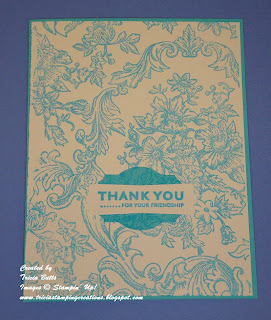
The final card I have to share with you is created with one of Stampin' Up's large background stamps. Bella Toile is a wonderful design and I love the way you can create a card where the background is the main focus of the card. The sentiment is from the stamp set Upsy Daisy. I wanted to have it stand out without taking away from the background so I used the Designer Label punch to create a matte and I stamped it with the Bella Toile stamp to create a tone on tone pattern. Then I punched out the stamped sentiment using the Modern Label punch and matted them together.  I chose to place the sentiment towards the center of the card, but you could position it wherever you would like.
Each of these cards can be stepped up and enhanced by adding embellishments such as ribbons, brads or even another stamped image and it will give you a completely different look. I chose to create these cards using a monchromatic theme, but they could be just as easily created with a combination of colors.
Another interesting idea is that each of these card layouts would work well on a scrapbook page to enhance your photos and personal memories. Stamps can be used to create backgrounds for your pages as well as focal points and embellishments to accent your photos.
I hope you have enjoyed today's card share and I hope I have helped to inspire you in your own projects whether they are cards, scrapbook pages or crafting ideas.
Until Next Time.
Stamping' Hugs,
Tricia Butts

Monday, May 17, 2010

Creative Card Buffet - Summer Mini Style

Hi Everyone,
With the release of the new Summer Mini Catalog and all the wonderful products that it contains, I decided that this month's Creative Card Buffet would be a great opportunity to showcase how to use these new products.
Today's card share is one of the card designs available for this month's Card Buffet and showcases the stamp set Sentimental Journey and is accented with a brad from the Circle Designer Series Brads that you can earn free with the purchase of Sentimental Journey stamp set.
This stamp set is so versatile and works well for cards and scrapbook pages. With Father's Day less than a month away, this stamp set would be perfect to create that special Father's Day card and this would also work well as a Graduation or Retirement Card.
Think of all the wonderful scrapbook pages you could create using this set or choose a special moment and create a page to be framed and hung on the wall.
Like this card? Then I hope you will join me this Saturday at my home studio to create this card as well as other wonderful designs using the new products from the Summer Mini Catalog. Visit my Events Calendar for further details.
Tomorrow I will be sharing another card design that will be available at this month's Creative Card Buffet, so I hope you will return soon to see what I have to share.
Have a wonderful day.
Until Next Time.
Stampin' Hugs,
Tricia Butts

Sentimental Journey - Clear-Mount Stamp 120075 Price: $17.95
                                 Wood Mount Stamp 118513  Price: $23.95                                  Set Quantity: 8


May is National Scrapbooking Month

Hello Everyone,
Sorry I have been MIA for so long. April was a crazy month and this month I am chasing time with end of school activities, so I apologize for not posting to my blog for the past month. Only 2 more weeks of school and then things should calm down a bit, I hope.

May is National Scrapbooking Month and Stampin' Up! has a fantastic special to celebrate and help you with your papercrafting projects.
Just purchase a qualifying scrapbooking stamp set (see list below) or the My Digital Studio software and receive a FREE package of Designer brads--choose from four designs!

Qualifying Stamp sets


Page     Description   Wood-Mount Item   Wood-Mount Price  Clear-Mount Item  Clear-Mount Price

81     Extreme Elements    115181                     $26.95                      ---                            ---
119   Framed with Love** 114389                    $27.95                      ---                            ---
128 Certified**               113706                   $27.95                      ---                            ---
129 Circle Circus               115778                  $28.95                       ---                            ---
12* Elements of Style        118611                   $27.95                     120045                    $19.95
13* Memento                    119910                   $27.95                     120105                    $19.95
13* Elements de style        119900                   $27.95                     120099                    $19.95
14* Rough Type             118659                  $26.95                     120072                    $18.95
22* Sentimental Journey    118513                   $23.95                     120075                    $17.95
25* First Day                    118521                  $23.95                     120051                     $17.95
25* Camino a la Escuela    120152                  $23.95                     120154                     $17.95
*From Summer Mini Catalog
**Last Chance stamp set!
My Digital Studio software
Page   Description             Item        Price
32*      My Digital Studio 118108    $79.95
*From Summer Mini Catalog
Designer brads (free with purchase of qualifying stamp set or My Digital Studio)
Page  Description                  Item  Retail Price  Price with Qualifying Purchase
179   Flower Designer brads 112579     $5.95      FREE
179 Filigree Designer brads   112577    $5.95       FREE
179 Circle Designer brads     112571    $5.95       FREE
179 Star Designer brads        112572   $5.95       FREE

Don't forget, the stamp sets Certified and Framed with Love will both retire soon and will appear on the Last Chance List that will be released June 1st. They can be found in the current 2009-2010 Idea Book & Catalog.
Plus, there are some great new stamp sets in the new Summer Mini Catalog that will be perfect for your Summer crafting projects and the designer brads can provide the finishing touch for your cards, scrapbook pages and crafting projects. Don't have a copy of the new Summer Mini yet? Please contact me and I will be happy to send one out to you or you can download a free digital copy Here or click on the icon located in my side bar.
Hope you all have a great day.
Until Next Time.
Stamping Hugs,
Tricia Butts

Tuesday, April 6, 2010

Join Me for April's Creative Card Class - Saturday, April 10th

Hi Everyone,
Well, in all the excitement I almost forgot to tell you about this month's Creative Card Class. We will be making 5 High Quality cards that you can use for the wonderful ladies in your life. You can choose to create cards for Mother's Day, Birthday, Thinking of You, Thank You etc. The choice is yours. 
This is a great opportunity to play with some of the colors that will soon retire, to see if you like them enough for your own collection.
Once again, there will be two class times available:
Morning: 10am - 12noon
Afternoon: 1pm - 3pm
This is a fun and relaxing class. No stress allowed! We will also be trying out some Two Step Stamping as part of April's special promotion, so it really is a great opportunity to come and play and learn something new. Plus, you get to take home 5 fabulous cards that you made yourself.
Tomorrow I will post sneak peeks of the card designs we will be making, just to tempt you (I hope, lol).
Please contact me to reserve your spot and don't forget to bring a friend to share the fun with you.
Until Next Time.
Stampin' Hugs,
Tricia Butts

Stampin' Up announces its Color Renovation

Hello Everyone,
Well, I had planned to share a project with you today but that has been bumped for some exciting breaking news from Stampin' Up.
Starting with the new 2010-2011 Idea Book & Catalog, Stampin' Up will launch its new Color Renovation consisting of 4 Color Collections. Each collection will consist of 10 colors to give us 40 core colors.
Here is the list of the 4 new color collections will be available July 1st, 2010. The new collections consist of 25 current colors, 10 returning In Colors (including current In Colors Melon Mambo, Soft Suede & Rich Razzleberry) and 5 new colors. (Click download to save this file to your desktop or click print to print a copy).
In addition, July 1st will also see the release of the new In Colors and the great news is that they will be available for 2 years instead of one! Stay tuned for further updates as we get closer to the new catalog!
Sadly, this also means we must say goodbye to some of our old favorites.
Here is the list of the colors that will be retiring June 30, 2010. (You can save this PDF file to your desktop by clicking download or print out a copy by clicking print.) In addition to this list, Basic Brown and the three remaining current In Colors: Crushed Curry, Bermuda Bay & Dusty Durango will also be retiring.
The retirement of these colors means that any inks, reinkers, cardstock, embellishments (ribbons, brads, buttons etc), Stampin' Write Markers, Water Color Crayons and Pastels in these colors will retire June 30th.
These colors will be available while stocks last, so if you see any colors that you would love to own, contact me to place your order before they disappear. Also, if you have any questions about this new development, please contact me and I will be happy to help you.
With all of these exciting changes, I will be posting projects in coming weeks that will feature some of the current colors that will be retiring so that you can get a chance to say goodbye to them and decide if it is something you would like to add to your collection.
I hope you are all as excited as I am about the new changes that are coming to Stampin' Up! This will provide you with new, updated colors that are in keeping with current trends and wonderful new options for your creative projects.
Until Next Time.
Happy Stampin',
Tricia Butts

Monday, April 5, 2010

The Birds are Back!

Hello Everyone,
I hope you all had a wonderful Easter with family and friends. I am sorry I have been AWOL the past few days but I what I thought was just allergies has turned into a nasty cough and my voice has practically disappeared. Let me tell you, it has made life challenging with my 4 kids, lol.
Today I thought I would share with you a card that I created with Stampin' Up's new Extra Large Two-Step Bird Punch and the stamp set, Vintage Vogue, both from the Occasions Mini Catalog. Did you know that April is the last month to order from the Occasions Mini? Time really has flown by (sorry, bad pun) and I can't believe that we will soon have to say goodbye to all the wonderful products available in this catalog.
This card is a great reminder that Spring has returned with the two cute little birds perched on the card so cheerfully. I chose to use Melon Mambo cardstock for the card base and stamped the large flower from the Vintage Vogue stamp set all over the card front with Melon Mambo Classic ink for a tone on tone pattern.
The birds were created using Pretty in Pink cardstock for the body of one and Barely Banana cardstock for the body of the second bird. The wings I punched from Whisper White cardstock and then stamped them using the vine stamp (from the Vintage Vogue stamp set) using Sage Shadow Classic ink on one wing to coordinate with the Barely Banana bird and Real Red Classic ink on the other to coordinate with the Pretty in Pink bird. Both of the branches were punched from Soft Suede cardstock.
I took a strip of Whisper White cardstock and stamped it with the vine stamp and Sage Shadow to create an all  over pattern. I then punched one edge with the Scallop Trim Border punch (sorry, now that Sale-a-bration is over this punch is no longer available). I matted the Whisper White strip onto a piece of Barely Banana cardstock.
Last piece of the puzzle, I stamped the F friends stamp (also from Vintage Vogue stamp set) with Sage Shadow onto a piece of Whisper White cardstock and matted it onto a piece of Sage Shadow cardstock.
Now, the fun part - assembling the card. The important thing with this card is to work out your placement before you apply the adhesive. This way you can plan out your layout the way you want it.
The first layer to adhere to your card is the Whisper White-Sage Shadow stamped cardstock that we matted with the Barely Banana cardstock. I positioned it so that it was approx 2/3 of the way down the card and adhered it with Snail Adhesive.
Next I positioned the F friend stamped cardstock piece so that it overlaps the top part of the Melon Mambo card front and the Barely Banana/Whisper White patterned piece. Apply Snail adhesive around the edge of the piece but when you place it on your card, don't apply pressure to the left edge (this is so that you can slide your branches underneath).
Take the two Soft Suede branches, apply Snail adhesive carefully to them and gently slide the end of each branch under the Friend piece to hide it. Gently rub the branches to adhere them to the card and then gently rub the edge of the Friend piece to adhere that to the card.
To assemble your birds, use Snail adhesive to glue the wing to the corresponding body and then using the Soft Suede Stampin' Write Marker draw a dot for the eye on each bird. Then using the Dusty Durango Stampin' Write Marker I colored the triangle for the beak.
Finally, I adhered both birds to the card using Snail adhesive to complete the card.
This card is a great combination of stamping and using punches to create a great card for a friend. You could also add a sentiment to personalize it for a birthday, thank you, thinking of you or get well card.
Hope you have enjoyed today's card share. Don't forget, April is the month to take advantage of the great Stampin' Up products from the Occasions Mini before they disappear (last day to order is April 30th).
Please Contact Me to place your order or visit my Online Store by visiting my Stampin' Up website and clicking Shop Now in the top right corner.
Until Next Time.
Happy Stampin',
Tricia Butts

Products Used (All Stampin' Up):
Stamp Set:  Vintage Vogue - Clear Mount Stamp 118598  Price: $17.95
                                                    Wood Mount Stamp 117690 Price: $23.95 
Set Quantity: 8
Cardstock: Whisper White, Barely Banana, Melon Mambo, Soft Suede, Sage Shadow, Pretty in Pink
Inks: Melon Mambo, Sage Shadow, Real Red
Accessories: Extra Large Two-Step Bird Punch, Scallop Trim Border Punch (currently not available), Soft Suede and Dusty Durango Stampin' Write Markers (from set of 6 In Color Stampin' Write Markers), Snail Adhesive


Thursday, April 1, 2010

Let's Celebrate Spring with Two Step Stamping!

Hello Everyone,
I hope you all survived the 1st day of April. April Fools Day definitely gets pretty crazy and this year didn't seem any different.
One thing that is not a joke is Stampin' Up's new promotion for April, celebrating Two Step Stamping. This is a wonderful way to get started on your Spring projects and you get the chance to save on select stamp sets as well as the chance to earn a brand new stamp set for free.
Aren't these samples beautiful! These were created with the new Awash with Flowers stamp set.

OK, do I have your attention? Here are all the details:
Attention Hostesses

Host a $350 workshop and receive the brand-new Two-Step Awash with Flowers stamp set FREE!
Item Description
117062 Awash with Flowers (wood-mount)
120549 Awash with Flowers (clear-mount)

Now to help you achieve that $350 goal, Stampin' Up is offering this great special.
Attention Customers

Two-Step into spring with a sneak peek from the 2010-2011 Idea Book & Catalog! Be the first to add the Awash with Flowers stamp set to your collection.

Item        Description                                            Price
117062  Awash with Flowers (wood-mount)    $39.95
120549  Awash with Flowers (clear-mount)  $27.95

Plus, purchase spring-themed Two-Step Stampin' sets at 20 percent off the retail price--no additional purchase necessary!

Qualifying stamp sets are listed below:
Item    Page   Description              Discount Price
113824   94    Greenhouse Garden    $20.76
113734  98    Fifth Avenue Floral  $19.96
111578  101   Flower Fancy           $29.56
113258  112   Trendy Trees            $14.36

Important Note: The Awash with Flowers stamp set is a sneak peek from the 2010-2011 Idea Book & Catalog and will not be available again until the release of the new Idea Book & Catalog.
You can download the special flyer for this month's special offers Here for all the details.
Contact me today to place your order, or better yet book a party and earn the new Flowers Awash stamp set for free.
Until Next Time.
Happy Stampin',
Tricia Butts


Wednesday, March 31, 2010

Farewell Sale-a-bration: All Good Things Must Come to an End

Hello Everyone,
Well, it has been a crazy busy kind of a day so I am running behind with my post today. It is with some sadness that I contemplate the end of Sale-a-bration. It has been fun working with this year's Sale-a-bration stamp sets and seeing all the possibilities they have to offer and I love the new Scallop Trim Border punch. Not to mention the wonderful DSP Welcome Neighbor and all the great stamp sets from the 2009-2010 Idea Book and Catalog that we had to choose from. I really think this was the best Sale-a-bration but now it's time to say goodbye for another year.
For those of you who are still sitting on the fence about placing an order and taking advantage of the Sale-a-bration free products, then my advice is to navigate your way to my website and visit my Online Store to place your order before 11:50pm Mountain to qualify for this promotion. It's as simple as creating an account and placing your order. The website walks you through the steps to help.
If you would like to look through any of the current catalogs, you can download a digital copy from my sidebar of my blog to peruse and make your wishlist.
I always tell my customers that a wishlist is a very important thing to have. It helps you to remember items that you have seen and where you found them so that when you are looking for them next time, you have the information right at your finger tips. It also helps you in that you can write something down and think about it awhile and see if it is something you still want in the future. It also makes a great list to give to someone who maybe would like to buy you a gift for your birthday or other special occasion.
Tomorrow is the start of a whole new month and a whole new promotion to get excited about. We will be entering the world of two step stamping with some great special offers that I think you will enjoy.
Hope you all have a wonderful evening.
Until Next Time.
Stampin' Hugs,
Tricia Butts

Tuesday, March 30, 2010

Tuesday Share: A Note of Thanks

Hello Everyone,
Today I thought I would share with you a project that I came up with by accident. I was playing around with my Big Shot and the Box #2 die one afternoon and started thinking that it would make a great Note Card Holder. My husband when he saw it, thought it would be a great Business Card Holder (but that's a story for another day).
So, I decided to create some Thank You notes that are quick and easy to create while still providing variety (if you are like me and don't like to make a lot of things exactly the same). The Thank You cards are inspired by Dawn Griffith, a wonderful, creative demonstrator.
You can customize your Thank You notes by varying the colors used as well as the stamps to create your design.

I chose my colors from the Soft Subtles color family from Stampin' Up and used the large flower from the Vintage Vogue stamp set (from the Occasions Mini catalog) to create the background on the note card and I created the border by using the Scallop Trim Border Punch (Free Sale-a-bration Product with $50 purchase of Stampin' Up products) on a scrap of cardstock to make a stencil.  The sentiment is from my faithful favorite stamp set, Teeny Tiny Wishes. I used Whisper White cardstock for the base for a crisp, clean look and I chose Bashful Blue, Pretty in Pink and Barely Banana Classic inks to create the card variations.
For the Note Card Holder I chose Barely Banana cardstock and cut out the box shape with my Big Shot and the Box #2 die. I then decorated one side of the cardstock with the Sweet Swirls wheel and Melon Mambo Classic ink for the inside of the box and on the other side I used the vine stamp from Vintage Vogue stamp set with Barely Banana for a tone on tone pattern for the outside of the box.

I put the box together using Sticky Strip adhesive to give the Note Card Holder extra strength and stability. I decorated the front of the box by stamping the fabulous friend stamp from the Oval All stamp set in Barely Banana Classic ink on Whisper White cardstock. I then punched it out using the Large Oval punch and then matted it onto a piece of Barely Banana cardstock punched with the Scallop Oval punch. Using Stampin' Dimensionals, I attached it to the front of the box.
Now wouldn't this look cute sitting on your desk,  full of note cards just ready for when you need them? It would be a great gift idea too (I am thinking it would be a great Teacher Gift for the end of the school year).
Hope you enjoyed today's project share and hope it inspires you to get crafty in your craft room.
Until Next Time.
Stampin' Hugs,
Tricia Butts

Products Used (All Stampin' Up!):
Stamp Sets: Vintage Vogue, Teeny, Tiny Wishes, Oval All, Sweet Swirls wheel
Cardstock: Whisper White, Barely Banana
Inks: Barely Banana, Pretty in Pink, Bashful Blue, Melon Mambo
Accessories: Big Shot, Sizzix Box #2 Die, Scallop Trim Border Punch (Sale-a-bration Free Product with $50 purchase of Stampin' Up Merchandise - ends March 31st), Large Oval Punch, Scallop Oval Punch, Sponge Daubers, Sticky Strip, Snail Adhesive, Stampin' Dimensionals

Why I Love Being a Stampin' Up Demonstrator

Hello Everyone,
I hope you are enjoying beautiful Spring weather this fine Tuesday. Well, it has been a very busy week since I last posted and I apologize for not sharing with you this past week. With my kids being on Spring Break, it was nice to be able to spend some time with them before the crazy final stretch of school starts again. Someone told me we have 9 weeks of school left until Summer Break, yikes! That means all the end of school year activities will soon start and then there are preparations for teacher gifts. OMG, I am tired just thinking about it!
Which brings me to the title of today's post. I am so thankful that I discovered the opportunity to become a Stampin' Up demonstrator and that I get to do something that I love and still be there for my family when they need me. I have been able make my own decisions as to what kind of demonstrator I want to be and have the flexibility to change to meet the needs of my family and myself.
When I first signed up in September, 2008, I was a "Hobby Demonstrator", taking advantage of the discounts and benefits Stampin' Up provides their demonstrators, for myself and my own personal needs. Over time, as my children have grown up and our family has changed, I have had more time to explore and develop my own business and share it with friends.
I love being able to teach classes and share with my customers the latest techniques I have learned and to inspire them with ideas that they can shape and develop for their own projects. It makes me so happy when I see the joy on someone's face when they realize they have created a card or project that they thought they couldn't possibly make, at a workshop or party. As much as I love creating for myself, I love sharing with others the joy of stamping and creating with others so much more.
One of my favorite things to do is spend time with my two daughters creating cards and projects with them and getting inspired by their wonderful ideas. Children don't have any preconceived ideas as to what colors should be used together or how things should be done and because of that, they create the most incredible things that make me go WOW!  They don't have any fear of "What if this doesn't look right", they just love to see what something will look like if they try something. Some of my best inspirations have come from my creative sessions with my daughters.
I often have people look at the things I create and ask me "Where did you learn how to do that?" or "how did you come up with that idea?" and I tell them it's simple. Being a demonstrator has provided me with an unlimited supply of ideas and techniques that helps me to learn and grow as a demonstrator everyday. Stampin' Up offers wonderful resources to its demonstrators to help teach us and inspire us so that we can continue to provide great ideas and projects to our customers. Plus, Stampin' Up demonstrators are some of the most kind, generous and sharing people I know and they often share their ideas and techniques with the rest of us on various demonstrator groups so that we all benefit.
So as I prepare to go and pick up my children from school, I say a prayer of thanks that I am lucky enough to have found an opportunity to have the best of both worlds. If you would like to learn more about being a Stampin' Up demonstrator (whether you just want to support your hobby or you wish to build your own business), please visit my website:
http://www.stampinup.net/esuite/home/triciabutts/startyourownbusiness
or contact me and I will be happy to answer any questions you may have.
With Sale-a-bration almost over, now is a great time to join Stampin' Up and save 15% off your Starter Kit. You can choose from the Standard Starter Kit or the Digital+ Starter Kit. Plus, you will also get to choose a free stamp set of your choice (up to $47.95 value). 
But hurry, Sale-a-bration ends March 31st.

Until Next Time.
Stampin' Hugs,
Tricia Butts

Tuesday, March 23, 2010

A Butterfly Easter Card

Hi Everyone,
I'm back with today's card share that will hopefully help inspire you to get started on your cards in time for Easter. Can you believe that April is almost here? It seems like the year has gone into fast forward with the changing of the seasons.
Today's card features one of my favorite items from the Occasions Mini catalog, the Beautiful Wings Embosslit, that works with my favorite tool, the Big Shot. This card was actually a Make n Take for a Stampin' Up party I had for a friend recently, and everyone loved using the Big Shot and fell in love with all the cute little butterflies created by the Beautiful Wings Embosslit. They just couldn't believe that so many butterflies could be embossed and cut from one small square of cardstock with just a quick turn of the handle on the Big Shot.
The base of the Easter card was created from Orchid Opulence cardstock (from the Bold Brights family), cut at 11" x 4 1/4" and scored at 5 1/2".  I used a piece of Whisper White card stock for the first layer and embossed it with the Perfect Polka Dots Textured Impressions folder with my Big Shot.  I adhered the embossed Whisper White cardstock to the Orchid Opulence card base with Snail adhesive.
Next, I used the Big Shot to cut and emboss my butterflies with the Beautiful Wings Embosslit (p24 Occasions Mini Catalog) using a scrap of Orchid Opulence cardstock.
Note: Make sure that your piece of cardstock is larger than the area of the embosslit so that the butterflies will release from the die easily. If the cardstock is too small, the butterflies may get stuck in the die. If this happens, gently remove them using the tip of the Paper Piercing Tool or another pointed instrument that can be used to carefully lever them from the die without damage.
Using the Paper Piercing Tool, I made a hole in the center of the largest butterfly. I then took my Two Way Glue Pen and carefully applied glue to the embossed areas of the butterfly. To add a little sparkle to my butterfly, I sprinkled Dazzling Diamonds onto the butterfly's wings and then gently tapped it to remove any loose glitter. Set it aside to allow the glue to dry.
I then took another smaller piece of Whisper White cardstock and carefully stamped Happy Easter, from the Well Scripted stamp set (p19 Occasions Mini catalog), in the lower right corner using Orchid Opulence Classic ink. Taking a piece of Barely Banana cardstock, I adhered the Whisper White cardstock stamped piece to it.
I used my Paper Piercing Tool to create a whole in the upper left corner of the Whisper White cardstock, making sure that it goes through the Barely Banana Cardstock.
Taking a clear rhinestone brad, I threaded it through the hole in the center of the butterfly and then through the hole in the Whisper White/Barely Banana cardstock and bent the legs back to anchor it.
Time to assemble the card by first attaching a piece of Shades of Spring Designer Series Paper (p25 Occasions Mini Catalog) to the right side of the card. I chose the pretty Orchid Opulence with polka dots because I loved the way it looked coordinated with the embossed polka dots on the Whisper White cardstock. I then applied Snail adhesive to the back of the Barely Banana cardstock and layered it on top of the Whisper White cardstock and the Orchid Opulence DSP.
This card could just as easily be used as a birthday, Mother's Day, thinking of you or get well card, just by changing the sentiment on the card. I like to create cards that can be used for a variety of occasions and I think this is one of those card designs.
I cased this card from another demonstrator, Dawn Griffith, who creates the most amazing cards and she is one of my greatest sources of inspiration. I hope that you will be inspired by this card and create your own cards soon.
Until Next Time.
Stampin' Hugs,
Tricia Butts
P.S. I would love to see your cards, so please leave a link to your card photo in the comments section so that I can visit and enjoy your creativity.

Products Used (All Stampin' Up):
Stamp Set:
Well Scripted Wood Mount 117072   Price   $19.95
                         Clear Mount  118601  Price   $14.95  Set of 6
Paper: Shades of Spring DSP, Orchid Opulence cardstock, Barely Banana Cardstock, Whisper White Cardstock
Ink: Orchid Opulence Classic Ink
Accessories: Big Shot, Beautiful Wings Embosslit, Perfect Polka Dots Textured Impressions Folder, Dazzling Diamonds, Clear Rhinestone Brad, Two Way Glue Pen, Snail Adhesive, Paper Piercing Tool.