Wednesday, March 8, 2023

Around The World On Wednesday March Blog Hop Color Challenge

Welcome to the Around The World On Wednesday March Blog Hop and this month we have our first Color Challenge for the year. For our Color Challenge this month we will be creating with at least 3 of the colors that our Design Team members chose as their favorite colors. The colors are: Coastal Cabana, Bermuda Bay, Pool Party, Mint Macaron, Soft Sea Foam, Pale Papaya, Petal Pink, Rich Razzleberry and Starry Sky. Our Design Team members will be sharing their projects and ideas to help inspire you to explore using these beautiful colors in your creative projects. 
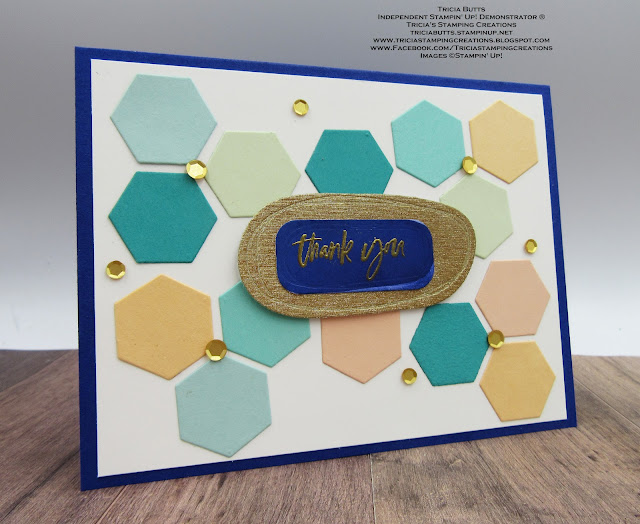
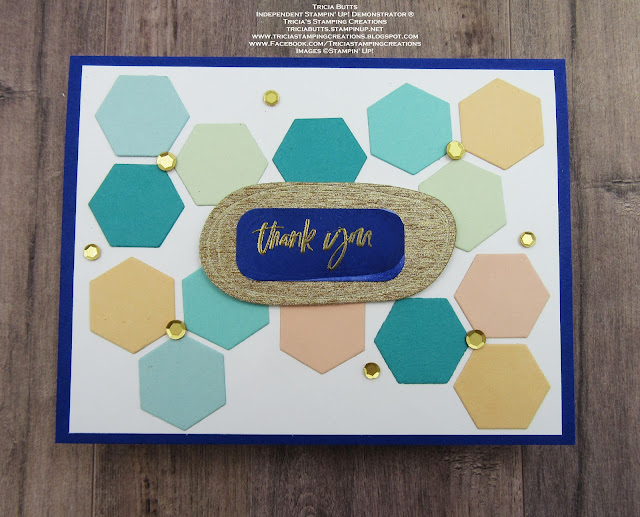
For this Color Challenge, I chose to create a geometric design for my card using 7 of the 9 colors - Starry Sky, Pool Party, Coastal Cabana, Bermuda Bay, Soft Sea Foam, Petal Pink and Pale Papaya. I die cut hexagons from 6 of the colors using the Beautiful Shapes to create a random background design. I love how these colors work together to create a mosaic design and I added Gold accents to step up the card. 
Products Used:
Hello Beautiful stamp set (item #158041)
Beautiful Shapes Dies (item #158046)
Gold & Rose Gold 6"x6" Metallic Specialty Paper (item #156844)
Starry Sky Cardstock (item #159263)
Pool Party Cardstock (item #154894)
Coastal Cabana Cardstock (item #131297)
Bermuda Bay Cardstock (item #131197)
Petal Pink Cardstock (item #146985)
Pale Papaya Cardstock (item #155668)
Basic White Cardstock (item #159276)
Starry Sky Classic Ink Pad (item #159212)
Versamark Pad (item #102283)
Metallic Embossing Powders (item #155555)
Pastel Adhesive Backed Sequins (item #160387)
Stampin' Dimensionals
Measurements:
Starry Sky Cardstock
Card Base - 8 1/2" x 5 1/2" (Scored at 4 1/4")
Basic White Cardstock
Card Front - 5 1/4" x 4"
Sentiment Label die cut with the Beautiful Shapes Dies
Gold Metallic Specialty Paper
Large Label die cut with the Beautiful Shapes Dies
Pool Party, Coastal Cabana, Bermuda Bay, Petal Pink, Pale Papaya, Soft Sea Foam Cardstock
4 Hexagons in each color die cut with the Beautiful Shapes Dies
This fun card design has a modern feel to it with the geometric background. I attached the hexagon die cuts in a random pattern onto the Basic White cardstock card front. The Starry Sky cardstock card base helps make the variety of colors of hexagons really pop. For the sentiment, I stamped the solid background with Starry Sky Classic ink and then heat embossed the sentiment with Gold embossing powder in the center. Using the smaller label die cut, I die cut out the sentiment and then I sponged the edges with Starry Sky Classic ink using a Blending Brush. I attached the sentiment label to the center of the larger background label that I die cut from Gold Metallic Specialty Paper and then attached it to the center of the card front with Stampin' Dimensionals. To finish off the card design, I added several Gold sequins for a touch of bling. This was a fun color challenge using these beautiful colors and I love how my finished design turned out. This is not my usual style and I loved having the opportunity to show some love to some of my old favorite products that I haven't used in a while. 
Thank you for taking the time to visit my blog. I hope that my card design will help inspire you to experiment with these wonderful colors to create your own beautiful projects. There are so many wonderful possibilities to explore. 
Now it's time to visit Jan's blog and see what she has created with this month's Color Challenge. Just click on the Next button below to visit her blog or use the Roll Call List to find your way. We would love it if you would leave us a comment and let us know what you liked about our projects. I hope you enjoy our blog hop this month. 

Roll Call List

If you live in the U.S. and do not have a Stampin' Up! Demonstrator, please contact me and I would be happy to help you with your creative projects. You may also visit my Online Store to place your order and have it shipped to you. 

Until Next Time

Happy Stamping,

Tricia Butts
Independent Stampin' Up! Demonstrator

Like What You See? Visit My Online Store Here

Visit My Facebook Business Page for Updates & Ideas

Click here to Contact Me


Explore Your Creative Side
With The January-April 2023 Mini Catalog
Click Below To Visit My Online Store
Online Exclusives Now Available
Only While Supplies Last
Click Below To Place Your Order


Friday, March 3, 2023

Global Stamping Friends March Blog Hop Time Marches On

Welcome to the Global Stamping Friends March Blog Hop with our theme this month "Time Marches On". When I think about the month of March, I think about the transition from Winter to Spring and all the changes that happen. It's been a cold and snowy Winter here in Colorado and I am looking forward to warm, sunny days again. Our Design Team will be sharing their projects to help inspire you to get creative as we "march" towards Spring.
For my card design, I featured products from the Fancy Flora Suite from the January-April 2023 Mini Catalog to create the look of a Spring garden in bloom. I love the colors in the Fancy Flora 6"x6" Designer Series Paper and I chose coordinating colors to create the flowers using the Two Tone Flora Bundle. It was so much fun playing with colors and layering the flowers to create a pretty Thinking of You card. This is not my normal style of card design and I love how it turned out. This design would work well for a variety of occasions for Spring and Summer. 
Products Used:
Fancy Flora Suite Collection (item #160431)
  Two Tone Flora Bundle (item #160414)
  Something Fancy Dies (item #160424)
  Fancy Flora 6"x6" Designer Series Paper (item #160413)
  Iridescent Pastel Gems (item #160429)
Go To Greetings stamp set (item #158763)
Orchid Oasis Cardstock (item #159267)
Basic White Cardstock (item #159276)
Soft Succulent Classic Ink Pad (item #155778)
Soft Sea Foam Classic Ink Pad (item #147102)
Fresh Freesia Classic Ink Pad (item #155611)
Rich Razzleberry Classic Ink Pad (item #147091)
Balmy Blue Classic Ink Pad (item #147105)
Orchid Oasis Classic Ink Pad (item #159214)
Versamark Pad (item #102283)
Metallics Embossing Powders (item #155555)
White 3/8" Glittered Organdy Ribbon (item #156408)
Stampin' Dimensionals (item #104430)
Mini Glue Dots (item #103683)
Measurements:
Orchid Oasis Cardstock
Card Base - 8 1/2" x 5 1/2" (Scored at 4 1/4")
Large Label die cut with the Something Fancy Dies
Basic White Cardstock
Sentiment Label die cut with the Something Fancy Dies
Flowers & Leaves stamped and die cut with the Two Tone Flora Bundle
Fancy Flora Designer Series Paper
Card Front - 5 1/4" x 4"
One of my favorite things about this style of card, is that you get to experiment with different color combinations to create beautiful floral images. For my flowers, I chose to use Balmy Blue and Orchid Oasis Classic inks for the large flower, Fresh Freesia and Rich Razzleberry Classic inks for the medium size flowers and Orchid Oasis for the small flowers (the solid images were stamped off once to give the two tone look). For the leaves, I chose to use Soft Succulent for the long leaves and Soft Sea Foam for the smaller leaves. The great thing about the Two Tone Flora Bundle is that there are coordinating dies to cut out the stamped images, which makes life so much easier. For the sentiment, I heat embossed the image from the Go To Greetings stamp set with Silver embossing powder onto Basic White cardstock and die cut it out with one of the Something Fancy Dies. I layered it onto the larger coordinating Orchid Oasis die cut to create a frame. Using Stampin' Dimensionals, I attached the sentiment label to the center of the card front and then added the flowers and leaves to create the focal design. For a touch of sparkle, I added some Glittered Organdy Ribbon using Mini Glue Dots and several of the Iridescent Pastel Gems to the centers of some of the flowers for a touch of bling. I think this is the perfect card design to welcome Spring. 
Thank you for taking the time to visit my blog. I hope that my card design will help inspire you to get creative for Spring. There are so many wonderful products to choose from to help spark your creativity. 
Now it's time to visit Marieke's blog and see what wonderful projects she has to share with us. Just click on the Next button below to visit her blog. We would love it if you would leave us a comment and let us know what you liked about our projects. I hope you enjoy the rest of our blog hop. 


If you live in the U.S. and do not have a Stampin' Up! Demonstrator, please contact me and I would be happy to help you with your creative projects. You may also visit my Online Store to place your order and have it shipped to you. 

Until Next Time

Happy Stamping,

Tricia Butts
Independent Stampin' Up! Demonstrator

Like What You See? Visit My Online Store Here

Visit My Facebook Business Page for Updates & Ideas

Click here to Contact Me

Online Exclusives Now Available
Only While Supplies Last
Visit My Online Store To Place Your Order

Celebrate Paper Pumpkin's 10 Year Annivesary
With The 10 Years Of Growth Kit
Click Below To Subscribe By March 10th

Explore Your Creative Side
With The January-April 2023 Mini Catalog
Click Below To Visit My Online Store


Wednesday, March 1, 2023

We Create March Blog Hop March To The Beat

Welcome to the We Create March Blog Hop as we celebrate the month of March. Whether you are looking forward to Spring or maybe your love of music (marching along to the beat), there is something for everyone to enjoy this month. Our wonderful Design Team members will be sharing their projects and ideas to help inspire you to get creative.
For my card, I decided to create a Spring themed design using the Sweet Songbirds Bundle. Here in Colorado, we welcome the birds back to our neighborhood in March and I love hearing their sweet music. I wanted to create a bright and cheerful design to celebrate their return and to help cheer me up on this cold and snowy days. It is a reminder that warmer days will be here soon.
Products Used:
Sweet Songbirds Bundle (item #158727)
Stylish Shapes Dies (item #159183)
Tea Boutique 6"x6" Designer Series Paper (item #158659)
Tahitian Tide Cardstock (item #159261)
Basic White Cardstock (item #159276)
Crushed Curry Classic Ink Pad (item #131199)
Soft Suede Classic Ink Pad (item #115318)
Parakeet Party Classic Ink Pad (item #159259)
Regals Collection Stampin' Write Markers (item #147155)
Sweet Sorbet Stampin' Blends Combo Pack (item #159224)
Heart Pearls (item #159190)
Mini Stampin' Dimensionals (item #144108)
Measurements:
Tahitian Tide Cardstock
Card Base - 8 1/2" x 5 1/2" (Scored at 4 1/4")
Large Stitched Circle die cut with the Stylish Shapes Dies 
Large Sentiment Label die cut with the Stylish Shapes Dies
Tea Boutique Designer Series Paper
Card Front - 5 1/4" x 4"
Basic White Cardstock 
Medium Stitched Circle die cut with the Stylish Shapes Dies
Sentiment Label die cut with the Stylish Shapes Dies
Bird stamped and punched out with the Sweet Songbirds Bundle
Leaves stamped and fussy cut with Paper Snips
This sweet card design features several of the beautiful 2022-2024 In Colors, including Tahitian Tide, which I used for the card base and the accent layers. For the card front, I chose to use a piece of Starry Sky Designer Series Paper from the Tea Boutique 6"x6" Designer Series Paper. I love the subtle texture in this design and this beautiful color helps make the bright colors pop. For the bird, I chose to use Crushed Curry Classic ink to stamp the images onto Basic White cardstock and used the coordinating Songbird Builder Punch to punch out the images. I colored the beak with a Pumpkin Pie Stampin' Write Marker and stamped the eyes with Soft Suede Classic ink . To create the background for the focal circle, I stamped the branches, musical notes and bird's legs with Soft Suede Classic ink onto the Basic White cardstock circle. For the leaves, I stamped the images twice onto Basic White cardstock with Parakeet Party Classic ink and fussy cut them out. I added them to the focal image using Mini Stampin' Dimensionals. For the sentiment, I stamped the image with Soft Suede Classic ink onto the Basic White label and then layered it onto the larger Tahitian Tide cardstock label. To assemble the card, I attached the focal circle to the center of the card front and added the bird to the circle with Mini Stampin' Dimensionals, lining it up over the top of the stamped legs. To embellish the card, I a colored several of the Pearl Hearts with the Dark Sweet Sorbet Stampin' Blends Marker and added them to the card front. I just love how bright and cheerful this card design is. It is a wonderful way to send someone a touch of Spring to brighten their day. 
Thank you for taking the time to visit my blog. I hope that my card design will help inspire you to get creative this month. There are so many wonderful possibilities available to celebrate the month of March and beyond.
Now it's time to visit Kimberley's blog and see what she has created this month. Just click on the Next button below to visit her blog. We would love it if you would leave us a comment and let us know what you liked about our projects. I hope you enjoy this month's hop. 


If you live in the U.S. and do not have a Stampin' Up! Demonstrator, please contact me and I would be happy to help you with your creative projects. You may also visit my Online Store to place your order and have it shipped to you. 

Until Next Time

Happy Stamping,

Tricia Butts
Independent Stampin' Up! Demonstrator

Like What You See? Visit My Online Store Here

Visit My Facebook Business Page for Updates & Ideas

Click here to Contact Me


Check Out The Amazing New Products
Available Online Only 
Click Here To Visit My Online Store For More Details

Explore Your Creativity
With The January-April 2023 Mini Catalog
Click Below To Visit My Online Store


Tuesday, February 28, 2023

Paper Pumpkin Possibilities February Blog Hop Sunshine & Smiles

Welcome to the Paper Pumpkin Possibilities February Blog Hop as we showcase the amazing Sunshine & Smiles Paper Pumpkin Kit. Our talented Design Team members will be sharing their beautiful alternative project ideas to help inspire you to think outside the box. This wonderful kit coordinates perfectly with the Rain or Shine Suite in the January-April 2023 Mini Catalog to help provide you with even more creative options to explore. 
There is so much to love about the Sunshine & Smiles Paper Pumpkin Kit and I wanted to recreate the gingham look of the card designs in the kit for my alternative design. I chose to use a piece of the Balmy Blue Gingham paper from the Country Gingham Designer Series Paper in the January-April 2023 Mini Catalog to create the background for my clean and simple card design. I focused on using the images from the exclusive stamp set in the kit to create the focal design. I just love the cute little frog and the sweet Spring flowers and I used the Add-on dies to die cut them out (the Add-on dies are now sold out). This fun, fresh Spring themed card design would work well for so many occasions and is sure to bring a smile to someone's face. 
Products Used:
Paper Pumpkin February 2023 Kit "Sunshine & Smiles"
Stylish Shapes Dies (item #159183)
Country Gingham 6"x6" Designer Series Paper (item #160388)
Basic White Cardstock (item #159276)
Thick Basic White Cardstock (item #159229)
Memento Tuxedo Black Pad (item #132708)
Daffodil Delight Classic Ink Pad (item #119683)
Parakeet Party Stampin' Blends Combo Pack (item #159220)
Flirty Flamingo Stampin' Blends Combo Pack (item #154884)
Daffodil Delight Stampin' Blends Combo Pack (item #154883)
Pastel Adhesive Backed Sequins (item #160387)
Mini Stampin' Dimensionals (item #144108)
Measurements:
Thick Basic White Cardstock
Card Base - 8 1/2" x 5 1/2" (Scored at 4 1/4")
Basic White Cardstock
Flowers & Frog images stamped and die cut
Medium Circle die cut with the Stylish Shapes Dies
Country Gingham Designer Series Paper (Balmy Blue)
Card Front - 5 1/4" x 4"
This cute all occasion card design combines the stamp images from the Sunshine & Smiles Kit with the fun, fresh Balmy Blue Gingham Designer Series Paper from the January-April 2023 Mini Catalog. I chose to use soft Spring-like colors for this card and I love the simplicity of this design. For the flowers and the frog, I stamped the images with Memento Tuxedo Black ink onto Basic White cardstock and I die cut them out with the Add-on Dies for this kit (which have unfortunately sold out). I colored the frog with Parakeet Party Stampin' Blends Markers to give him a bright and cheerful look and I used Flirty Flamingo and Daffodil Delight Stampin' Blends Markers to color the flowers. For the sun, I stamped the image with Daffodil Delight Classic ink onto the Stitched Basic White Circle and attached it to the center of the card front with Stampin' Dimensionals from the kit, making sure the sun is positioned in the upper right corner. For the sentiment, I stamped the image with Tuxedo Black ink onto one of the labels from the kit and attached it below the Stitched Circle using Stampin' Dimensionals. Using Mini Stampin' Dimensionals, I attached the flowers to either side of the circle with Mini Stampin' Dimensionals, just above the sentiment and then I attached the frog to the Stitched Circle, also using Mini Stampin' Dimensionals. To finish off the card design, I added several of the Petal Pink Pastel Adhesive Backed Sequins for a touch of bling. This alternative card design is a great example of how you can use the exclusive stamp set in this kit to create fun cards for all occasions. 
Thank you for taking the time to visit my blog. I hope that my card design will inspire you to create your own wonderful alternative projects with this fun kit. There are so many great possibilities to explore. 
Now it's time to visit Janey's blog and see what wonderful projects she has to share with us this month. Just click on the Next button below to visit her blog. We would love it if you would leave us a comment and let us know what you liked about our projects. I hope you enjoy the rest of our blog hop. 

If you live in the U.S. and do not have a Stampin' Up! Demonstrator, please contact me and I would be happy to help you with your creative projects. You may also visit my Online Store to place your order and have it shipped to you. Not a Paper Pumpkin subscriber? Click the link below to sign up by March 10th to receive the 10 Years of Growth Card Kit and celebrate Paper Pumpkin's 10 year Anniversary. This kit includes an exclusive free stamp set in addition to the supplies to create this month's projects. 

Until Next Time

Happy Stamping,

Tricia Butts
Independent Stampin' Up! Demonstrator

Like What You See? Visit My Online Store Here

Visit My Facebook Business Page for Updates & Ideas

Click here to Contact Me


Celebrate Paper Pumpkin's 10 Year Anniversary 
With The 10 Years Of Growth Card Kit
Click Below To Subscribe By March 10th

Explore Your Creative Side
With The January-April 2023 Mini Catalog
Click Below To Visit My Online Store


Saturday, February 18, 2023

Stamping With Friends February Blog Hop Favorite January-April 2023 Mini Catalog Products

Welcome to the Stamping With Friends February Blog Hop, as we showcase our favorite products from the January-April 2023 Mini Catalog. There are so many amazing new products to choose from that it's hard to pick a favorite. Our wonderful Design Team members will be sharing their projects and ideas to help inspire you to explore the products in this new Mini Catalog to help spark your creativity. 
One of my favorite bundles in the January-April 2023 Mini Catalog is the Fragrant Flowers Bundle and I love that it coordinates with the Favored Flowers Designer Series Paper, which is a Level 1 Sale-a-bration Reward you can earn free with a qualifying order. For this card design, I used the Fragrant Flowers Dies to die cut out the flowers from one of the sheets of Favored Flowers Designer Series Paper to create the focal image. I love the bold, vibrant florals in this pretty paper and it is perfect for creating beautiful card designs. I also chose to use the Framed Florets Dies, another one of my favorites from the new mini catalog. The detailed oval frame die cut worked perfectly for this design and helped the focal design stand out against the Design A Day Dream Designer Series Paper background. This card requires minimal stamping and is simple to create with these amazing dies.
Products Used:
Go To Greetings stamp set (item #158763)
Fragrant Flowers Dies (item #160459)
Framed Florets Dies (item #160623)
Stylish Shapes Dies (item #159183)
Favored Flowers Designer Series Paper (item #160833) Level 1 Sale-a-bration Reward
Design A Daydream Designer Series Paper (item #159161) 
Host Reward
Petal Pink Cardstock (item #146985)
Basic Black Cardstock (item #121045)
Versamark Pad (item #102283)
Metallics Embossing Powders (item #155555)
Classic Matte Dots (item #158146)
Mini Stampin' Dimensionals (item #144108)
Measurements:
Petal Pink Cardstock
Card Base - 8 1/2" x 5 1/2" (Scored at 4 1/4")
Basic Black Cardstock
Layer 1 - 5 3/8" x 4 1/8"
Detailed Oval Frame die cut with the Framed Florets Dies
Sentiment Label die cut with the Stylish Shapes Dies
Design A Daydream Designer Series Paper 
Card Front - 5 1/4" x 4"
Tip: Die cut the Detailed Oval Frame from the middle of the Layer 1 Basic Black Cardstock to save cardstock. 
To create this beautiful card, I die cut all the pieces I would need first, so that I could arrange them into the finished design. I die cut the detailed oval frame using the Framed Florets Dies from Basic Black cardstock (the Layer 1 that frames the designer series paper card front) and then adhered the Design A Daydream Designer Series Paper to the Black Cardstock layer. I attached the detailed oval die cut to the center of the card front to create the focal area for my design. Using Mini Stampin' Dimensionals, I popped up the larger floral die cut. I attached the smaller floral elements first to the card front, to create the background and then attached the larger popped up image so that it slightly overlapped these flowers. For the sentiment, I heat embossed the image from the Go To Greetings stamp set onto a Basic Black sentiment label die cut with the Stylish Shapes Dies. I added it to the card front with Mini Stampin' Dimensionals. To complete the card design, I added several Matte Black Dots to coordinate with the Black accents in the card design. I love how this card design turned out and how dramatic the floral image looks against the subtle stripes in the background. 
Thank you for taking the time to visit my blog. I hope that my card design will help inspire you to explore the wonderful products in the January-April Mini Catalog. There are so many great options available to help you get creative. 
Please take the time to visit with my fellow Design Team members by clicking on the links in the Roll Call List below. We would appreciate it if you would leave us a comment and let us know what you enjoyed about our projects. 

If you live in the U.S. and do not have a Stampin' Up! Demonstrator, please contact me and I would be happy to help you with your creative projects. You may also visit my Online Store to place your order and have it shipped to you. 

Until Next Time

Happy Stamping,

Tricia Butts
Independent Stampin' Up! Demonstrator

Like What You See? Visit My Online Store Here

Visit My Facebook Business Page for Updates & Ideas

Click here to Contact Me


Time Is Running Out
To Take Advantage Of Sale-a-bration
Click Below For More Details

Explore The Amazing New Products
In The January-April 2023 Mini Catalog
Click Below To Visit My Online Store