Showing posts with label Nature's Harvest Bundle. Show all posts

Saturday, October 8, 2022

Colour Combo October Blog Hop

Welcome to the Colour Combo October Blog Hop as we showcase projects created using this month's color combination of Pumpkin Pie, Mossy Meadow and Starry Sky. Our Design Team members will be sharing their projects and ideas to help inspire you to try creating your own beautiful projects with this color combination. 
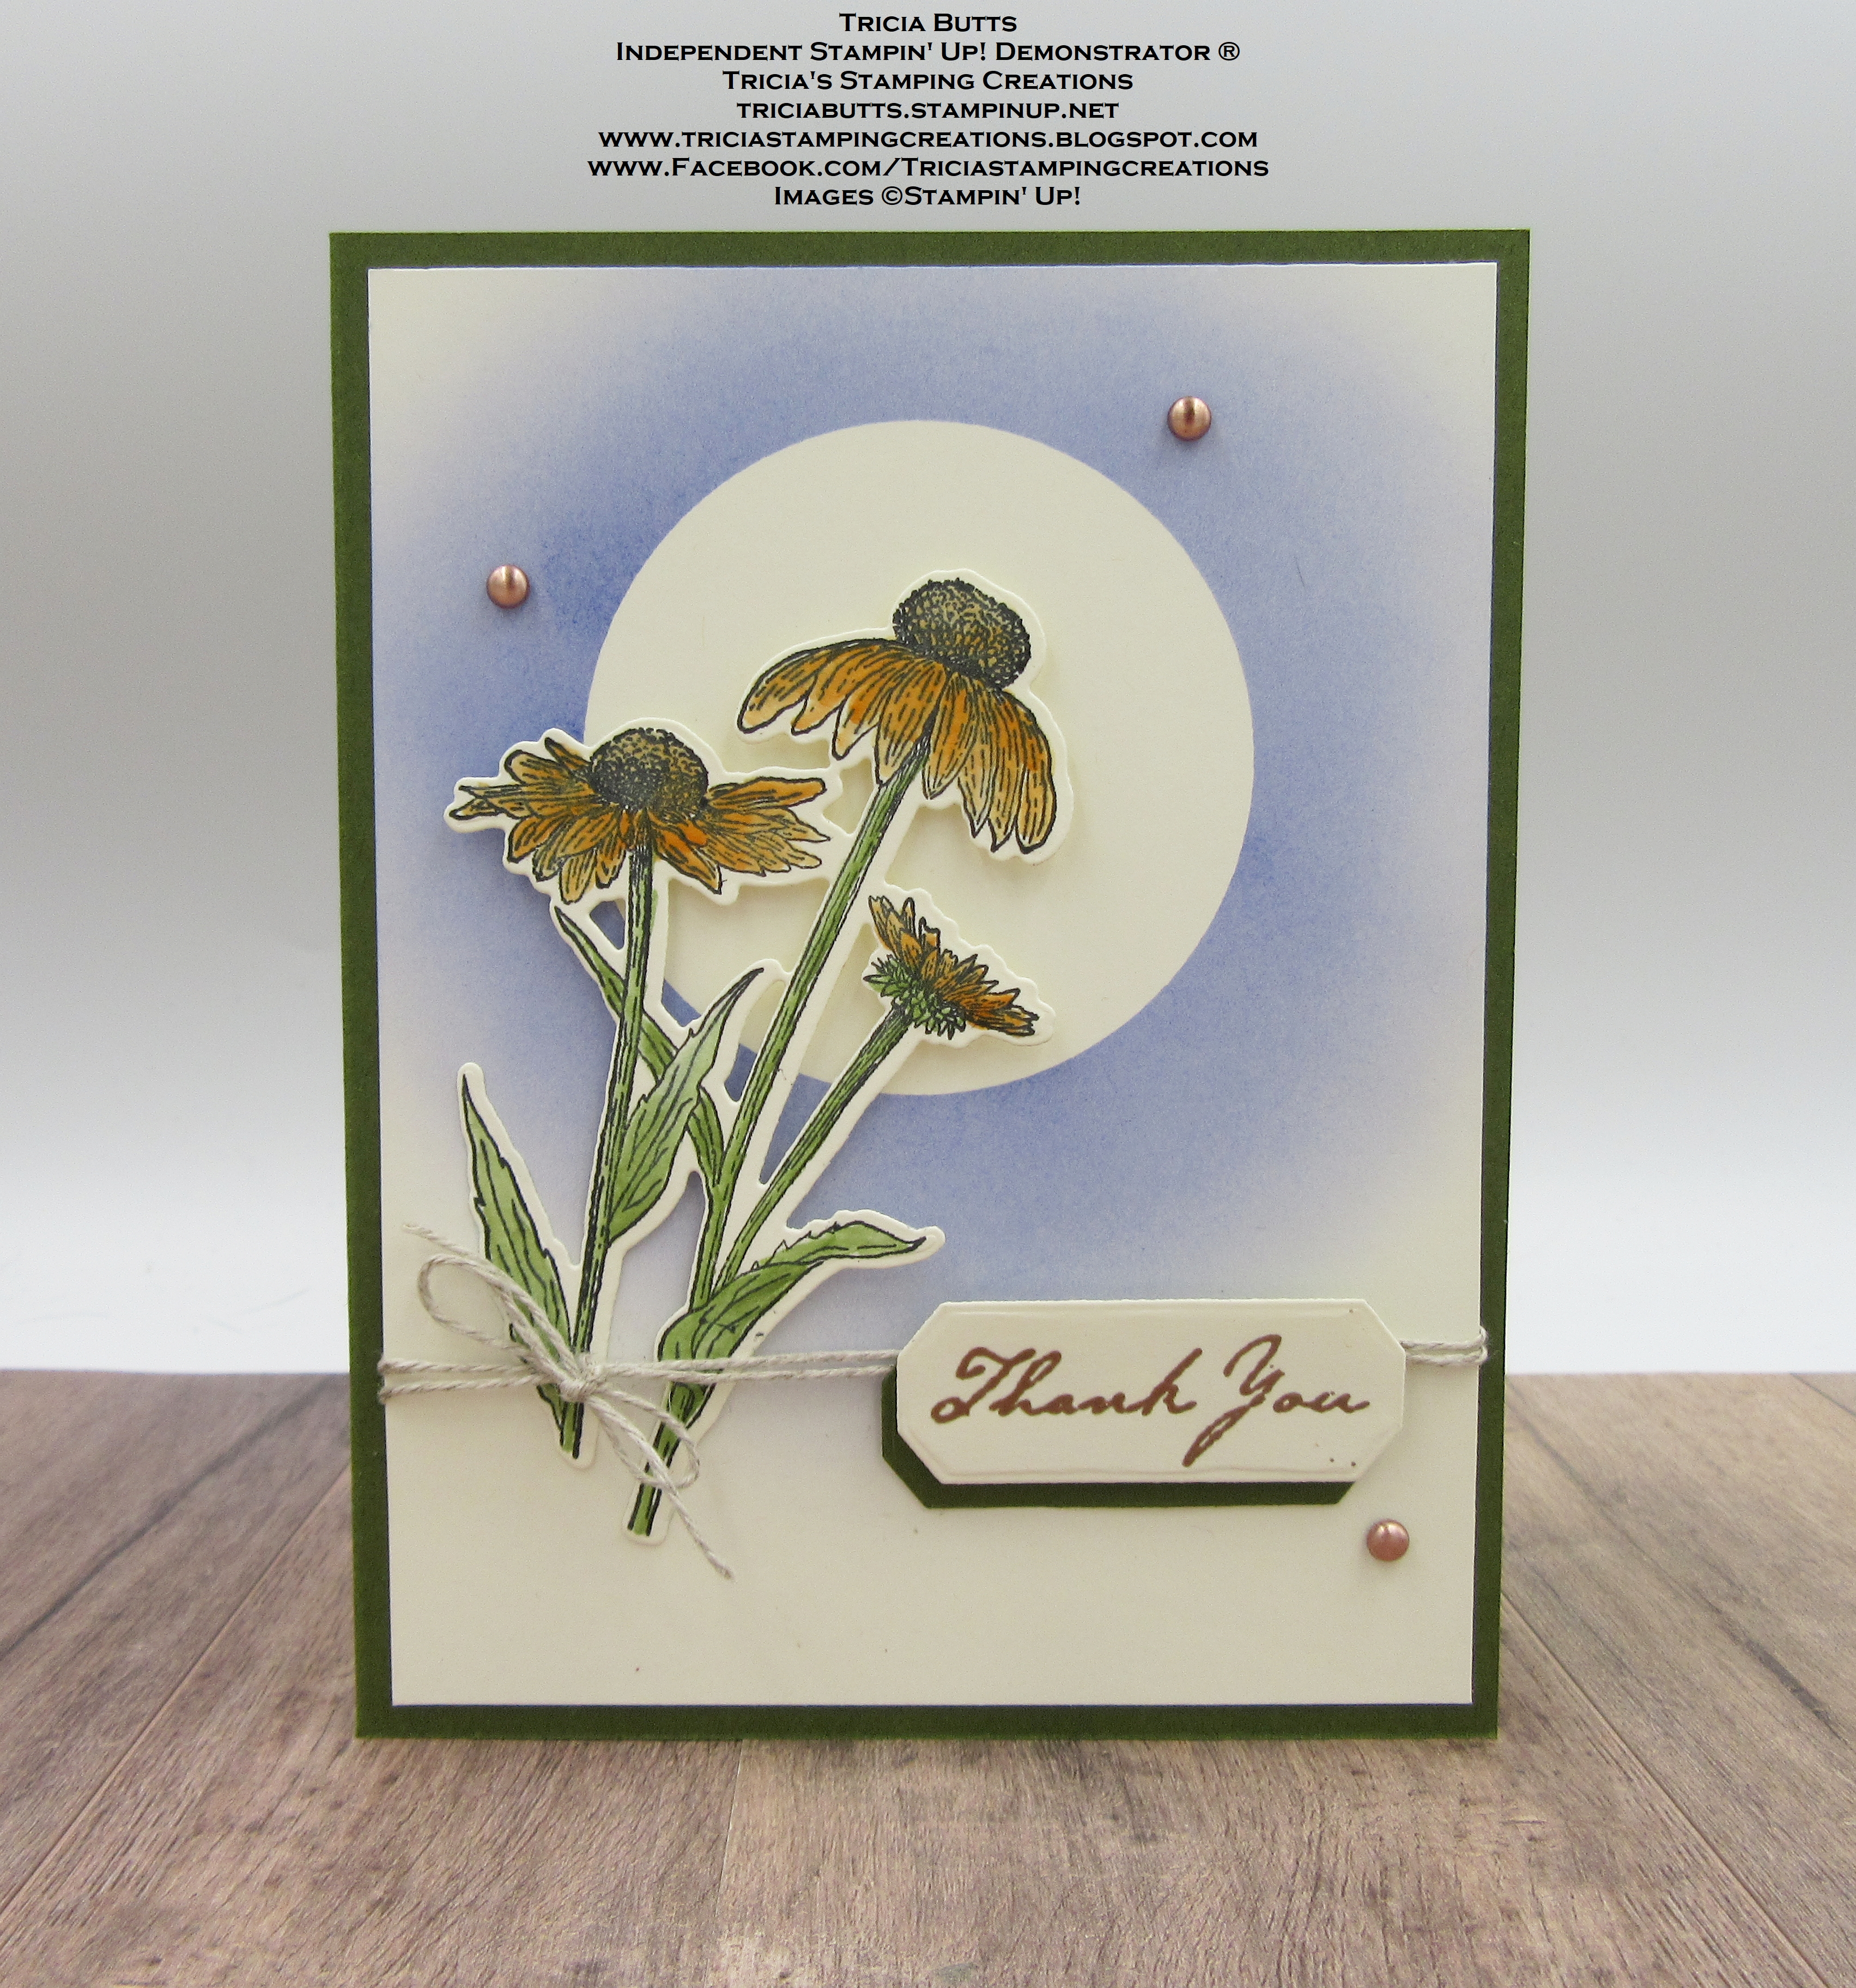
For my card design, I decided to do a little reverse masking to create a soft background for my focal design. I chose to use the Nature's Harvest Bundle, as it has a wonderful range of images and sentiments and the coordinating dies take the stress out of creating. 
Products Used:
Nature's Harvest Bundle (item #156813)
Layering Circles Dies (item #151770(
Mossy Meadow Cardstock (item #133676)
Very Vanilla Cardstock (item #101650)
Mossy Meadow Classic Ink Pad (item #147111)
Pumpkin Pie Classic Ink Pad (item #147086)
Starry Sky Classic Ink Pad (item #159212)
Memento Tuxedo Black Pad (item #132708)
Versamark Pad (item #102283)
Metallics Embossing Powders (item #155555)
Blending Brushes (item #153611)
Blender Pens (item #102845)
Brushed Metallic Adhesive Backed Dots (item #156506)
Linen Thread (item #104199)
Stampin' Dimensionals (item #104430)
Measurements:
Mossy Meadow Cardstock
Card Base - 8 1/2" x 5 1/2" (Scored at 4 1/4")
Small Label die cut with the Harvest Dies
Very Vanilla Cardstock
Card Front - 5 1/4" x 4"
Sentiment Label die cut with the Harvest Dies
Stamped and die cut floral image using the Nature's Harvest Bundle
This clean and simple card design is simple to create and I love that I only need one bundle to create this card. The background is easy to create by die cutting a circle from a Post It Note and applying it to the Very Vanilla cardstock layer and then applying Starry Sky Classic around it with a Blending Brush to create this beautiful background. When you remove the Post It Note, you are left with a circle of Very Vanilla that adds wonderful contrast to the card and is a perfect spotlight for the floral image. To create the floral image, I stamped the image with Memento Tuxedo Black ink onto Very Vanilla cardstock and I die cut it with the coordinating die. I colored the image using Classic inks and a Blender Pen. I attached the floral image to the card front using Stampin' Dimensionals so that the flowers are inside the Very Vanilla circle. I wrapped a piece of Linen Thread around the card front twice and tied a bow over the stems of the floral image. The sentiment was heat embossed with Copper embossing powder onto the Very Vanilla Label and I attached it to the Mossy Meadow Label with Stampin' Dimensionals, slightly off setting it. I added the sentiment to the card front so that it overlaps the Linen Thread on the right side of the card front. To finish off the design, I added three of the small Copper Brushed Metallic Dots to the card front. 
Thank you for taking the time to visit my blog. I hope that my card design will help inspire you to create your own wonderful projects using this color combination.
Now it's time to visit Sonja's blog and see what she has created with this month's color combination. Just click the Next button below to visit her blog. We would appreciate it if you would leave us a comment and let us know what you liked about our projects. I hope you enjoy the rest of our blog hop. 


If you live in the U.S. and do not have a Stampin' Up! Demonstrator, please contact me and I would be happy to help you with your creative projects. You may also visit my Online Store to place your order and have it shipped to you. 

Until Next Time

Happy Stamping,

Tricia Butts
Independent Stampin' Up! Demonstrator

Like What You See? Visit My Online Store Here

Visit My Facebook Business Page for Updates & Ideas

Click here to Contact Me


Get Creative For The Holidays 
With The July-December 2022 Mini Catalog
Click Below To Visit My Online Store

Last Days To Sign Up
For The Ho Ho Ho Paper Pumpkin Card Kit
Click Below To Subscribe By October 10th


Monday, December 6, 2021

Kylie Bertucci's Monthly International Blog Highlights December 2021

Welcome to Kylie Bertucci's Monthly International Blog Highlights for December as we showcase beautiful Thank You cards to help inspire you. Thank You cards are one of the most important cards you can send to the people in your life and we hope that our projects and ideas will help encourage you to create your wonderful cards. You will have the opportunity to visit with talented Stampin' Up! Demonstrators from all over the world as the share their amazing Thank You cards. 
One of my favorite ways to create pretty Thank You cards is with designer series paper. For today's card design, I chose to use one of the beautiful designs from the Harvest Meadow Designer Series Paper in the July-December 2021 Mini Catalog. I am so sad that this pretty paper is retiring, so I am making the most of the opportunity to showcase it while it's still available. I paired it with the coordinating Nature's Harvest stamp set, with one of my favorite techniques, Heat Embossing. I love the way the White embossing powder pops against the Misty Moonlight cardstock and coordinates with the pattern in the designer series paper. This wonderful clean and simple card design is perfect for creating multiple cards to have on hand in your stash, just waiting for that moment when you need a special Thank You card. 
Products Used:
Nature's Harvest stamp set (item #156495)
Harvest Meadow Designer Series Paper (item #156494) Retiring)
Stitched So Sweetly Dies (item #151690)
Misty Moonlight Cardstock (item #153081)
Versamark Pad (item #102283)
Basics Embossing Powders (item #155554)
Misty Moonlight Stampin' Blends Combo Pack (item #153108)
Whit 1/4" Crinkled Seam Binding Ribbon (item #151326)
Opal Rounds (item #154289)
Stampin' Dimensionals (item #104430)
Measurements:
Misty Moonlight Cardstock
Card Base - 8 1/2" x 5 1/2" (Scored at 4 1/4")
Focal Label die cut with Stitched So Sweetly Dies
Sentiment Label die cut with Stitched So Sweetly Dies
Harvest Meadow Designer Series Paper
Card Front - 5 1/4" x 4"
This pretty clean and simple card design is easy to assemble and requires just a few supplies to complete. The designer series paper card front provides a wonderful background for the card and helps make the Misty Moonlight labels stand out. I love how the White embossing steps up this card design and I used the Light Misty Moonlight Stampin' Blends Marker to color a piece of the White Crinkled Seam Binding Ribbon to embellish the card. To finish off the design, I added three of the Opal Rounds for a touch of bling. There are so many beautiful designs in this pretty designer series paper pack that you could use to create your own wonderful Thank You cards, using this simple layout. I hope you will give it a try and create your own beautiful cards. 
Thank you for taking the time to visit my blog. I hope that my card design will help inspire you to create your own beautiful cards to send to the people in your life. It's amazing what a difference a card can make to help brighten someone's day and help them feel appreciated.
I would love it if you would vote for my card design as part of this month's Blog Highlights. Just click the Vote button below and click on the heart above my card (#25) to vote for it. You will have the opportunity to vote for 5 cards each day over the next week, so please share the love and visit with my fellow demonstrators and vote for their beautiful cards.


If you live in the U.S. and do not have a Stampin' Up! Demonstrator, please contact me and I would be happy to help you with your creative projects. You may also visit my Online Store to place your order and have it shipped to you. 

Until Next Time

Happy Stamping,

Tricia Butts
Independent Stampin' Up! Demonstrator

Like What You See? Visit My Online Store Here

Visit My Facebook Business Page for Updates & Ideas

Click here to Contact Me


Stock Up On Your Favorite Retiring Products
From The July-December 2021 Mini Catalog
Click Below To Visit My Online Store 

Have Lots Of Pun
With The December Paper Pumpkin Kit
Click Below To Subscribe by December 10th


Saturday, November 20, 2021

Stamping With Friends November Showcase Blog Hop


Welcome to the Stamping With Friends November Showcase Blog Hop as we share what projects we are currently working on to inspire you. You will be visiting with our Design Team Members as they share their wonderful projects and ideas to help spark your creativity. 
Today I thought I would share a clean and simple card design created with products from the Harvest Meadow Suite in the July-December 2021 Mini Catalog. At this time of the year, we are often busy and trying to create cards for friends and family can be a challenge. I love that this card design is simple to create but has a simply Wow factor that makes it special. I chose to use the Harvest Meadow Designer Series Paper for the background and used the images from the Nature's Harvest stamp set to create the focal image and sentiment. The coordinating Harvest Dies has the perfect size die to create the sentiment label and I used the Layering Circles Dies for the focal design. 
Products Used:
Nature's Harvest Bundle (item #156813)
Layering Circles Dies (item #151770)
Harvest Meadow Designer Series Paper (item #156494)
Crumb Cake Cardstock (item #120953)
Basic White Cardstock (item #159276)
Crumb Cake Classic Ink Pad (item #147116)
Versamark Pad (item #102283)
Basics Embossing Powder (item #155554)
Basic Pearl Jewels (item #144219)
Stampin' Dimensionals (item #104430)
Measurements:
Crumb Cake Cardstock 
Card Base - 8 1/2" x 5 1/2" (Scored at 4 1/4")
Medium Circle die cut with Layering Circles Dies
Harvest Meadow Designer Series Paper
Card Front - 5 1/4" x 4"
Basic White Cardstock
Sentiment Label die cut with Harvest Dies
This design would be great for creating multiple cards to add to your stash. Thank You cards are one the most common cards that we send out and using designer series paper for the background is a wonderful way to create beautiful cards quickly. I love heat embossing, so I embossed the floral image onto the Crumb Cake circle with White embossing powder. I love how it takes the design to the next level and the white embossing really pops against the Crumb Cake background. For the sentiment, I kept it simple by stamping the Thank You with Crumb Cake ink to create a reverse look to the focal image. I attached both the focal image and the sentiment to the card front with Stampin' Dimensionals to pop them up. For a touch of bling, I added some Basic Pearls to the card front to finish off the design. 
Thank you for taking the time to visit my blog. I hope that my card design will help inspire you to create your own beautiful cards to share with family and friends. There are so many wonderful products in the July-December 2021 Mini Catalog to choose from to create wonderful projects. 
Now it's time to visit Victoria's blog and see what she has to share with us. Just click on the Next button or use the Roll Call List below to find your way. Please leave us a comment and let us know what you liked about our projects. Your feedback is greatly appreciated. I hope that you enjoy the rest of our blog hop. 

Roll Call

If you live in the U.S. and do not have a Stampin' Up! Demonstrator, please contact me and I would be happy to help you with your creative projects. You may also visit my Online Store to place your order and have it shipped to you.

Until Next Time

Happy Stamping,

Tricia Butts
Independent Stampin' Up! Demonstrator

Like What You See? Visit My Online Store Here

Visit My Facebook Business Page for Updates & Ideas

Click here to Contact Me