Showing posts with label Stitched So Sweetly Dies. Show all posts

Wednesday, April 20, 2022

New At SU April Blog Hop Celebrating Mother's Day

Welcome to the New At SU April Blog Hop as we celebrate Moms, Dads, Brides & Grads. There are so many special occasions coming up in the next couple of months and our Design Team members will be sharing projects and ideas to help inspire you to create your own beautiful projects. For my card design, I will be Celebrating Mother's Day, a special occasion to celebrate the special mothers in our lives.
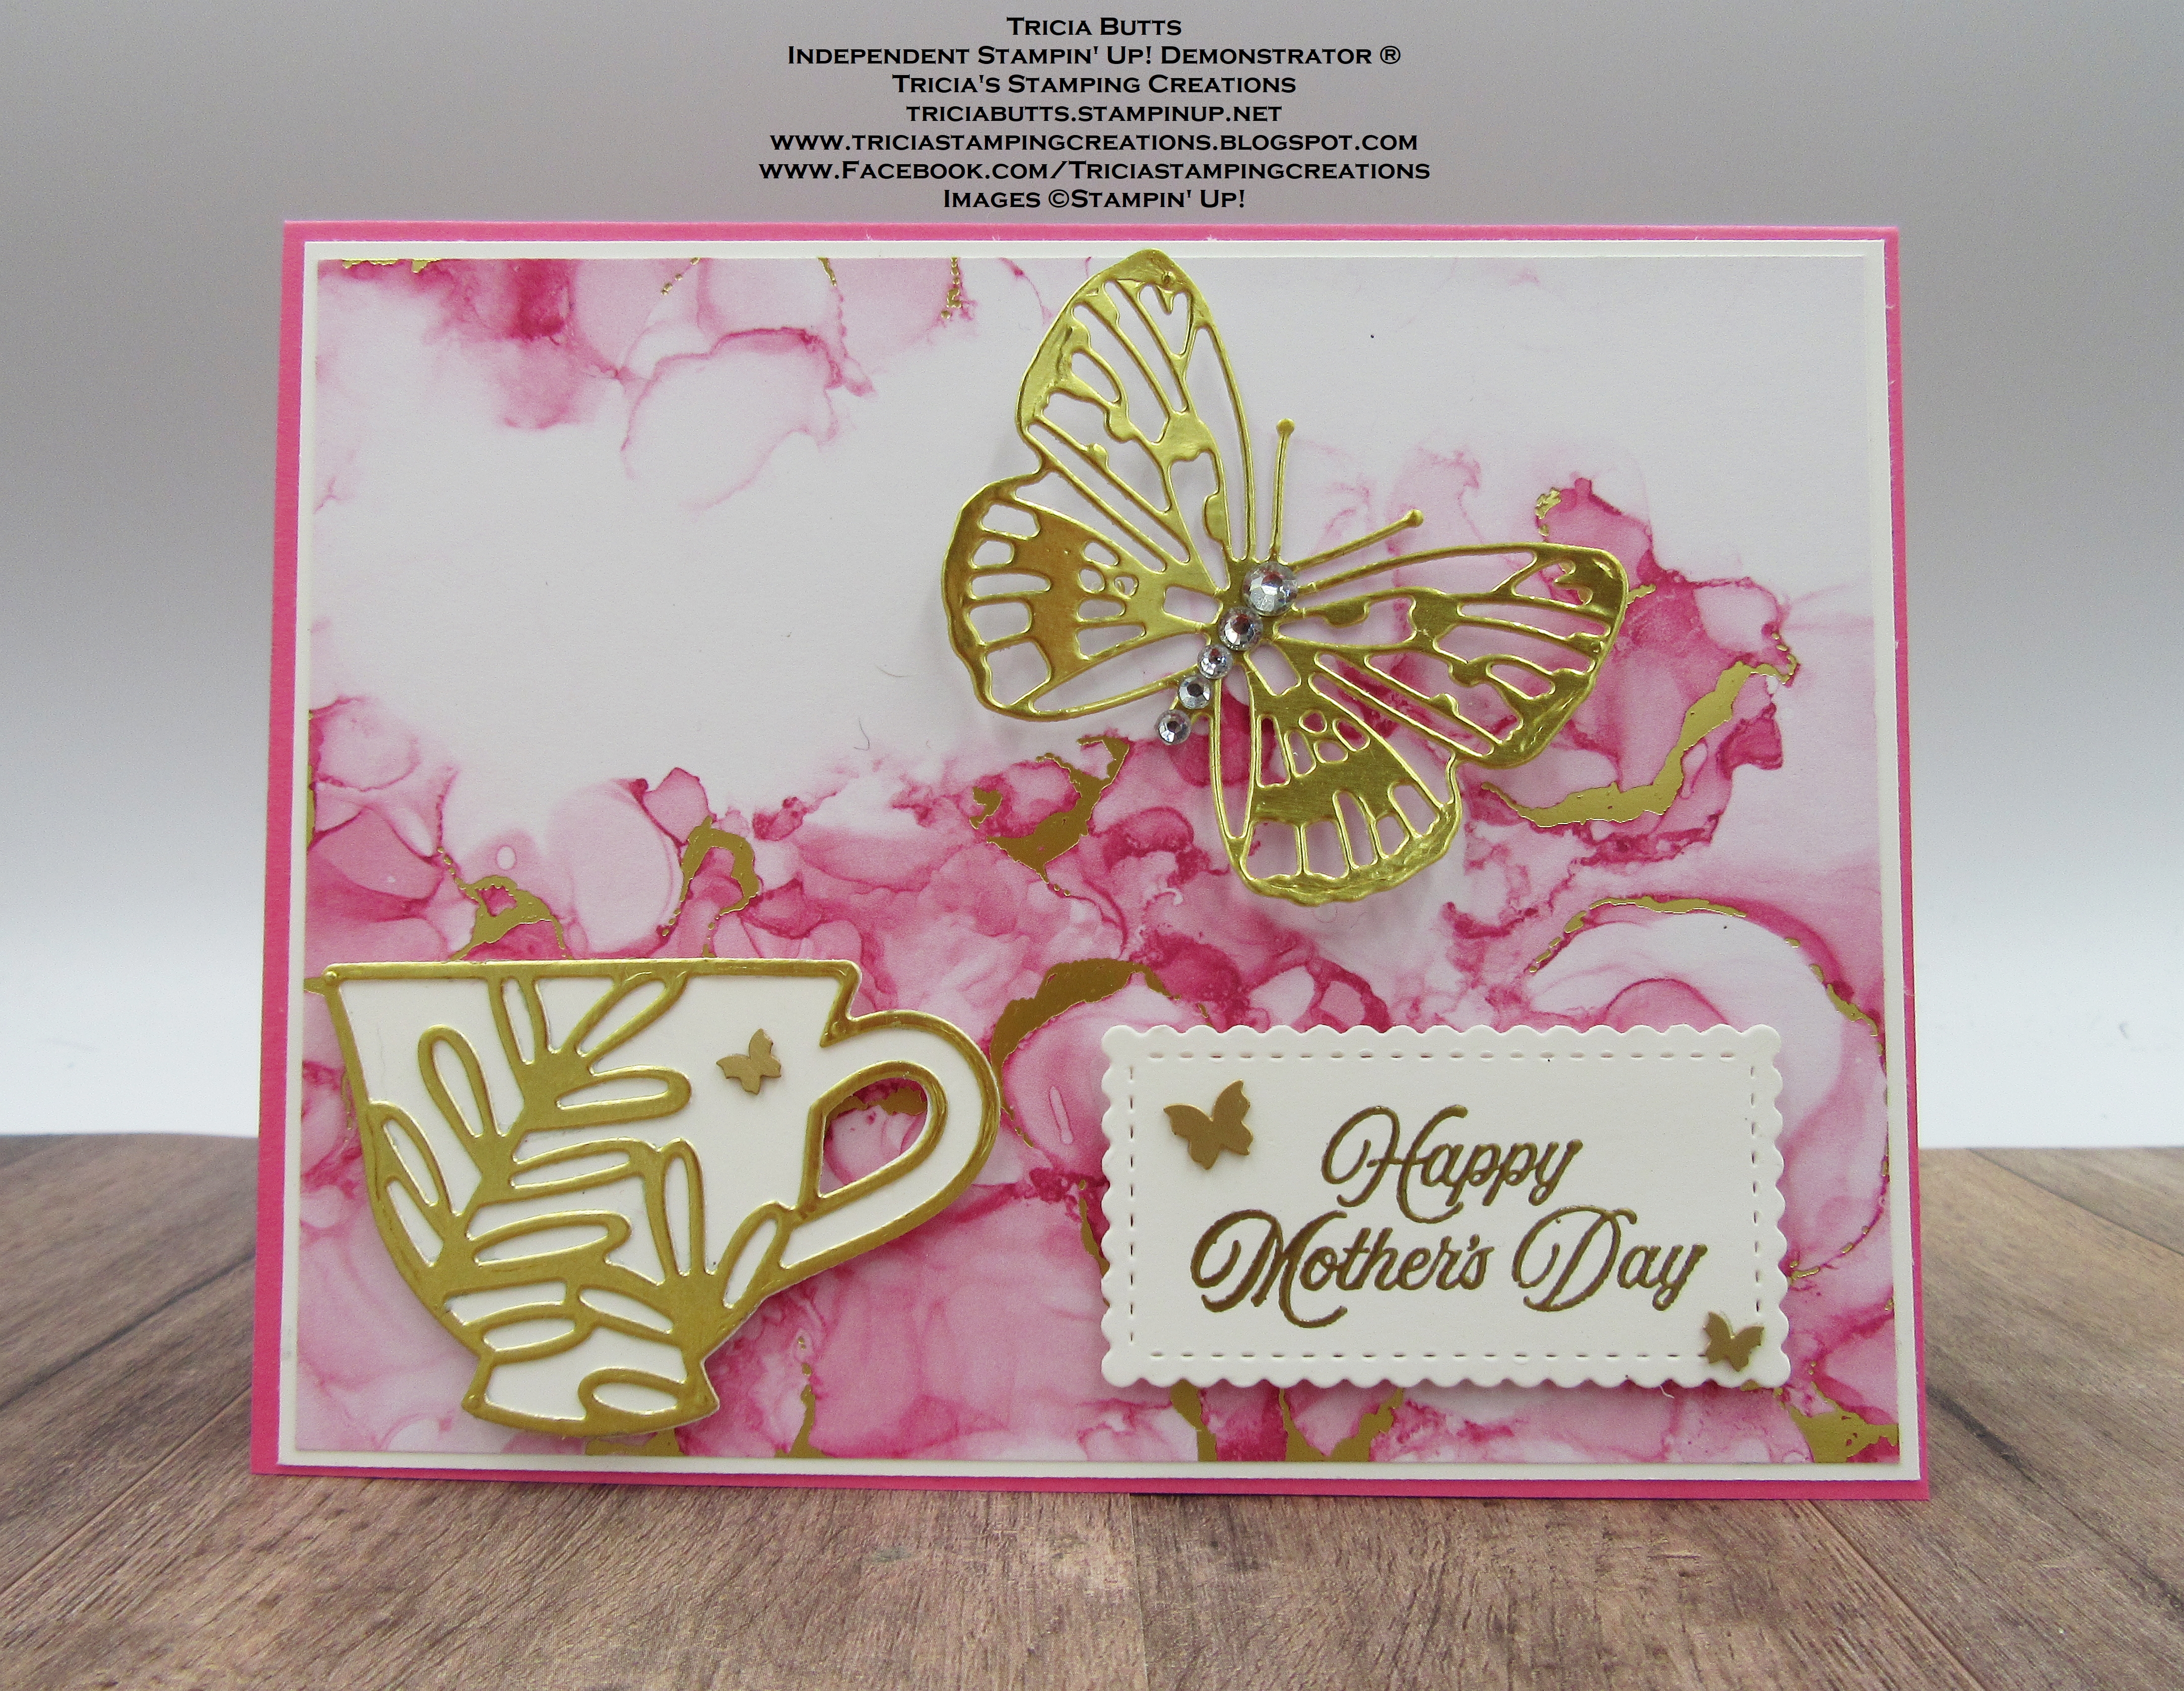
For my card design today, I wanted to create a beautiful, elegant Mother's Day card and what better way to do that than with the gorgeous Expressions In Ink Specialty Designer Series Paper. The designs in this paper pack are simply stunning and I chose to use one of the patterns with the gold foil accents for my background. The Celebrating You stamp set is an amazing sentiment stamp set and I just love the beautiful script for the Happy Mother's Day image. The die cut tea cup is a Sneak Peek from the new 2022-2023 Annual Catalog and was created with the new Teacup Dies. The detailed butterfly die cut is from the Brilliant Wings Dies looks amazing in gold foil to coordinate with the designer series paper.
Products Used:
Celebrating You stamp set (item #158028)
Teacup Dies (item #160186) Sneak Peek from the 2022-2023 Annual Catalog
Brilliant Wings Dies (item #155523)
Stitched So Sweetly Dies (item #151690) Retiring
Expressions In Ink Specialty Designer Series Paper (item #155464) Retiring
Polished Pink Cardstock (item #155710)
Basic White Cardstock (item #159276)
Gold Foil Sheets (item #132622)
Versamark Pad (item #102283)
Metallics Embossing Powder (item #155555)
Brushed Brass Butterflies (item #158136)
Basic Rhinestone Jewels (item #144220)
Stampin' Dimensionals (item #104430)
Mini Glue Dots (item #103683)
Measurements:
Polished Pink Cardstock
Card Base - 8 1/2" x 5 1/2" (Scored at 4 1/4")
Basic White Cardstock
Layer 1 - 5 3/8" x 4 1/8"
Tea cup die cut with the Teacup Dies
Sentiment Label die cut with the Stitched so Sweetly Dies
Gold Foil Sheets
Detailed teacup layer die cut with the Teacup Dies
Detailed butterfly die cut with the Brilliant Wings Dies
Mother's Day cards should be extra special to celebrate the amazing women in our lives. I struggle to create over the top cards with lots of layers, preferring to keep my designs clean and simple. I chose to use Gold Foil to create my detailed butterfly and the detailed layer for my teacup to coordinate with the gold accents in the designer series paper background. For the sentiment, I heat embossed the image with Gold embossing powder for an elegant touch and to tie all the elements of the card together. To embellish the card, I used Basic Rhinestone Jewels for the body of the butterfly to add some bling as well as several of the Brushed Brass Butterflies to embellish the teacup and sentiment label. 
Thank you for taking the time to visit my blog. I hope that my card design will help inspire you to create your own beautiful Mother's Day cards to share with the special women in your life. There are so many wonderful products to choose from to help you create your own unique design. 
Now it's time to take a journey along our blog hop and to see what the rest of the Design Team has to share. Please use the Roll Call List below to find your way by using the Next or Previous or by clicking on the names in the list. 

If you live in the U.S. and do not have a Stampin' Up! Demonstrator, please contact me and I would be happy to help you with your creative projects. You may also visit my Online Store to place your order and have it shipped to you. 

Until Next Time

Happy Stamping,

Tricia Butts
Independent Stampin' Up! Demonstrator

Like What You See? Visit My Online Store Here

Visit My Facebook Business Page for Updates & Ideas

Click here to Contact Me


On April 21st - For One Day Only
Take Advantage Of Free Shipping On Orders of $75 Or More
Click Below To Shop From My Online Store
Time Is Running Out
To Shop From The Last Chance Retirement List
Click Below To Visit My Online Store


Tuesday, April 12, 2022

ICS April Blog Hop It's A Girl Thing

Welcome to the ICS April Blog Hop as we showcase projects created with this month's theme "It's A Girl Thing." Our Design Team Members will be sharing their projects and ideas to help inspire you to create beautiful feminine card designs for the ladies in your life. 
My style is clean and simple, so when I thought about what I would create for this theme, I wasn't imaging ribbons and lace and lots of layers. Instead, I chose to create a colorful background abstract background with the Artistically Inked stamp set and added the beautiful detailed floral die cut created with the Artistic Dies using Gold Foil. I chose to use Fresh Freesia, Polished Pink and Coastal Cabana to create a background that reminds me of a watercolor garden and I couldn't resist adding the gorgeous Brushed Brass Butterflies to embellish my garden design.
Products Used:
Artistically Inked Bundle (item #155456)
Stitched So Sweetly Dies (item #151690) - Retiring
Thick Basic White Cardstock (item #159229)
Basic White Cardstock (item #159276)
Vellum Cardstock (item #101856)
Gold Foil Sheets (item #132622)
Fresh Freesia Classic Ink Pad (item #155611)
Polished Pink Classic Ink Pad (item #155712)
Coastal Cabana Classic Ink Pad (item #147097)
Versamark Pad (item #102283)
Metallics Embossing Powders (item #155555)
Brushed Brass Butterflies (item #158136)
Blender Pens (item #102845)
Mini Glue Dots (item #103683)
Measurements:
Thick Basic White Cardstock
Card Base - 8 1/2" x 5 1/2" (Scored at 4 1/4")
Basic White Cardstock
Card Front - 5 1/4" x 4"
Vellum Cardstock
Sentiment Label die cut with Stitched So Sweetly Dies
Gold Foil Sheets
Detailed Floral die cut with the Artistic Dies 
This pretty card design is so simple to create and you can personalize the card design by changing the background colors. I wanted to create patches of color that would represent the colors of the flowers and the leaves, so I used the large background image from the Artistically Inked stamp set and randomly stamped the background using Fresh Freesia, Polished Pink and Coastal Cabana, including some second and third generation stamping to create layers of color. I stamped the small dots stamp image with Versamark randomly around the background layer and heat embossed them with Gold embossing powder and repeated the process with the lines I created using a Blender Pen with Versamark ink to create gold veins in the design. I attached the detailed Gold Floral die cut to the card front, leaving some room in the bottom right corner of the card for the sentiment label. The sentiment was heat embossed on the Vellum cardstock label with Gold embossing powder and I attached it to the bottom right corner with Mini Glue Dots. To finish off the card design, I added the beautiful Brushed Brass Butterflies to give the illusion of them flying around my pretty card design. This card design has all the things I love about creating - pretty colors, Gold Foil, embossing and butterflies. How could I not love it. 
Thank you for taking the time to visit my blog. I hope that my card design will help inspire you to create your own pretty cards to share with the wonderful women in your life. There are so many wonderful options to explore. 
Now it's time to visit Janey's wonderful blog and see what she has created to share with us. Just click the Next button below to visit her blog. We would love it if you would leave us a comment and let us know what you liked about our projects. I hope that you enjoy the rest of our blog hop. 

If you live in the U.S. and do not have a Stampin' Up! Demonstrator, please contact me and I would be happy to help you with your creative projects. You may also visit my Online Store to place your order and have it shipped to you.

Until Next Time

Happy Stamping,

Tricia Butts
Independent Stampin' Up! Demonstrator

Like What You See? Visit My Online Store Here

Visit My Facebook Business Page for Updates & Ideas

Click here to Contact Me


Time Is Running Out
To Shop From The Last Chance Retirement List
Click Below To Visit My Online Store

Celebrate In Color
With The May Paper Pumpkin Kit
Click Below To Subscribe By May 10th


Saturday, April 9, 2022

Stamping Inkspirations April Blog Hop Fun Folds

It's time to hop along with the Stamping Inkspirations April Blog Hop as we showcase beautiful fun fold card designs to help inspire you. Our wonderful Design Team Members will be sharing their amazing projects and ideas to help you step outside your comfort zone and take your cards to the next level. 
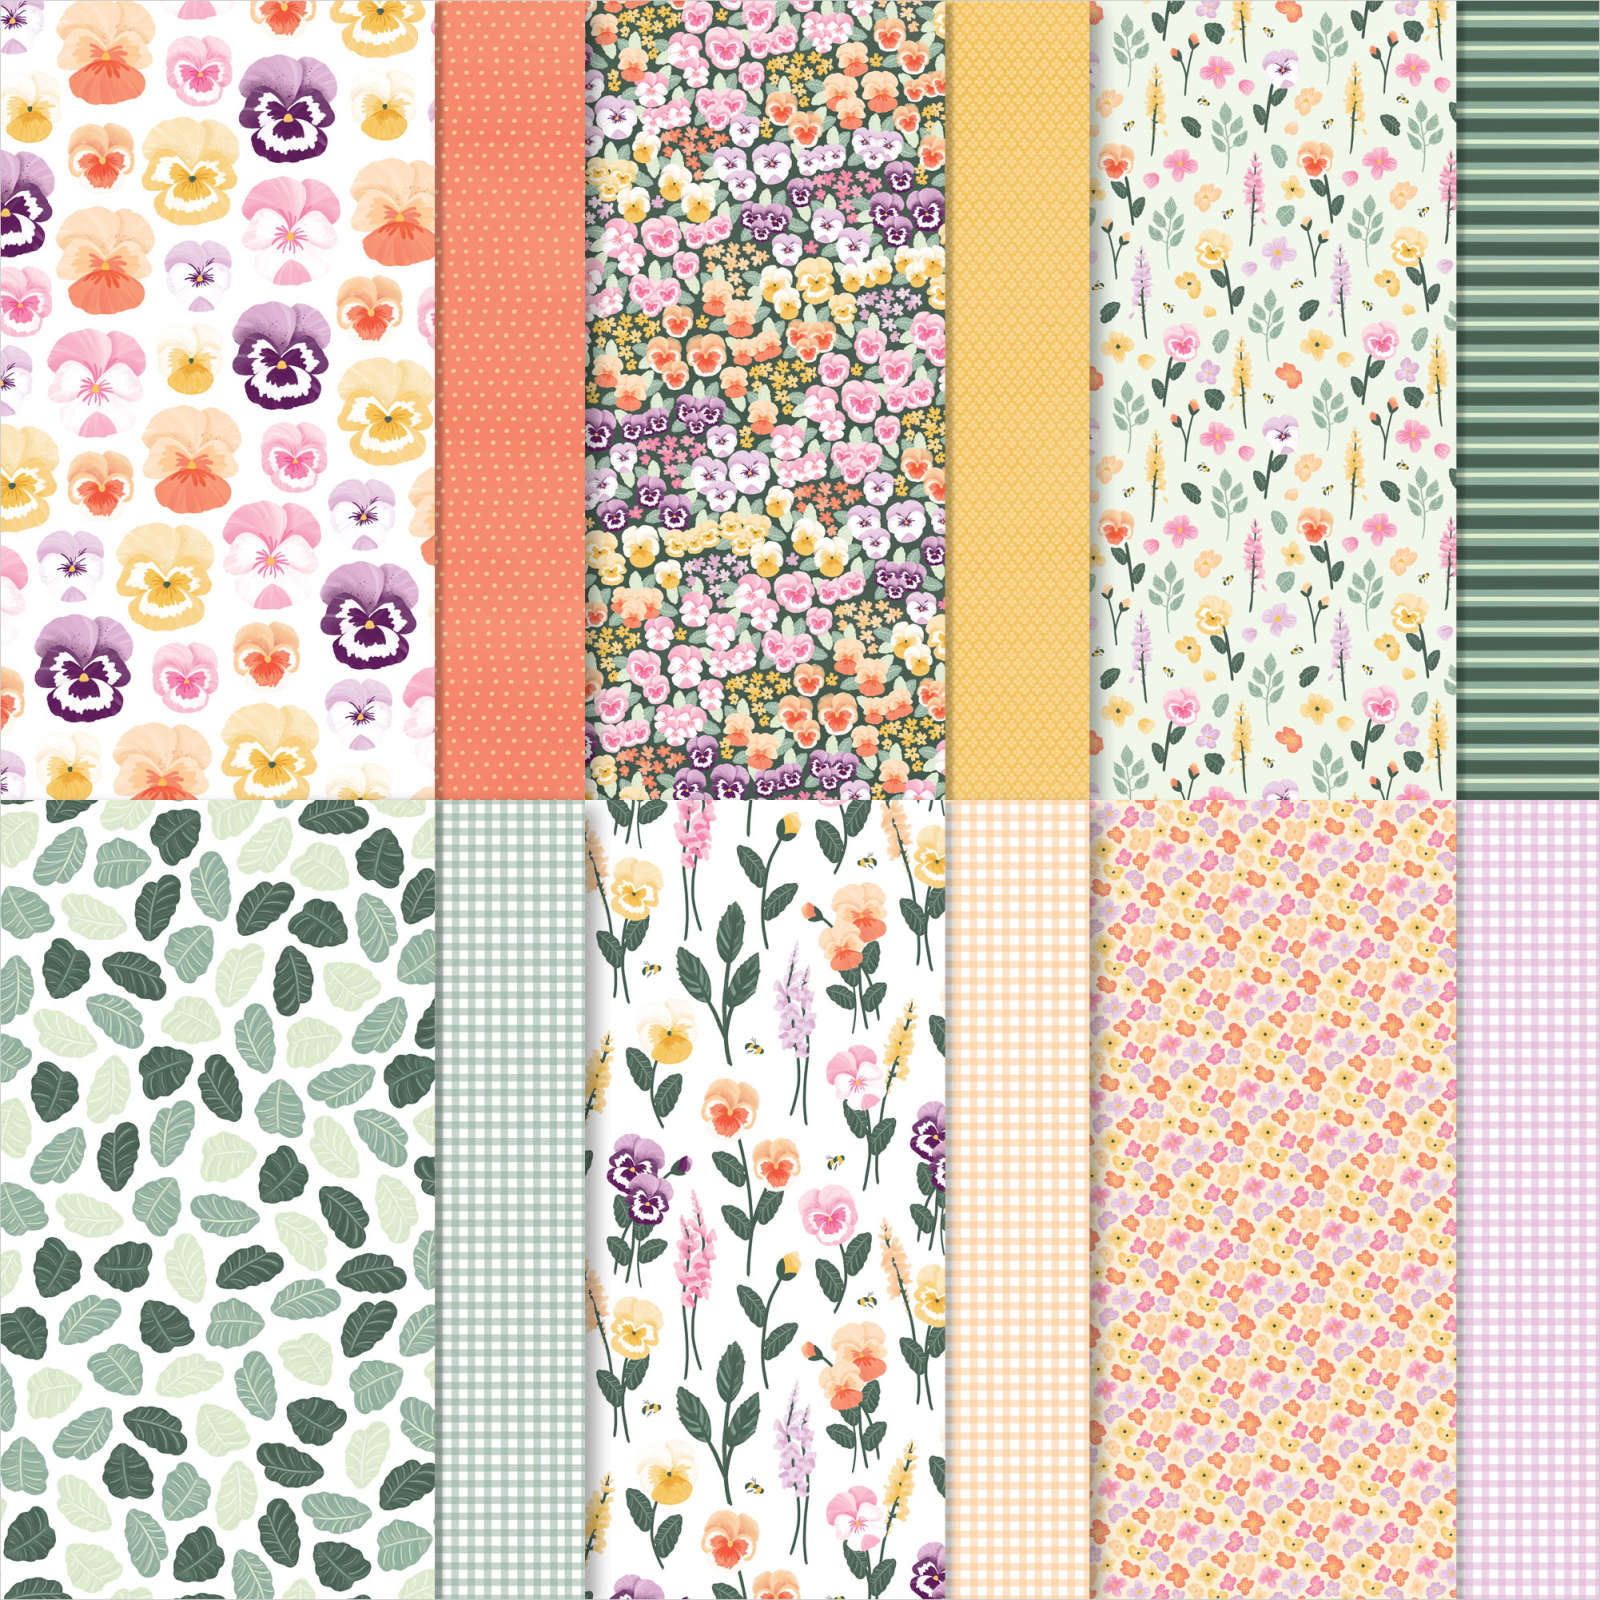
With Easter coming up soon, I thought I would create a simple fun fold to celebrate the occasion. For this card design I chose the Easter Friends stamp set with its wonderful images and sentiments and paired it with the pretty Pansy Petals Designer Series Paper. Isn't the bunny in this stamp set simply adorable? This simple fun fold is easy to create and is a wonderful way to step up a standard card base.
Products Used:
Easter Friends stamp set (item #157737)
Pansy Dies 155680)
Tasteful Labels Dies (item #152886) Retiring
Stitched So Sweetly Dies (item #151690) Retiring
Pansy Petals Designer Series Paper (item #155807) Retiring
Fresh Freesia Cardstock (item #155613)
Basic White Cardstock (item #159276)
Cinnamon Cider Classic Ink Pad (item #153114) Retiring
Soft Sea Foam Classic Ink Pad (item #147102)
Versamark Pad (item #102283)
Metallics Embossing Powders (item #155555)
Brushed Brass Butterflies (item #158136)
Stampin' Dimensionals (item #104430)
Blender Pens (item #102845)
Measurements:
Fresh Freesia Cardstock
Card Base - 5 1/2" x 7 1/2" (Scored at 4 1/4")
Pansy Petals Designer Series Paper
Card Front - 3" x 5 1/4" Side Strip - 1" x 5 1/4"
Two pansies die cut with the Pansy Dies
Basic White Cardstock
Focal Label die cut with the Stitched So Sweetly Dies
Sentiment Label die cut with the Tasteful Labels Dies
This cute fun fold is simple to create using a standard size card base (5 1/2" x 8 1/2") by simply cutting off 1" from the card front so that the base measures 7 1/2" x 5 1/2". You will still score the card base at 4 1/4" to create your fun fold. For the card front, I cut a 5 1/4" x 4" piece of the Pansy Petal Designer Series Paper and then cut a 1" strip off of one side to create two pieces measuring 3" x 5 1/4" and 1" x 51/4". I attached the larger piece to the card front and flipped the strip over so that the reverse side faces up. I attached the strip to the inside Basic White layer along the right side and then attached this layer to the inside of the card base. This way when the card is closed, you have that wonderful contrast between the two designs. For the bunny, I stamped it with Cinnamon Cider Classic ink onto the scalloped rectangle layer and used a Blender Pen to soften and lightly color the image. The Blender Pen helps to reactivate the ink to add that soft color to the image. For the grass, I used Soft Sea Foam Classic ink along the bottom to help ground the image and once again softened it with the Blender Pen. For the sentiment, I heat embossed the image with Gold embossing powder onto the sentiment label. To assemble the card front, I attached both the focal image and the sentiment label with Stampin' Dimensionals. I attached the two die cut pansies (from the designer series paper) to decorate the panels. To finish off the card design, I added several Brushed Brass Butterflies for a touch of bling. 
Thank you for taking the time to visit my blog. I hope that my fun fold card design will help inspire you to create your own beautiful cards and explore the variety of fun fold designs available. There are so many wonderful options to try. 
Now it's time to visit Aurélie's wonderful blog to see what she has created for us. Just click the Next button below to visit her blog or use the Roll Call List to find your way. We would appreciate it if you would leave us a comment and let us know what you liked about our projects. I hope you enjoy the rest of our blog hop.

Roll Call List

If you live in the U.S. and do not have a Stampin' Up! Demonstrator, please contact me and I would be happy to help you with your creative projects. You may also visit my Online Store to place your order and have it shipped to you. 

Until Next Time

Happy Stamping,

Tricia Butts
Independent Stampin' Up! Demonstrator

Like What You See? Visit My Online Store Here

Visit My Facebook Business Page for Updates & Ideas

Click here to Contact Me


Stock Up On Your Favorite Retiring Products
Before They Disappear
Click Below To Visit My Online Store

Final Days To Sign Up
For The April Paper Pumpkin Kit
Click Here To Subscribe By April 10th


Friday, March 4, 2022

Global Stamping Friends March Blog Hop Spring Into Stamping

Welcome to the Global Stamping Friends March Blog Hop as we showcase projects to help us Spring into Stamping. It's hard to believe that it's March already and that the official start of Spring is just weeks away. Our Design Team will be sharing their beautiful projects and ideas to help spark your creativity to help you create your own beautiful Spring projects. 
For my Spring card design, I have chosen to use the Art Gallery Bundle that is part of the Savings Are In Bloom Promotion during the month of March. You can save 20% on this beautiful bundle while supplies last and it's perfect for creating wonderful Spring themed projects. I paired it with the Heart & Home Designer Series Paper from the January-June 2022 Mini Catalog. This pretty Fresh Freesia pattern makes a lovely background for my floral card design. I chose to use several of the 2021-2023 In Colors for my color combination and I love the way they pop against the Basic White cardstock layer that was die cut with the Stitched So Sweetly Dies. Did you know that the Stitched So Sweetly Dies and the Floral Gallery Dies fit perfectly in the Mini Stampin' Cut & Emboss Machine? This cute little machine is so versatile and fits perfectly in your craft space. This pretty card design would work well for a variety of occasions and would be a great addition to your card stash.  
Products Used:
Art Gallery Bundle (item #156227) Available for a limited time only
Stitched So Sweetly Dies (item #151690)
Heart & Home Designer Series Paper (item #157928)
Fresh Freesia Cardstock (item #155613)
Basic White Cardstock (item #159276)
Polished Pink Classic Ink Pad (item #155712)
Soft Succulent Classic Ink Pad (item #155778)
Fresh Freesia 3/8" Open Weave Ribbon (item #155615)
2021-2023 In Color Jewels (item #155571)
Stampin' Dimensionals (item #104430)
Measurements:
Fresh Freesia Cardstock
Card Base - 8 1/2" x 5 1/2" (Scored at 4 1/4")
Basic White Cardstock 
Scalloped Rectangle die cut with the Stitched So Sweetly Dies
Sentiment Label die cut with the Stitched So Sweetly Dies
Flower and stem stamped and die cut with the Art Gallery Bundle 
Heart & Home Designer Series Paper
Card Front - 5 1/4" x 4"
This clean and simple card design features the beautiful florals from the Art Gallery Bundle. I stamped the background flower image with Polished Pink Classic ink by stamping it off once on scrap paper before stamping it onto Basic White cardstock. I then stamped the second floral image on top with Polish Pink Classic ink to create the layers of color for the image. I stamped the stem using Soft Succulent Classic ink also onto Basic White cardstock and then used the coordinating Floral Gallery Dies from the bundle to die cut both images. I attached the stem to the Basic White Scalloped Rectangle using Stampin' Dimensionals behind the leaves. Next I attached the floral image with Stampin' Dimensionals towards the top of the rectangle so that it overlaps the top of the stem. I attached the Scalloped Rectangle using Stampin' Dimensionals, to the designer series paper layer which has been adhered to the card base. For the sentiment, I stamped the image with Soft Succulent Classic ink onto the label and attached it to the card front with Stampin' Dimensionals. To embellish the card design, I tied a bow with the Fresh Freesia Open Weave Ribbon and attached it to the stem with a Mini Glue Dot and added Polished Pink Jewels from the 2021-2023 In Color Jewels, to the sentiment label. This color combination is perfect for Spring themed cards and I love how this design turned out.
Thank you for taking the time to visit my blog. I hope that my card design will help put you in the mood to create your own pretty Spring projects with the wonderful products that Stampin' Up! has to offer. Make sure to take advantage of the Savings Are In Bloom Promotion to save 20% off the Mini Stampin' Cut & Emboss Machine and select compatible bundles during the month of March. 
Now it's time to visit Marieke's blog and see what wonderful Spring projects she has to share with us. Just click on the Next button to visit her blog. We would appreciate it if you would leave us a comment and let us know what you liked about our projects. I hope you enjoy the rest of our blog hop. 


If you live in the U.S. and do not have a Stampin' Up! Demonstrator, please contact me and I would be happy to help you with your creative projects. You may also visit my Online Store to place your order and have it shipped to you.

Until Next Time

Happy Stamping,

Tricia Butts
Independent Stampin' Up! Demonstrator

Like What You See? Visit My Online Store Here

Visit My Facebook Business Page for Updates & Ideas

Click here to Contact Me 


Save 20% With The Savings Are In Bloom Promotion
While Supplies Last During The Month Of March
Click Below To Visit My Online Store


Available For A Limited Time
The Waves of the Ocean Collection
Click Below For More Details


Friday, February 4, 2022

Global Stamping Friends February Blog Hop Love & Friends

Welcome to the Global Stamping Friends February Blog Hop as we showcase projects created with the theme "Love & Friends". You will be visiting with our talented Design Team Members as they share their projects and ideas to help inspire you. 
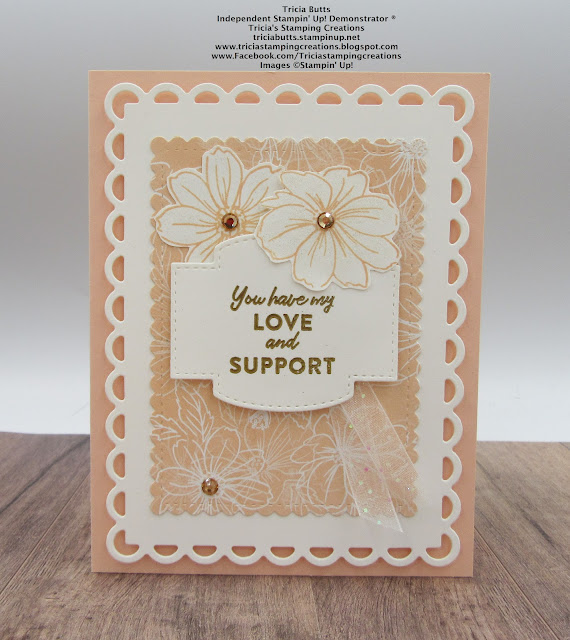
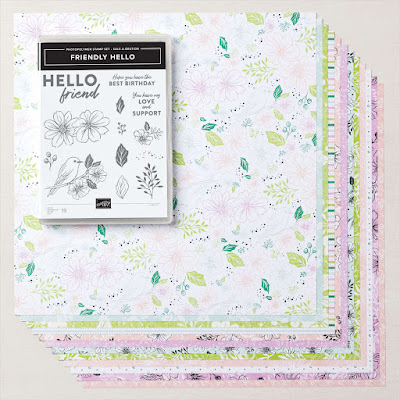
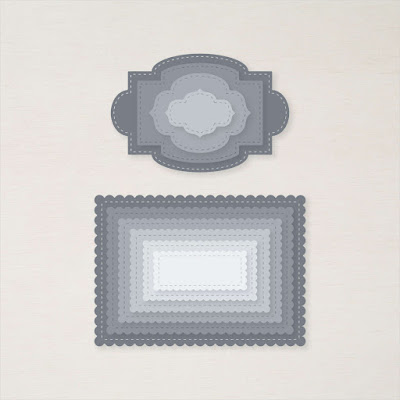
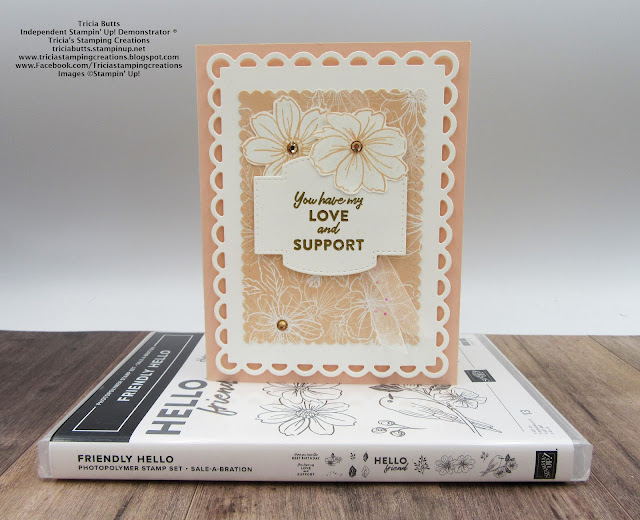
Today's card design features the Friendly Hello Bundle, one of the Level 2 Rewards you can earn during Sale-a-bration. The combination of this beautiful stamp set and designer series paper open up many possibilities for creating beautiful cards for all occasions. For my card, I wanted to create a design that would offer love and support to someone going through a difficult time. These past two years have been difficult for us all, so this type of card can mean the world to someone going through tough times. I paired this bundle with the Stitched So Sweetly Dies and Scalloped Contours Dies to create a pretty clean and simple card. 
Products Used:
Friendly Hello Bundle (item #159990) 
Level 2 Sale-a-Bration Reward
Stitched So Sweetly Dies (item #151690)
Scalloped Contours Dies (item #155560)
Petal Pink Cardstock (item #146985)
Basic White Cardstock (item #159276)
Petal Pink Classic Ink Pad (item #147108)
Versamark Pad (item #102283)
Metallics Embossing Powders (item #155555)
Clear Wink of Stella Glitter Brush (item #141897)
Champagne Rhinestone Basic Jewels (item #151193)
White 3/8" Glittered Organdy Ribbon (item #156408)
Stampin' Dimensionals (item #104430)
Measurements:
Petal Pink Cardstock
Card Base - 8 1/2" x 5 1/2" (Scored at 4 1/4")
Basic White Cardstock
Detailed Scalloped Rectangle die cut with the 
Scalloped Contours Dies
Sentiment Label die cut with the Stitched So Sweetly Dies
Flowers stamped with the Friendly Hello stamp set and fussy cut with Paper Snips
Friendly Hello Designer Series Paper 
Scalloped Rectangle die cut with the Stitched So Sweetly Dies
This lovely card design is easy to create and requires just a few supplies. The color combination of Petal Pink and Basic White is so soft and pretty and I love how the Gold embossing for the sentiment helps step up the design. I stamped the flowers with Petal Pink Classic ink and fussy cut them out with Paper Snips. I colored both flowers with Clear Wink of Stella for a touch of shimmer and added one of the flowers underneath the sentiment label and popped up the second flower with Stampin' Dimensionals so that it overlaps the first flower and the sentiment label. To embellish the card, I added a piece of White Glittered Organdy Ribbon folded in half, underneath the bottom of the sentiment label. I used Champagne Rhinestones for a touch of bling and I love how they coordinate with the Petal Pink cardstock and designer series paper. 
Thank you for taking the time to visit my blog. I hope that my card design will help spark your creativity and inspire you to create your own beautiful projects. There are so many wonderful Sale-a-Bration Rewards you can earn free with a qualifying order. 
Now it's time to visit Marieke's blog and see what she has created. Just click the Next button below to visit her blog. We would appreciate it if you would leave us a comment and let us know what you liked about our projects. I hope you enjoy the rest of our blog hop.  

Roll Call List

If you live in the U.S. and do not have a Stampin' Up! Demonstrator, please contact me and I would be happy to help you with your creative projects. You may also visit my Online Store to place your order and have it shipped to you. Remember, Sale-a-Bration ends February 28th, so place your order soon to avoid disappointment.

Until Next Time

Happy Stamping,

Tricia Butts
Independent Stampin' Up! Demonstrator

Like What You See? Visit My Online Store Here

Visit My Facebook Business Page for Updates & Ideas

Click here to Contact Me


The New All Together Collection
Is Now Available
Click Here To Visit My Online Store

Earn Exclusive Free Products
During Sale-a-Bration
Click Below For More Details

Explore Your Creativity
With The January-June 2022 Mini Catalog
Click Below To Visit My Online Store