Showing posts with label Merry Bold & Bright Designer Series Paper. Show all posts

Wednesday, December 13, 2023

ICS December Blog Hop Homemade Holiday

Welcome to the Inspire. Create. Share December Blog Hop and this month we are focusing on Homemade Holiday projects to share with you. Our wonderful Design Team will be sharing their projects and ideas to help get you in the Christmas spirit as we count down the last days until the big celebration.
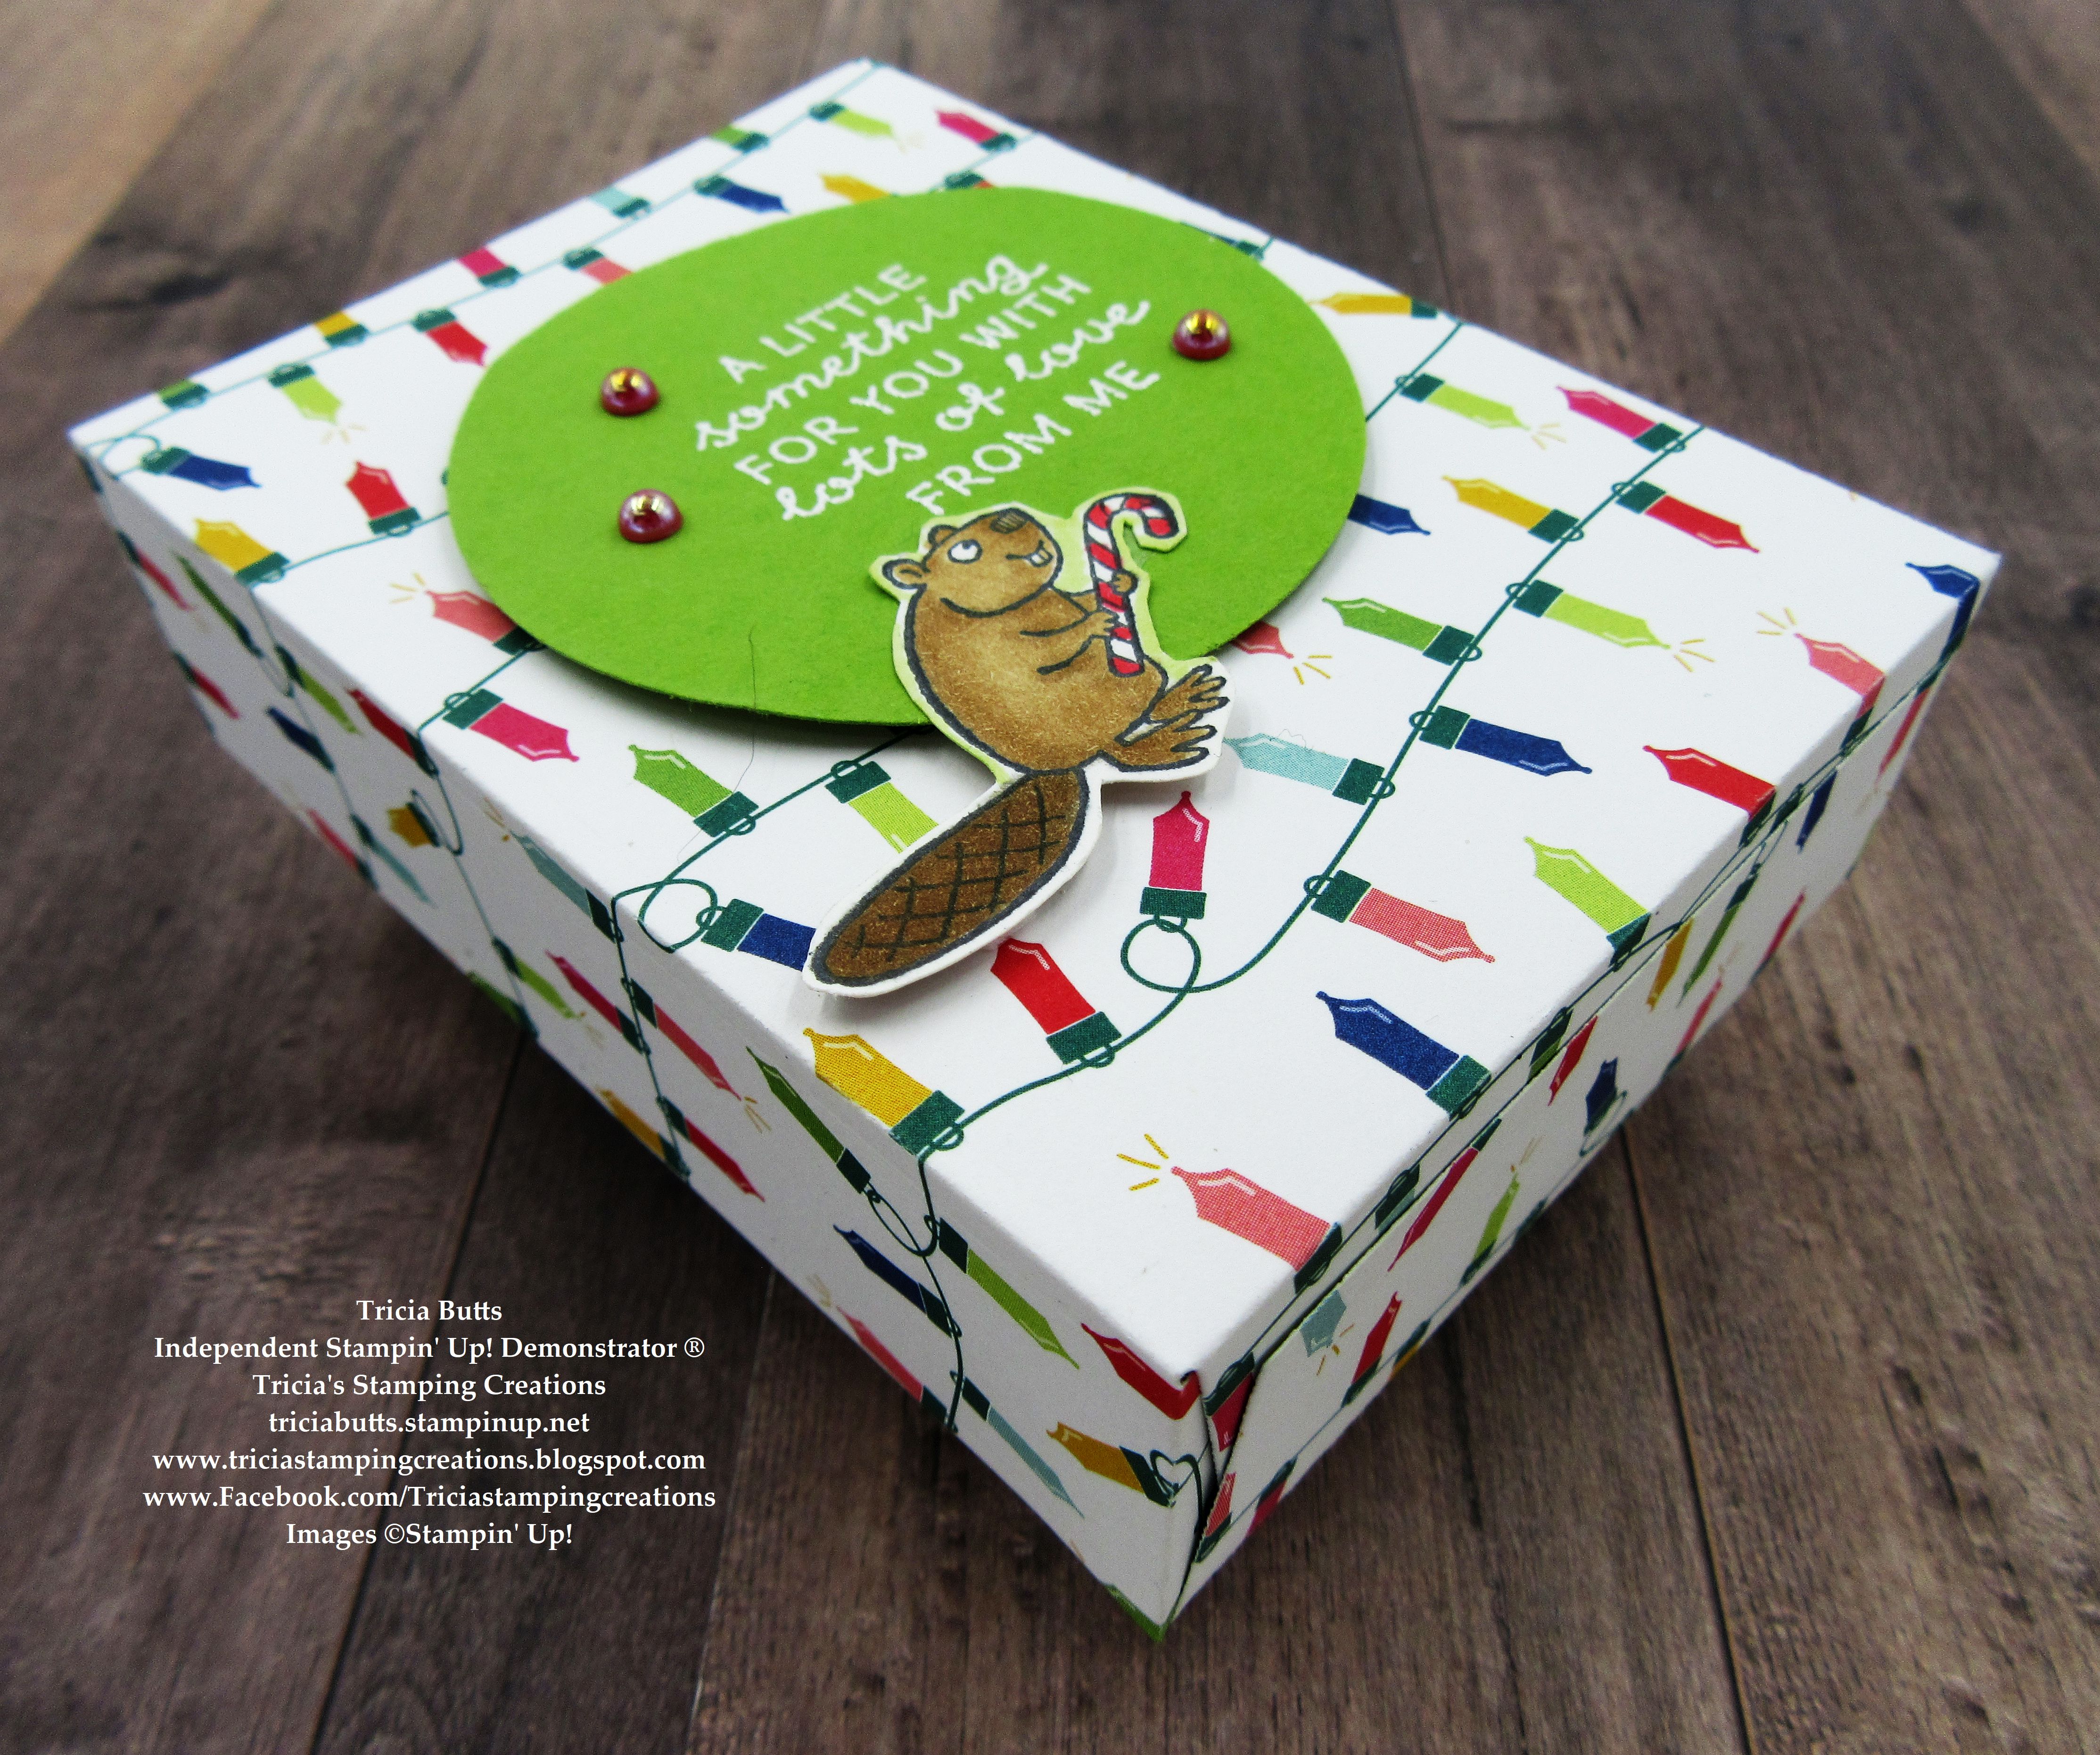
Today I wanted to share a fun treat holder idea that you can create as a quick gift for the holidays. The Tricks or Treats Dies is wonderful for creating a simple treat bag/box and I used a design from the Merry Bold & Bright Designer Series Paper to give it a fun and festive feel. You may remember that I used these dies to create bunch of these treat boxes for Halloween and they were a big hit with the kids who received them. 
Products Used:
Festive & Fun stamp set (item #162078)
Tricks Or Treats Dies (item #162225)
2 3/8" Circle Punch (item #161354)
Merry Bold & Bright Designer Series Paper (item #161945)
Granny Apple Green Cardstock (item #146990)
Basic White Cardstock (item #159276)
Pecan Pie Stampin' Blends Combo Pack (item #161574)
Pebbled Path Stampin' Blends Combo Pack (item #161658)
Poppy Parade Stampin' Blends Combo Pack (item #154958)
Memento Tuxedo Black Pad (item #132708)
Versamark Pad (item #102283)
Basics Embossing Powders (item #155554)
2022-2024 In Color Pearls (item #161621)
Tear & Tape Adhesive (item #154031)
Stampin' Dimensionals (item #104430)
Measurements:
Merry Bold & Bright Designer Series Paper
2 sides for box die cut with the Tricks or Treats Dies
Granny Apple Green Cardstock
Large Circle punched out with the 2 3/8" Circle Punch
Basic White Cardstock
Beaver image stamped and fussy cut with Paper Snips
This cute treat holder is perfect for the holidays and easy to assemble. I love that the die from the Tricks Or Treats Dies does all the work and all I have to do is decide what paper to use and then add some Tear & Tape Adhesive to put it together. The fun part is decorating it to make it extra special. For this treat holder, I used the Festive & Fun stamp set for the sentiment, which I heat embossed onto the Granny Apple Green circle and the cute little beaver that I colored with Stampin' Blends Markers and fussy cut with Paper Snips. I kept the embellishments simple with some Sweet Sorbet Pearls from the 2022-2024 In Color Pearls. Just think of how many treat holders you could create for neighbors and friends to hand out during the holidays. 
Thank you for taking the time to visit my blog. I hope that my project will inspire you to get creative and have fun making your own homemade gifts and decorations. There are so many wonderful possibilities to explore.
Now it's time to visit Deb's blog and see what she has created to share with us. Just click on the Next button to visit her blog. We would appreciate it if you would leave us a comment and let us know what you liked about our projects. I hope you enjoy the rest of our blog hop.


If you live in the U.S. and do not have a Stampin' Up! Demonstrator, please contact me and I would be happy to help you with your creative projects. You may also visit my Online Store to place your order and have it shipped to you. 

Until Next Time

Happy Stamping,

Tricia Butts
Independent Stampin' Up! Demonstrator

Like What You See? Visit My Online Store Here

Visit My Facebook Business Page for Updates & Ideas

Click here to Contact Me


One Day Only - December 14th
Free Shipping On Orders Of $75 Or More
Click Below To Start Shopping

Stock Up On Your Favorite Retiring Products
From The September-December 2023 Mini Catalog
Click Below To Visit My Online Store

Explore The Latest Additions
To The Online Exclusives
Click Below To Shop Now


Saturday, December 9, 2023

Stamping Inkspirations December Blog Hop Sounds of the Season

Welcome to the Stamping Inkspirations December Blog Hop and this month our theme is Sounds of the Season. Our wonderful Design Team members will be sharing their projects and ideas to help inspire you to explore this wonderful theme. There are so many possibilities to explore. 
When I think about the sounds of Christmas, I think of singing Christmas carols and listening to holiday music to get us into the spirit of the season. So for my card design, I chose to use one of the designs from the Merry Bold & Bright Designer Series Paper with the Merry Melody 3D Embossing Folder to create a festive background. The focal image and sentiment are from one of my favorite Christmas stamp sets, Festive & Fun, and I colored the images with Stampin' Blends Markers, one of my favorite ways to color. The result is a bright and festive Christmas card that makes me think of spending time together with family and friends, celebrating the joy of the holidays. 
Products Used:
Festive & Fun stamp set (item #162078) - Retiring
Countryside Corners Dies (item #161471)
Merry Melody 3D Embossing Folder (item #156392)
Merry Bold & Bright Designer Series Paper (item #161945) - Retiring
Shaded Spruce Cardstock (item #146981)
Parakeet Party Cardstock (item #159259)
Basic White Cardstock (item #159276)
Sweet Sorbet Classic Ink Pad (item #159216)
Memento Tuxedo Black Pad (item #132708)
Sweet Sorbet Stampin' Blends Combo Pack (item #159224)
Parakeet Party Stampin' Blends Combo Pack (item #159220)
Balmy Blue Stampin' Blends Combo Pack (item #154830)
Shaded Spruce Stampin' Blends Combo Pack (item #154903)
Crumb Cake Stampin' Blends Combo Pack (item #154882)
Smoky Slate Stampin' Blends Combo Pack (item #154904)
Daffodil Delight Stampin' Blends Combo Pack (item #154883)
Color Lifter (item #144608)
White 1/2" Iridescent Ribbon (item #161955)
Parakeet Party 1/8" Metallic Woven Ribbon (item #159196)
2022-2024 In Color Pearls (item #161621)
Stampin' Dimensionals (item #104430)
Measurements:
Shaded Spruce Cardstock
Card Base - 8 1/2" x 5 1/2" (Scored at 4 1/4")
Large Layer die cut with the Countryside Corners Dies
Parakeet Party Cardstock
Card Front - 5 1/4" x 4" embossed with the Merry Melody 3D Embossing Folder
Merry Bold & Bright Designer Series Paper
Card Front Square - 4" x 4"
Basic White Cardstock
Focal Layer die cut with the Countryside Corners Dies
Sentiment Label die cut with the Countryside Corners Dies
For my card design, I chose to go traditional with a red and green combination using Sweet Sorbet, Shaded Spruce and Parakeet Party. I love how the designer series paper adds a wonderful pop of color against the greens and I embossed the Parakeet Party cardstock to add some texture to the design. I stamped the focal image with Memento Tuxedo Black ink and colored the images with a variety of bright and cheerful colors to bring the design to life. For the sentiment, I used part of one of the images from the Festive & Fun stamp set and die cut it out with one of the Countryside Corners Dies. For the embellishments, I layered the White Iridescent Ribbon with the Parakeet Party Metallic Woven Ribbon to cover the seam of the designer series paper layer and used several Parakeet Party Pearls from the 2022-2024 In Color Pearls. I love how this card turned out and how bright and festive it looks. 
Thank you for taking the time to visit my blog. I hope that my card design will help inspire you to explore this fun theme to help you create your own beautiful projects. Remember to check out the retiring products from the September-December 2023 Mini Catalog to stock up on your favorites before they disappear. 
Now it's time to visit Danielle's blog and see what she has to share with us. Just click on the Next button to visit her blog or use the Roll Call List to find your way. We would love it if you would leave us a comment and let us know what you liked about our projects. I hope you enjoy the rest of our blog hop. 

Roll Call List

If you live in the U.S. and do not have a Stampin' Up! Demonstrator, please contact me and I would be happy to help you with your creative projects. You may also visit my Online Store to place your order and have it shipped to you. 

Until Next Time

Happy Stamping,

Tricia Butts
Independent Stampin' Up! Demonstrator

Like What You See? Visit My Online Store Here

Visit My Facebook Business Page for Updates & Ideas

Click here to Contact Me


Stock Up On Your Favorite Retiring Products
From The September-December 2023 Mini Catalog
Click Below To Start Shopping

Send A Note Of Hope
With The All The Best Paper Pumpkin Kit
Click Below To Subscribe By December 10th

Check Out The Latest Additions
To The Online Exclusives
Click Below To Visit My Online Store


Friday, November 3, 2023

Global Stamping Friends November Blog Hop Thanks A Bunch

Welcome to the Global Stamping Friends November Blog Hop with our theme this month "Thanks A Bunch". Our Design Team will be sharing their projects and ideas to help inspire you to create your own beautiful Thank You cards and projects to send to friends and family to show how much you appreciate them.
For my card design today, I wanted to create something fun and cheerful that would help brighten someone's day. I recently ordered the Fluffiest Friends Bundle as part of my November Online Exclusives preorder and I thought the cute little kitty would be perfect for the focal image of my card design. For the background, I chose to use one of the designs from the Merry Bold & Bright Designer Series Paper. I love that this paper pack has such bold bright colors and patterns that work for so much more than Christmas and the rainbow diagonal stripes were perfect for my card design. 
Products Used:
Fluffiest Friends Bundle (item #162850)
Timeless Arrangements Bundle (item #161526)
Deckled Circles Dies (item #162286)
Merry Bold & Bright Designer Series Paper (item #161945)
Thick Basic White Cardstock (item #159229)
Basic White Cardstock (item #159276)
Memento Tuxedo Black Pad (item #132708)
Pumpkin Pie Stampin' Blends Combo Pack (item #154897)
Petal Pink Stampin' Blends Combo Pack (item #154893)
Crumb Cake Stampin' Blends Combo Pack (item #154882)
Daffodil Delight Stampin' Blends Combo Pack (item #154883)
Granny Apple Green Stampin' Blends Combo Pack (item #154885)
Color Lifter (item #144608)
Glossy Dots Assortment (item #158827)
Stampin' Dimensionals (item #104430)
Measurements:
Thick Basic White Cardstock 
Card Base - 8 1/2" x 5 1/2" (Scored at 4 1/4")
Merry Bold & Bright Designer Series Paper
Card Front - 5 1/4" x 4"
Basic White Cardstock
Medium Circle die cut with the Deckled Circles Dies 
Cat image stamped and die cut with the Fluffiest Friends Bundle
Sentiment Label die cut with the Timeless Arrangements Dies
To create my Thank You card, I used a Thick Basic White card base to help frame the designer series paper card front layer. I love that the Basic White card base helps make the background pop. I chose to use one of the medium size Deckled Circles Dies to die cut the background circle for the cat from Basic White cardstock and attached it to the card front. I stamped the fluffy kit image onto Basic White cardstock with Tuxedo Black ink and colored the image with Stampin' Blends Markers to bring him to life. I used the coordinating dies to die cut the image and attached it to the circle with Stampin' Dimensionals. For the sentiment, I stamped the image with Tuxedo Black ink onto Basic White cardstock and die cut it with the coordinating Timeless Arrangements Dies. I attached it towards the bottom right corner of the card front using Stampin' Dimensionals. To complete the card design, I added several Daffodil Delight Glossy Dots to the sentiment label and card front for a touch of bling. I just love how this Thank You card turned out and how bright and fun it looks. I hope the person receiving this card will love it too.
Thank you for taking the time to visit my blog. I hope that my card design will help spark your creativity and encourage you to create your own Thank You cards to send out to the people you care about. The new November Online Exclusives products will be available beginning November 7th while supplies last and there are so many wonderful new products to explore. 
Now it's time to visit Jan's blog and see what she has to share with us. Just click on the Next button below to visit her blog. We would appreciate it if you would leave us a comment and let us know what you enjoyed about our projects.

Roll Call List

If you live in the U.S. and do not have a Stampin' Up! Demonstrator, please contact me and I would be happy to help you with your creative projects. You may also visit my Online Store to place your order and have it shipped to you. 

Until Next Time

Happy Stamping,

Tricia Butts
Independent Stampin' Up! Demonstrator

Like What You See? Visit My Online Store Here

Visit My Facebook Business Page for Updates & Ideas

Click here to Contact Me


Coming Soon!
New Online Exclusive Products
Available In My Online Store November 7th

Send Holiday Treats
With The Warm Wishes Paper Pumpkin Kit
Click Below To Subscribe By November 10th

Get Creative For The Holidays
With The September-December 2023 Mini Catalog
Click Below To Visit My Online Store


Sunday, October 15, 2023

Stamptastic Friends October Blog Hop Favorite Coloring Method

Welcome to the Stamptastic Friends October Blog Hop and this month we are showcasing our favorite coloring methods. Stampin' Up! has so many wonderful coloring mediums that it is difficult to choose a favorite. Our Design Team will be sharing their projects and ideas to help convince you that their method is the best. I wonder which method they will choose.
One of my favorite ways to color would have to be using Stampin' Blends Markers. I just love how they blend and the beautiful range of colors that Stampin' Up! offers gives me so many options. I find coloring with Stampin' Blends Markers so relaxing and I couldn't wait to use them to color the giraffe image in the new Festive & Fun stamp set. I paired this cute image with the new Merry Bold & Bright Designer Series Paper to create a bright and cheerful Christmas card. Don't you just love the Fa La La La La in the background design? 
Products Used:
Festive & Fun stamp set (item #162078)
Countryside Corners Dies (item #161471)
Inked & Tiled Punch Pack (item #161167)
Merry Bold & Bright Designer Series Paper (item $161945)
Thick Basic White Cardstock (item #159229)
Basic White Cardstock (item #159276)
Memento Tuxedo Black Pad (item #132708)
Granny Apple Green Stampin' Blends Combo Pack (item #154885)
Lemon Lolly Stampin' Blends Combo Pack (item #161673)
Daffodil Delight Stampin' Blends Combo Pack (item #154883)
Pecan Pie Stampin' Blends Combo Pack (item #161674)
Poppy Parade Stampin' Blends Combo Pack (item #154958)
Fresh Freesia Stampin' Blends Combo Pack (item #155518)
Balmy Blue Stampin' Blends Combo Pack (item #154830)
Shaded Spruce Stampin' Blends Combo Pack (item #154903)
Clear Wink of Stella Glitter Brush (item #141897)
Glossy Dots (item #158827)
Stampin' Dimensionals (item #104430)
Measurements:
Thick Basic White Cardstock
Card Base - 9 1/2" x 5 1/2" (Scored at 4 1/4")
Basic White Cardstock 
Focal background die cut with the Countryside Corners Dies
Giraffe image stamped with Festive & Fun stamp set
Sentiment Strip - 1/2" x 4"
Merry Bold & Bright Designer Series Paper
Card Front - 5 1/4" x 4"
I love creating Christmas cards and the Festive & Fun stamp set is one of my favorites from the September-December 2023 Mini Catalog. It's like a Christmas version of the Zany Zoo Bundle in the 2023-2024 Annual Catalog. I chose to use one of the designs from the Merry Bold & Bright Designer Series Paper to add a wonderful pop of color to the card. The giraffe image from the Festive & Fun stamp set is so much fun to color with Stampin' Blends Markers. For a touch of shimmer, I used Clear Wink of Stella on the ornaments and Santa hat. I used the Countryside Corners Dies to create the background for the giraffe and I fussy cut the image and attached it to the background with Stampin' Dimensionals to pop it up. The sentiment has been stamped on a 1/2" strip of Basic White cardstock using Memento Tuxedo Black ink and I used the star punch from the Inked & Tiled Punch Pack to create the banner for the strip. For a touch of bling, I added several Daffodil Delight Dots to complete this bright and cheerful Christmas card. 
Thank you for taking the time to visit my blog. I hope my card design will help inspire you to try Stampin' Blends Markers to color your images for your projects. They are so much fun to use and I love the vibrant colors and how easy they are to blend. 
Please take a moment to hop along and visit the other Design Team members by clicking on the links in the Roll Call List below. We would appreciate it if you would leave us a comment and let us know what you enjoyed about our projects. 
 
If you live in the U.S. and do not have a Stampin' Up! Demonstrator, please contact me and I would be happy to help you with your creative projects. You may also visit my Online Store to place your order and have it shipped to you. 

Until Next Time

Happy Stamping,

Tricia Butts
Independent Stampin' Up! Demonstrator

Like What You See? Visit My Online Store Here

Visit My Facebook Business Page for Updates & Ideas

Click here to Contact Me


Celebrate Stampin' Up!'s 35th Annivesary
With Your Choice of Starter Kit
Click Below For More Details

Get Creative For The Holidays
With The September-December 2023 Mini Catalog
Click Below To Visit My Online Store