Showing posts with label 2019-2021 In Colors. Show all posts

Friday, November 22, 2019

Global Stamping Friends Extraordinary Blog Hop

Welcome to the Global Stamping Friends (aka GSF) Extraordinary Blog Hop as we showcase Sneak Peek projects featuring new products from the New January-June 2020 Mini Catalog and 2020 Sale-a-bration Catalog. I hope our ideas will have you as excited about these new products as we are. 
 Last weekend I attended Onstage in Portland, Oregon and I received some amazing new products from the new catalogs that will launch January 3rd, 2020. One of the perks of being a demonstrator with Stampin' Up! is the opportunity to get new products before anyone else. Today I am sharing a clean and simple card design featuring the images from the new Painted Poppies stamp set and the sentiment from the new Timeless Tulips stamp set. Both of these stamp sets can be found in the January-June 2020 Mini Catalog and can be ordered by themselves or as part of a bundle. Stay tuned for more Sneak Peeks over the next few weeks for more ideas and new products.
 For my card design I chose to use Terracotta Tile cardstock, one of the 2019-2021 In Colors, which just happens to be on sale as part of the Online Extravaganza. Today is the last day of this amazing sale, so make sure to stock up on your favorite products. I added a layer of Whisper White cardstock to create a matte for the focal layer and heat embossed the images and sentiment using Shimmer White Embossing Powder (item #149511)to add a soft sparkle to my card design. 

I used the Everyday Label Punch (item #144668) to punch out the sentiment from Terracotta Tile cardstock and I layered a second label punched from Whisper White behind it to create a frame for the label. I added the sentiment to the card front with Stampin' Dimensionals and added two Basic Pearls to embellish the label. To finish off the card design, I colored the embossed leaves and flowers with Clear Wink of Stella for a touch of shimmer. 
This pretty sympathy card design would also work well for other occasions such as for birthdays, as a get well soon card or something as simple as a thinking of you card. 

Thank you for taking the time to visit my blog today and I hope that you enjoyed my Sneak Peek project from the New January-June 2020 Mini Catalog. If you live in the U.S. and you do not already have a demonstrator, please contact me and I would be happy to help you. 

Now it's time to visit Libby's blog and see what she has created with the new products from the new catalogs. Just click the Next button below to visit her blog or click on the links in the Roll Call List to find your way. I hope that you enjoy our blog hop today.
Blog Hop Roll Call
1. Amanda Farlinger
2. Tricia Butts
3. Libby Dyson
4. Barbara Welch
5. Angélique Stempelkeuken

Until Next Time
Happy Stamping,

Tricia Butts
Independent Stampin' Up! Demonstrator
Like What You See? Visit My Online Store Here
Visit My Facebook Business Page for Updates & Ideas

Click here to Contact Me


Last Day to Take Advantage of the Great Savings During Online Extraganza

The Christmastime Is Here Suite is Available While Supplies Last. Shop Now for these Amazing Products for Christmas

 There is still time to Shop for your Holiday Projects from the 2019 Holiday Catalog

Monday, September 9, 2019

Kylie's Demonstrator Training Blog Hop September 2019

Welcome to Kylie's Demonstrator Training Blog Hop for September and our last blog hop together as part of this wonderful year of training and sharing with my fellow demonstrators from around the world. This has been an amazing experience and I have had the opportunity to meet so many wonderful people and learn so much that has helped me grow as a demonstrator and as a person. I hope that you will enjoy our last blog hop together and be inspired by the amazing projects that we have to share with you all.

 My card design today features the beautiful Woven Threads Designer Series Paper (item #149497) from the 2019-2020 Annual Catalog. I love that the new 2019-2021 In Colors coordinate perfectly with the wonderful patterns in this paper pack and make it simple to create projects using these colors. The combination of Terracotta Tile and Seaside Spray made me think of how we are transitioning from Summer into Fall, I thought these colors worked well together. The Overlay Fun Fold is a wonderful card design that I discovered from fellow demonstrator, Susan Campfield, and I thought would work beautifully with this pretty paper. 
 The sheet of designer series paper that I chose from the Woven Threads Designer Series Paper pack predominantly features Seaside Spray with hints of Terracotta Tile. I chose to use Terracotta Tile cardstock for the base of my card to create a nice contrast.  To create my daisy, I stamped the images from the Daisy Lane stamp set (item #149325) on Whisper White cardstock using Seaside Spray Classic ink. I stamped the medium daisy image twice and then punched both of them out using the Medium Daisy Punch (item #149517) and layered them together with a Mini Glue Dot. I then stamped the large daisy image twice and punched them out using the Daisy Punch (item #143713) and layered them together with a Mini Glue Dot. To complete the daisy, I layered the medium daisy on top of the large daisy and attached them together with several Mini Glue Dots. Did you know that when you order both the Daisy Lane stamp set and coordinating Medium Daisy Punch as the Daisy Lane Bundle (item #151118), you can save 10%? It's a great way to help you with your stamping budget. 
For the inside panel of the card, I attached two 3/4"x4" strips of the Woven Threads Designer Series Paper to the sides of the 5 1/4"x4" Whisper White cardstock insert and then attached it to the inside of the card. This provides and area to write a message that will be hidden behind the front panel of the card.
 For the front of the card design, I attached a 3/4"x5 1/4" strip of the same designer series paper across the top of the Terracotta Tile card base, which has been cut to 5 1/4" x 5 1/2" and scored at 1" along the 5 1/4" side to create a small flap. I attached a 5" x4" piece of Terracotta Tile cardstock to the inside of the card flap using Tear & Tape Adhesive for added strength, lining up the bottom of the piece with the base of the back of the card base. For the design area, I added a 3"x3 3/4" Whisper White cardstock layer to the Terracotta Tile layer. I heat embossed the sentiment from the Magnolia Blooms stamp set (item #152729) with Copper Embossing Powder onto the Whisper White cardstock. 

I punched out two of the leaves from Pear Pizzazz cardstock using the Leaf Punch (item #144667) and attached them to the card front with Snail Adhesive so that the stems would be underneath the daisy. I also attached a piece of the Terracotta Tile 1/2" Scalloped Linen Ribbon (item #149705) between the leaves so that it would stick out from underneath the daisy. To finish off the card, I attached the Seaside Spray daisy onto the card front with Stampin' Dimensionals, making sure to center it so that it the leaves and ribbon were visible. For a touch of bling, I added a Clear Faceted Gem (item $144142) to the center of the daisy and lightly brushed the petals with the Clear Wink of Stella for a touch of shimmer. 
Thank you for taking the time to visit my blog today. I hope that my card design will inspire you to try this fun fold and explore using the amazing designer series paper that Stampin' Up! has to offer. Remember that there is a special promotion during the month of September. See the link below my signature for more details. Please take the time to visit all the wonderful blogs listed below for more fabulous projects from my fellow demonstrators. I hope that you enjoy our last blog hop. 

A big thank you to Kylie and Bruno Bertucci for this wonderful training experience and for all the amazing information and support during this past year. I am so happy to be a part of the Stampin' Up! family and for having the chance to get to know you and meet you. 

Until Next Time
Happy Stamping,


Tricia Butts
Independent Stampin' Up! Demonstrator
Like What You See? Visit My Online Store Here
Visit My Facebook Business Page for Updates & Ideas


Click here to Contact Me

September is the month to take advantage of the Buy 3, Get 1 Free Designer Series Paper Promotion. Choose from the select paper packs in the 2019-2020 Annual Catalog. Click the link below for more details.

Tuesday, July 30, 2019

Paper Pumpkin Possibilities July Blog Hop On My Mind

Welcome to the Paper Pumpkin Possibilities July Blog Hop and this month we are featuring the On My Mind Kit. This wonderful kit features three of the amazing suites in the 2019-2020 Annual Catalog to help you create 9 beautiful card designs. As you hop around on our blog hop today, you will see creative alternative projects that our design team have to share to help inspire you to think outside the box. I hope you enjoy this month's blog hop. 
To create my alternative card design this month, I chose to use mainly supplies from the July kit with just a couple of the new 2019-2021 In Color products to complete it. I chose to use the Sahara Sand print card base for my card and used the frame from around one of the Woven Threads patterned pieces in the kit, to create the focal layer. 
 I cut a piece of Pretty Peacock cardstock to fit behind the frame and stamped a tone on tone design using the medallion image from the stamp set in the kit, using the Pretty Peacock Classic ink spot that is also included in the kit. I adhered the frame to the cardstock layer with Snail Adhesive. Using a piece of Terracotta Tile 1/2" Scalloped Linen Ribbon (item #149705), I attached it along the bottom of the panel using Snail Adhesive to complete the frame.
To create the sentiment, I stamped the Happy Birthday image onto the label from the kit, with Versamark ink and heat embossed it with Gold embossing powder. Using two of the labels from the kit, one Seaside Spray and the other Terracotta Tile, I cut them both in half and used the Banner Triple Punch (item #138292) to flag the ends of the Terracotta Tile Label. I then attached the labels on either side of the sentiment using the Mini Glue dots included in the kit. 
 To complete the card design, I tied two bows using the Linen Thread included in the kit and attached them on either side of the sentiment label with Mini Glue Dots. Using the Mini Dimensionals from the kit, I attached the sentiment label to the center of the panel and then attached the panel to the card base with Mini Dimensionals. I loved that I was able to make use of the supplies from the kit to create this card design and come up with something fun that would work well as either a masculine or feminine card. 
Thank you for taking the time to visit my blog today and I hope that my card design will help inspire you to explore new ways to use the supplies in this month's kit. If you live in the U.S. and do not already have a demonstrator, please contact me and I would be happy to help you. 

Now it's time to visit Lisa's blog and see what she has created for us this month. Just click the Next button below to visit her blog. I hope you enjoy the rest of your journey along our blog hop. 
Until Next Time
Happy Stamping,


Tricia Butts
Independent Stampin' Up! Demonstrator
Like What You See? Visit My Online Store Here
Visit My Facebook Business Page for Updates & Ideas

Click here to Contact Me 

August's Paper Pumpkin Kit is perfect for Fall. Watch this Sneak Peek video for more details:


Final Days to Earn Coupons!
Bonus Days are Back! For every $50 you spend July 1-31 
(Before S&H and Taxes), you'll get a $5 Bonus Days Coupon that you can use August 1-31. There is no limit to how many coupons you can earn, so shop all month!

 Sign Up to Join My Team - Just $99 for your Starter Kit 
& Choose $155 in Product 
Plus Get a $10 Coupon for the Following Month

Friday, June 14, 2019

SBTD Something Old & Something New Blog Hop

Welcome to the SBTD Something Old & Something New Blog Hop. This month we are sharing ideas and projects to help you pair up new products from the new 2019-2020 Annual Catalog with old favorites that have carried over from past catalogs. 
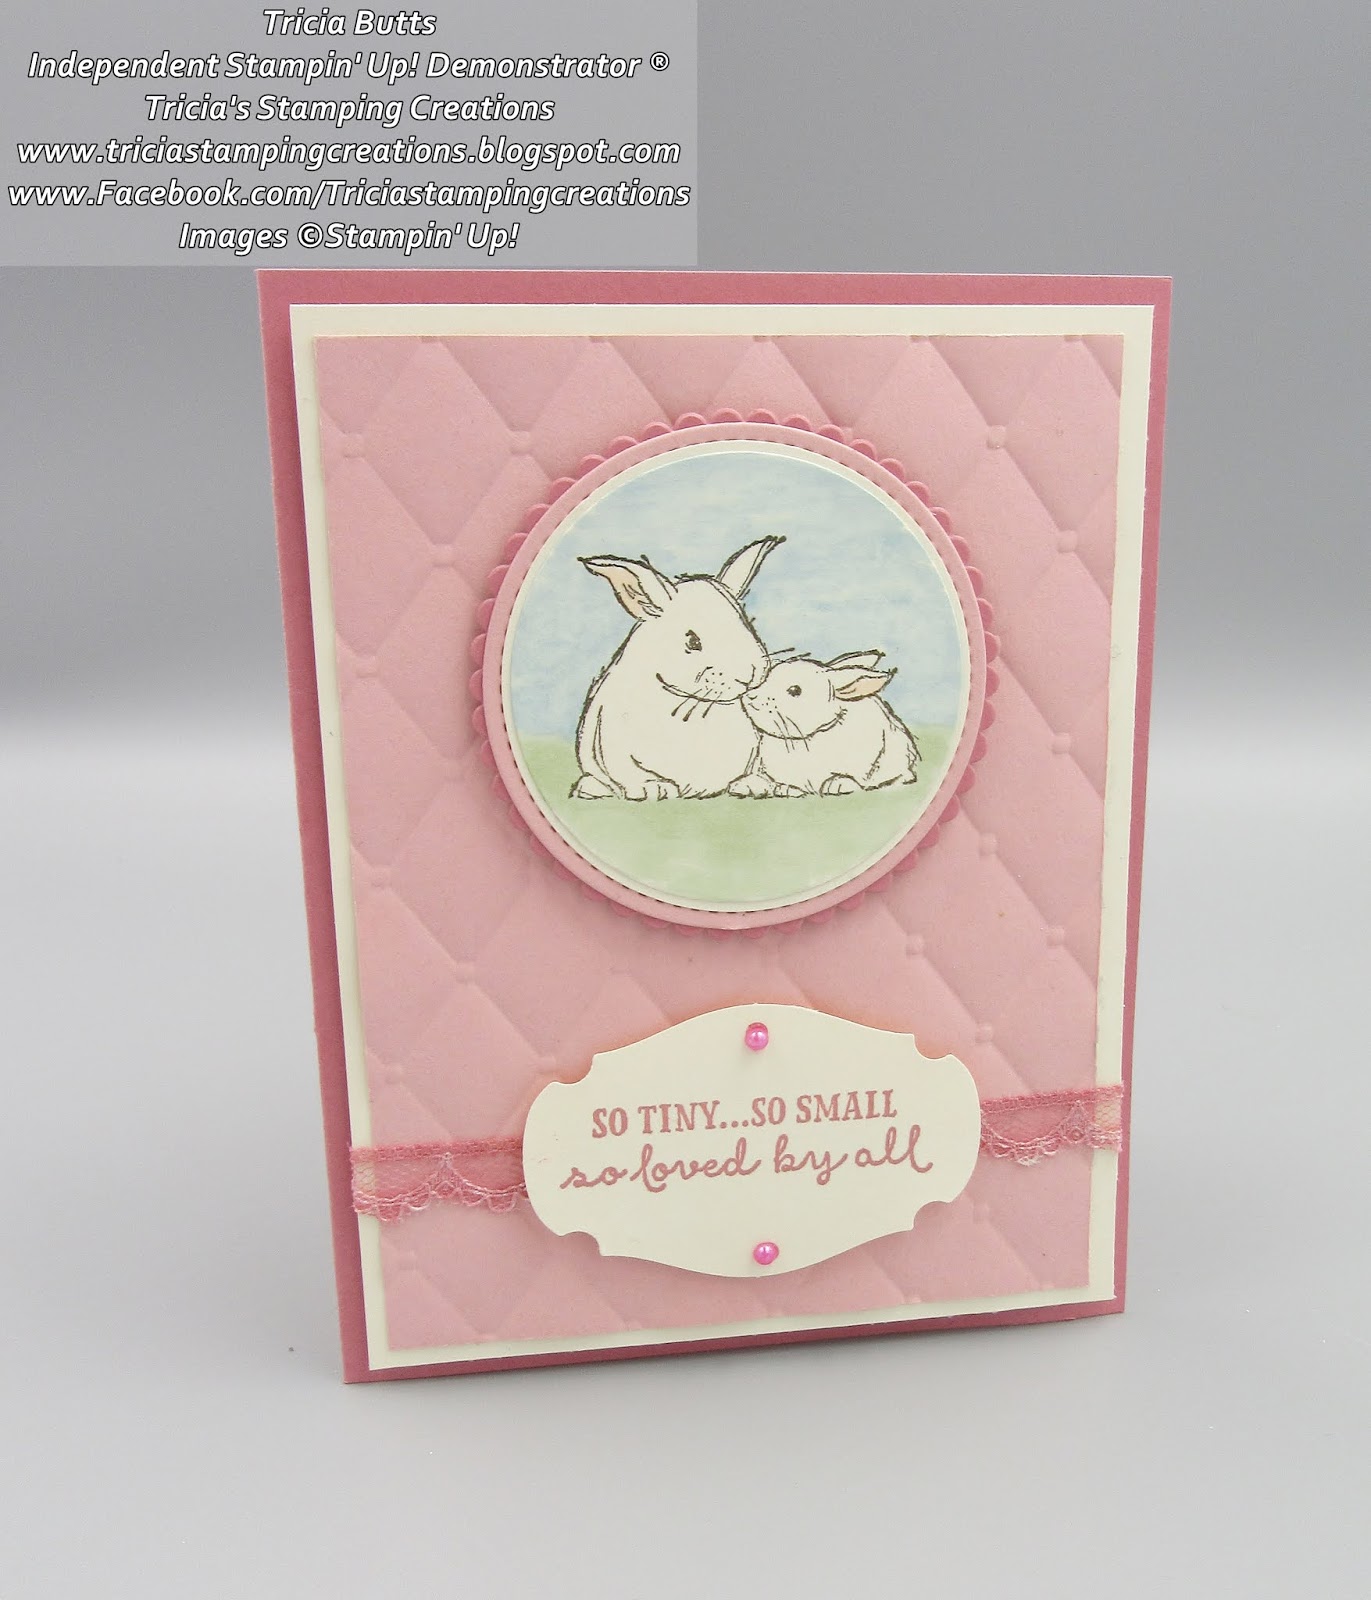
 My card design today features the new Wildly Happy Cling stamp set (item #149408) paired with the Layering Circles Dies (item #141705) and Stitched Shapes Dies (item #152323) from the 2019-2020 Annual Catalog. I thought it would be fun to pair a new stamp set with some old favorite die sets.
 My card base was created from Rococo Rose cardstock, one of the new 2019-2021 In Colors. It works beautifully with Very Vanilla and Blushing Bride cardstock. I embossed the layer of Blushing Bride cardstock using the Tufted 3D Embossing Folder to create a quilted look to the background. 
The bunnies image has been stamped onto a Very Vanilla cardstock circle die cut using the dies from the Layering Circles Dies. I stamped the image with Early Espresso Classic ink and colored the background and inside of the ears using the Stampin' Blends Markers. I layered the colored image onto a circle of Very Vanilla cardstock that I punched out using the 2 1/4" Circle Punch and then layered it onto a circle die cut from Blushing Bride cardstock using the Stitched Shapes Dies. The last layer was created from Rococo Rose cardstock using one of the Scalloped Circle dies from the Layering Circles Dies. I attached the image to the card front with Stampin' Dimensionals. 
The sentiment was stamped with Rococo Rose Classic ink onto a scrap of Very Vanilla cardstock and punched out using the Story Label Punch. Using the Rococo Rose Light Stampin' Blend Marker,  I colored a piece of the Very Vanilla Lace Trim and attached it to the card front. I attached the sentiment label on top of the lace using Stampin' Dimensionals. To embellish the sentiment, I colored two of the smallest Basic Pearls with the Rococo Rose Light Stampin' Blends Marker and attached them to the label. 

I love the soft and pretty look to this card design and I think it makes a wonderful baby card for a little girl. By changing the colors for this card, you could create a card design suitable for a baby boy or keep it neutral so that it isn't gender specific. 
Thank you for taking the time to visit my blog today and I hope that my card design helps inspire you to mix and match your old favorites with some new products from the 2019-2020 Annual Catalog. If you live in the U.S. and do not already have a demonstrator, please contact me and I would be happy to help you.

Now it's time to visit Courtenay's blog and see what she has to share with us this month. Just click the Next button below to visit her blog. I hope that you will take the time to hop along our blog hop this month and we would appreciate you leaving us a comment. 

Until Next Time
Happy Stamping,


Tricia Butts
Independent Stampin' Up! Demonstrator
Like What You See? Visit My Online Store Here
Visit My Facebook Business Page for Updates & Ideas