Welcome to the first Paper Pumpkin Pop Up Blog Hop. We are a group of Stampin' Up! demonstrators showcasing the amazing 5th Anniversary Paper Pumpkin kit that was release this March. As fans of Paper Pumpkin, we are excited to share with you all our alternative ideas for this incredible paper crafting kit to help inspire you to get creative. This month's kit is called "May Good Things Grow" and is a perfect way to create Spring projects.
You have probably just visited the amazing Janet Wakeland's blog and her wonderful ideas for this kit. Or perhaps you are starting your journey here with me. Either way, I hope that you will enjoy the fabulous ideas shared on this blog hop.
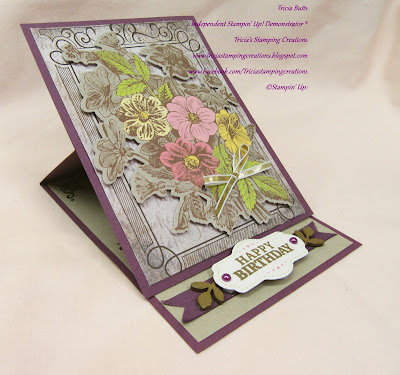
When I saw this amazing Paper Pumpkin kit, I immediately thought of an easel card. To me it was the perfect way to showcase the beautiful designs in this kit. I created the card base from Fresh Fig cardstock and used a piece of Crumb Cake cardstock for the inside layer.
For the inside layer, I stamped the decorative corner images (from the exclusive stamp set included in the kit) in the top corners of the Crumb Cake cardstock and heat embossed them with Gold embossing powder. Next I stamped the sentiment and repeated the process and then finally stamped the bottom two corners and heat embossed to create an area to write a personal sentiment.
At the base of the Crumb Cake cardstock layer, I cut a piece of Fresh Fig ribbon and snipped the ends to create a banner look. I attached the ribbon to the cardstock with Snail adhesive approx. 3/8" from the bottom. For the sentiment, I heat embossed the sentiment with Gold embossing powder onto the tag from the kit and added the purple pearls that were included in the kit to embellish. I added two layers of Stampin' Dimensionals stacked on top of each other to the back of the tag and centered it onto the Fresh Fig ribbon.
The final touch was created by covering two of the wood leaf embellishments with Versamark and then Gold embossing powder, then heat embossed to create the look of gold embellishments. The leaves are from the free gift included in the kit and this is just one fun way that you can alter them to add to your projects. They are attached to the card with several Glue Dots.
To finish off the card, I cut the large background image from one of the decorative envelopes included in the kit to a finished size of 5 1/4" X 4" and layered it onto a piece of Fresh Fig cardstock sized at 5 1/2" x 4 1/4". Next I attached the large floral die cut from the kit using Stampin' Dimensionals and attached it to the background layer. I added Clear Wink of Stella to the die cut flowers and leaves for a little extra shimmer. The bow was created with a piece of Gold 1/8" ribbon and attached with a Glue Dot.
The card front layer was attached to the card base so that the bottom rests against the sentiment to create an easel. I just love the vintage look of this card and how easy it was to create with the supplies in this kit and it was so simple to create. I can't wait to create more of these cards with the rest of this wonderful kit.
I hope that you have enjoyed my project today and I hope it will inspire you to give Paper Pumpkin a try. If you are new to Paper Pumpkin, now is the perfect time to sign up and give it a try. It's simple to sign up and if you sign up between now and May 10th, you will receive 50% off your first 2 months with the Creativity Starts with Paper Pumpkin Promotion. As a new subscriber you just need to enter the Promo code: SAVEFIFTY0418 when you sign up. Please contact your demonstrator to sign up. If you do not have a demonstrator, I would be happy to help you with your Paper Pumpkin subscription. Just click the link below to sign up. If you sign up by April 10th, you will receive the April Paper Pumpkin kit as your first kit.
Now it is time to visit Rachel Tessman's blog and see what exciting ideas she has to share. Please click the Next button below to visit her blog.
Until Next Time.
Happy Stampin',
Tricia Butts
Independent Stampin' Up! Demonstrator ®
Like What you see? Visit My Online Store Here
Visit my Facebook Page


