Wednesday, April 12, 2023

ICS April Blog Hop Spring Is Sprung

It's time to hop along with the ICS April Blog Hop and this month we are celebrating Spring with the theme, "Spring Is Sprung". Our talented Design Team members will be sharing their projects and ideas to help you get creative. 
When I think of Spring and flowers, it reminds me that Mother's Day is less than a month away. I decided to show some love to some of my retiring products to create this beautiful card design that requires minimal stamping and no coloring. The Hues of Happiness Designer Series Paper has so many stunning floral designs that are perfect for creating lovely Spring projects. By mixing and matching products, it's amazing what you can create. 
Products Used:
Celebrating You stamp set (item #158028) Retiring
Blossoming Happiness Dies (item #158823) Retiring 
Split Card Textures Dies (item #159162) Retiring 
Fabulous Frames Dies (item #159163) Retiring 
Double Oval Punch (item #154242)
Hues of Happiness Designer Series Paper (item #158822) Retiring
Pool Party Cardstock (item #122924)
Basic White Cardstock (item #159276)
Brushed Metallic Cardstock (item #153524) Retiring
Versamark Pad (item #102283)
Metallics Embossing Powders (item #155555)
Brushed Brass Butterflies (item #158136)
Stampin' Dimensionals (item #104430)
Measurements:
Pool Party Cardstock
Card Base - 5 1/2" x 8 1/2" (Scored at 4 1/4")
Brushed Gold Metallic Cardstock
Large Frame die cut with the Fabulous Frames Dies
Basic White Cardstock
Background Layer - 4 7/8" x 3 5/8" Die cut with the Split Card Textures Dies
Sentiment Label punched out with the Double Oval Punch
Hues of Happiness Designer Series Paper
Flowers & Leaves die cut using the Blossoming Happiness Dies
This beautiful Mother's Day card is a wonderful combination of die cutting and designer series paper. The flowers and leaves have been die cut from one of the sheets of designer series paper that coordinates with the Blossoming Happiness Dies. The detailed background was created using the Split Card Textures Dies and I framed it with the large frame die from the Fabulous Frames Dies, using the Brushed Gold Metallic cardstock to step up the design. For the sentiment, I heat embossed the image from the Celebrating You stamp set with Gold embossing powder to coordinate with the frame. To complete the card design, I added several Brushed Brass Butterflies for a subtle touch of bling. This card is perfect for creating beautiful cards quickly and without the fuss of coloring images. So many of the products I used are retiring, so if you would like to order them, I recommend doing it soon to avoid missing out. 
Thank you for taking the time to visit my blog. I hope that my card design will help inspire you to create your own beautiful Spring projects. Make sure you take the time to check the Last Chance Products Sale List, with some products discounted up to 60%. These products are available only while supplies last. 
Now it's time to visit Terri's blog and see what she has created this month. Just click the Next button below to visit her blog. We would love it if you would leave us a comment and let us know what you liked about our projects. I hope you enjoy the rest of our blog hop. 

If you live in the U.S. and do not have a Stampin' Up! Demonstrator, please contact me and I would be happy to help you with your creative projects. You may also visit my Online Store to place your order and have it shipped to you.

Until Next Time

Happy Stamping,

Tricia Butts
Independent Stampin' Up! Demonstrator

Like What You See? Visit My Online Store Here

Visit My Facebook Business Page for Updates & Ideas

Click here to Contact Me 


Save Up To 60% On Select Retiring Products
During The Last Chance Products Sale
Click Below To Visit My Online Store


Around The World On Wednesday April Blog Hop April Showers Bring May Flowers

Welcome to the Around The World On Wednesday April Blog Hop. It's hard to believe we are celebrating our 4th Anniversary of our little blog hop and to celebrate our theme is, "April Showers Bring May Flowers." Visit with our talented Design Team members as we share projects and ideas to help inspire you. 
For my card design, I just had to use the products in the Rain or Shine Suite Collection in the January-April 2023 Mini Catalog, as they are a perfect fit for this month's theme. I am so sad that the Rain or Shine Specialty Designer Series Paper is retiring, so I decided to use the designs to create my focal design for this card. I love the shine on the raindrops in the background and on the coat and hat that the fox is wearing. I used the Playing In The Rain Dies to die cut the fox and the puddle images from one of the sheets of designer series paper and I fussy cut two of the flower bushes to embellish the frame around the focal image. The colors are so fun and perfect for Spring and the design gives us hope that with a little rain, we will soon be enjoying flowers blooming in our gardens once more. 
Products Used:
Rain Or Shine Suite Collection (item #160556)
 - Playing In The Rain Bundle (item #160551)
 - Raindrops  Embossing Folder (item #160554)
 - Rain Or Shine Specialty Designer Series Paper (item #160540) Retiring
Layering Diorama Dies (item #155565) Retiring
Stylish Shapes Dies (item #159183)
Misty Moonlight Cardstock (item #153081) Returning Color Sneak Peek
Balmy Blue Cardstock (item #146982)
Versamark Pad (item #102283)
Metallics Embossing Powders (item #155555)
Stampin' Dimensionals (item #104430)
Measurements:
Misty Moonlight Cardstock
Card Base - 8 1/2" x 5 1/2" (Scored at 4 1/4")
Sentiment Label die cut with the Stylish Shapes Dies
Balmy Blue Cardstock
Card Front Layer - 5 1/4" x 4" (Opening die cut with the Layering Diorama Dies)
Rain Or Shine Specialty Designer Series Paper 
Background Layer - 5 " x 3 3/4"
Fox and puddle die cut with the Playing In The Rain Dies
2 sets of flowers fussy cut with Paper Snips
I am so excited that Misty Moonlight is returning and couldn't resist using the cardstock for this card design. It works so well with Balmy Blue and felt that it was the perfect combination for this design. I used the Layering Diorama Dies to die cut the opening from the Balmy Blue cardstock layer and then embossed it with the Raindrops Embossing Folder to tie it in with the background layer. I attached the raindrop designer series panel to the center of the Misty Moonlight card base and then added the Balmy Blue die cut layer with Stampin' Dimensionals to pop it up. To create the focal design, I adhered the puddle to the designer series paper layer and added the fox die cut with Stampin' Dimensionals so that it looked like the fox was about to walk through the puddle. I added the flower bushes on either side of the opening to decorate the frame. For the sentiment, I heat embossed the image from the Playing In The Rain stamp set using Silver Embossing Powder and then die cut it out with the Stylish Shapes Dies. I attached it to the top right corner of the Balmy Blue layer to complete the card design. I decided not to add any other embellishments, preferring to let the shimmer of the designer series paper and the Silver embossing powder add a subtle bling to the card.
Thank you for taking the time to visit my blog. I hope that my card design will help inspire you to get creative and explore creating your own beautiful Spring themed projects.
Now it's time to visit Teri's Blog and see what she has created for Spring. Just click the Next button below to visit her blog or use the Roll Call List to find your way. We would appreciate it if you would leave us a comment and let us know what you liked about our projects. I hope you enjoy the rest of our blog hop. 


If you live in the U.S. and do not have a Stampin' Up! Demonstrator, please contact me and I would be happy to help you with your creative projects. You may also visit my Online Store to place your order and have it shipped to you. 

Until Next Time

Happy Stamping,

Tricia Butts
Independent Stampin' Up! Demonstrator

Like What You See? Visit My Online Store Here

Visit My Facebook Business Page for Updates & Ideas

Click here to Contact Me

Save Up To 60% On Select Retiring Products
From The Last Chance Products List
Retiring Products Available Only While Supplies Last
Click Below To Visit My Online Store


Saturday, April 8, 2023

Colour Combo April Blog Hop

Welcome to the Colour Combo April Blog Hop and this month we have been challenged to use Sahara Sand, Shaded Spruce and Sweet Sorbet to create our projects. Our wonderful Design Team members will be sharing their projects and ideas to help inspire you to explore this fun color combination.
This month's color combination was very challenging and I had to carefully look through my stamp sets and supplies before coming up with my design. This color combination would actually have been great for a Christmas card but unfortunately I didn't have any current stamp sets that worked for this type of card. Then I remembered that the retiring Tea Boutique Cards & Envelopes had a wonderful Sweet Sorbet printed card base that would be perfect for this challenge. I decided to use the Silly Goose stamp set for my focal design and a piece of Sahara Sand Designer Series Paper from the Neutrals 6"x6" Designer Series Pack to complete my card design. 
Products Used:
Silly Goose stamp set (item #160866)
Scalloped Contours Dies (item #155560)
Tea Boutique Cards & Envelopes (item #159270)
Neutrals 6"x6" Designer Series Paper (item #159257) Retiring
Basic White Cardstock (item #159276)
Shaded Spruce Classic Ink Pad (item #147088)
Memento Tuxedo Black Pad (item #132708)
Sweet Sorbet Stampin' Blends Combo (item #159224)
Shaded Spruce Stampin' Blends Combo (item #154903)
Neutrals Stampin' Write Marker Assortment (item #147158) Retiring
Clear Wink of Stella Glitter Brush (item #141897)
Basic Pearls Jewels (item #144219)
Stampin' Dimensionals (item #104430)
Measurements:
Tea Boutique Cards & Envelopes
Sweet Sorbet Card Base (and matching envelope)
Neutrals Designer Series Paper (Sahara Sand Polka Dot)
Large Scalloped Rectangle die cut with the Scalloped Contours Dies
Basic White Cardstock
Medium Scalloped Rectangle die cut with the Scalloped Contours Dies
Balloon stamped with the Silly Goose stamp set and fussy cut with Paper Snips
This fun card design is simple to create and requires minimal coloring. I stamped the goose and sentiment images onto the Basic White scalloped rectangle with Memento Tuxedo Black ink and stamped the balloon image onto a scrap of Basic White cardstock and fussy cut it out with Paper Snips. To add some color to the goose, I used the Sahara Sand Stampin' Write Marker and blended it with Clear Wink of Stella to add a touch of shimmer. I colored the balloon with the Sweet Sorbet Stampin' Blends Markers and added the fussy cut balloon on top of the original balloon with Stampin' Dimensionals to pop it up. I added some Clear Wink of Stella to the balloon to add a little sparkle. For the hat, I used Shaded Spruce and Sweet Sorbet Stampin' Blends Markers and I added some grass to the bottom of the rectangle with Shaded Spruce Classic ink. I adhered the Basic White rectangle to the Sahara Sand Designer Series Paper with Stampin' Dimensionals and then added these layers to the card base to assemble to the card. I colored several Basic Pearls with the Light Shaded Spruce Stampin' Blends Marker and added them to the card front to finish off the design. 
Thank you for taking the time to visit my blog. I hope that my card design will help inspire you to give this color combination a try to create your own beautiful projects. There are so many ways you can mix and match your crafting supplies to create your own beautiful designs. 
Please take the time to visit with my fellow Design Team members by using the Roll Call List below to visit their blogs. We would appreciate it if you would leave us a comment and let us know what you liked about our projects. I hope you enjoy the rest of our blog hop. 

If you live in the U.S. and do not have a Stampin' Up! Demonstrator, please contact me and I would be happy to help you with your creative projects. You may also visit my Online Store to place your order and have it shipped to you. 
 

Until Next Time

Happy Stamping,

Tricia Butts
Independent Stampin' Up! Demonstrator

Like What You See? Visit My Online Store Here

Visit My Facebook Business Page for Updates & Ideas

Click here to Contact Me


Save Up To 60% On Select Retiring Products
From The Last Chance List
Click Below To Place Your Order


Stamping Inkspirations April Blog Hop Fun Fold Time

Welcome to the Stamping Inkspirations April Blog Hop as we month explore the wonderful world of "Fun Folds". Our talented Design Team members will be sharing their projects and ideas to help inspire to try creating your own beautiful projects and step outside your comfort zone. 
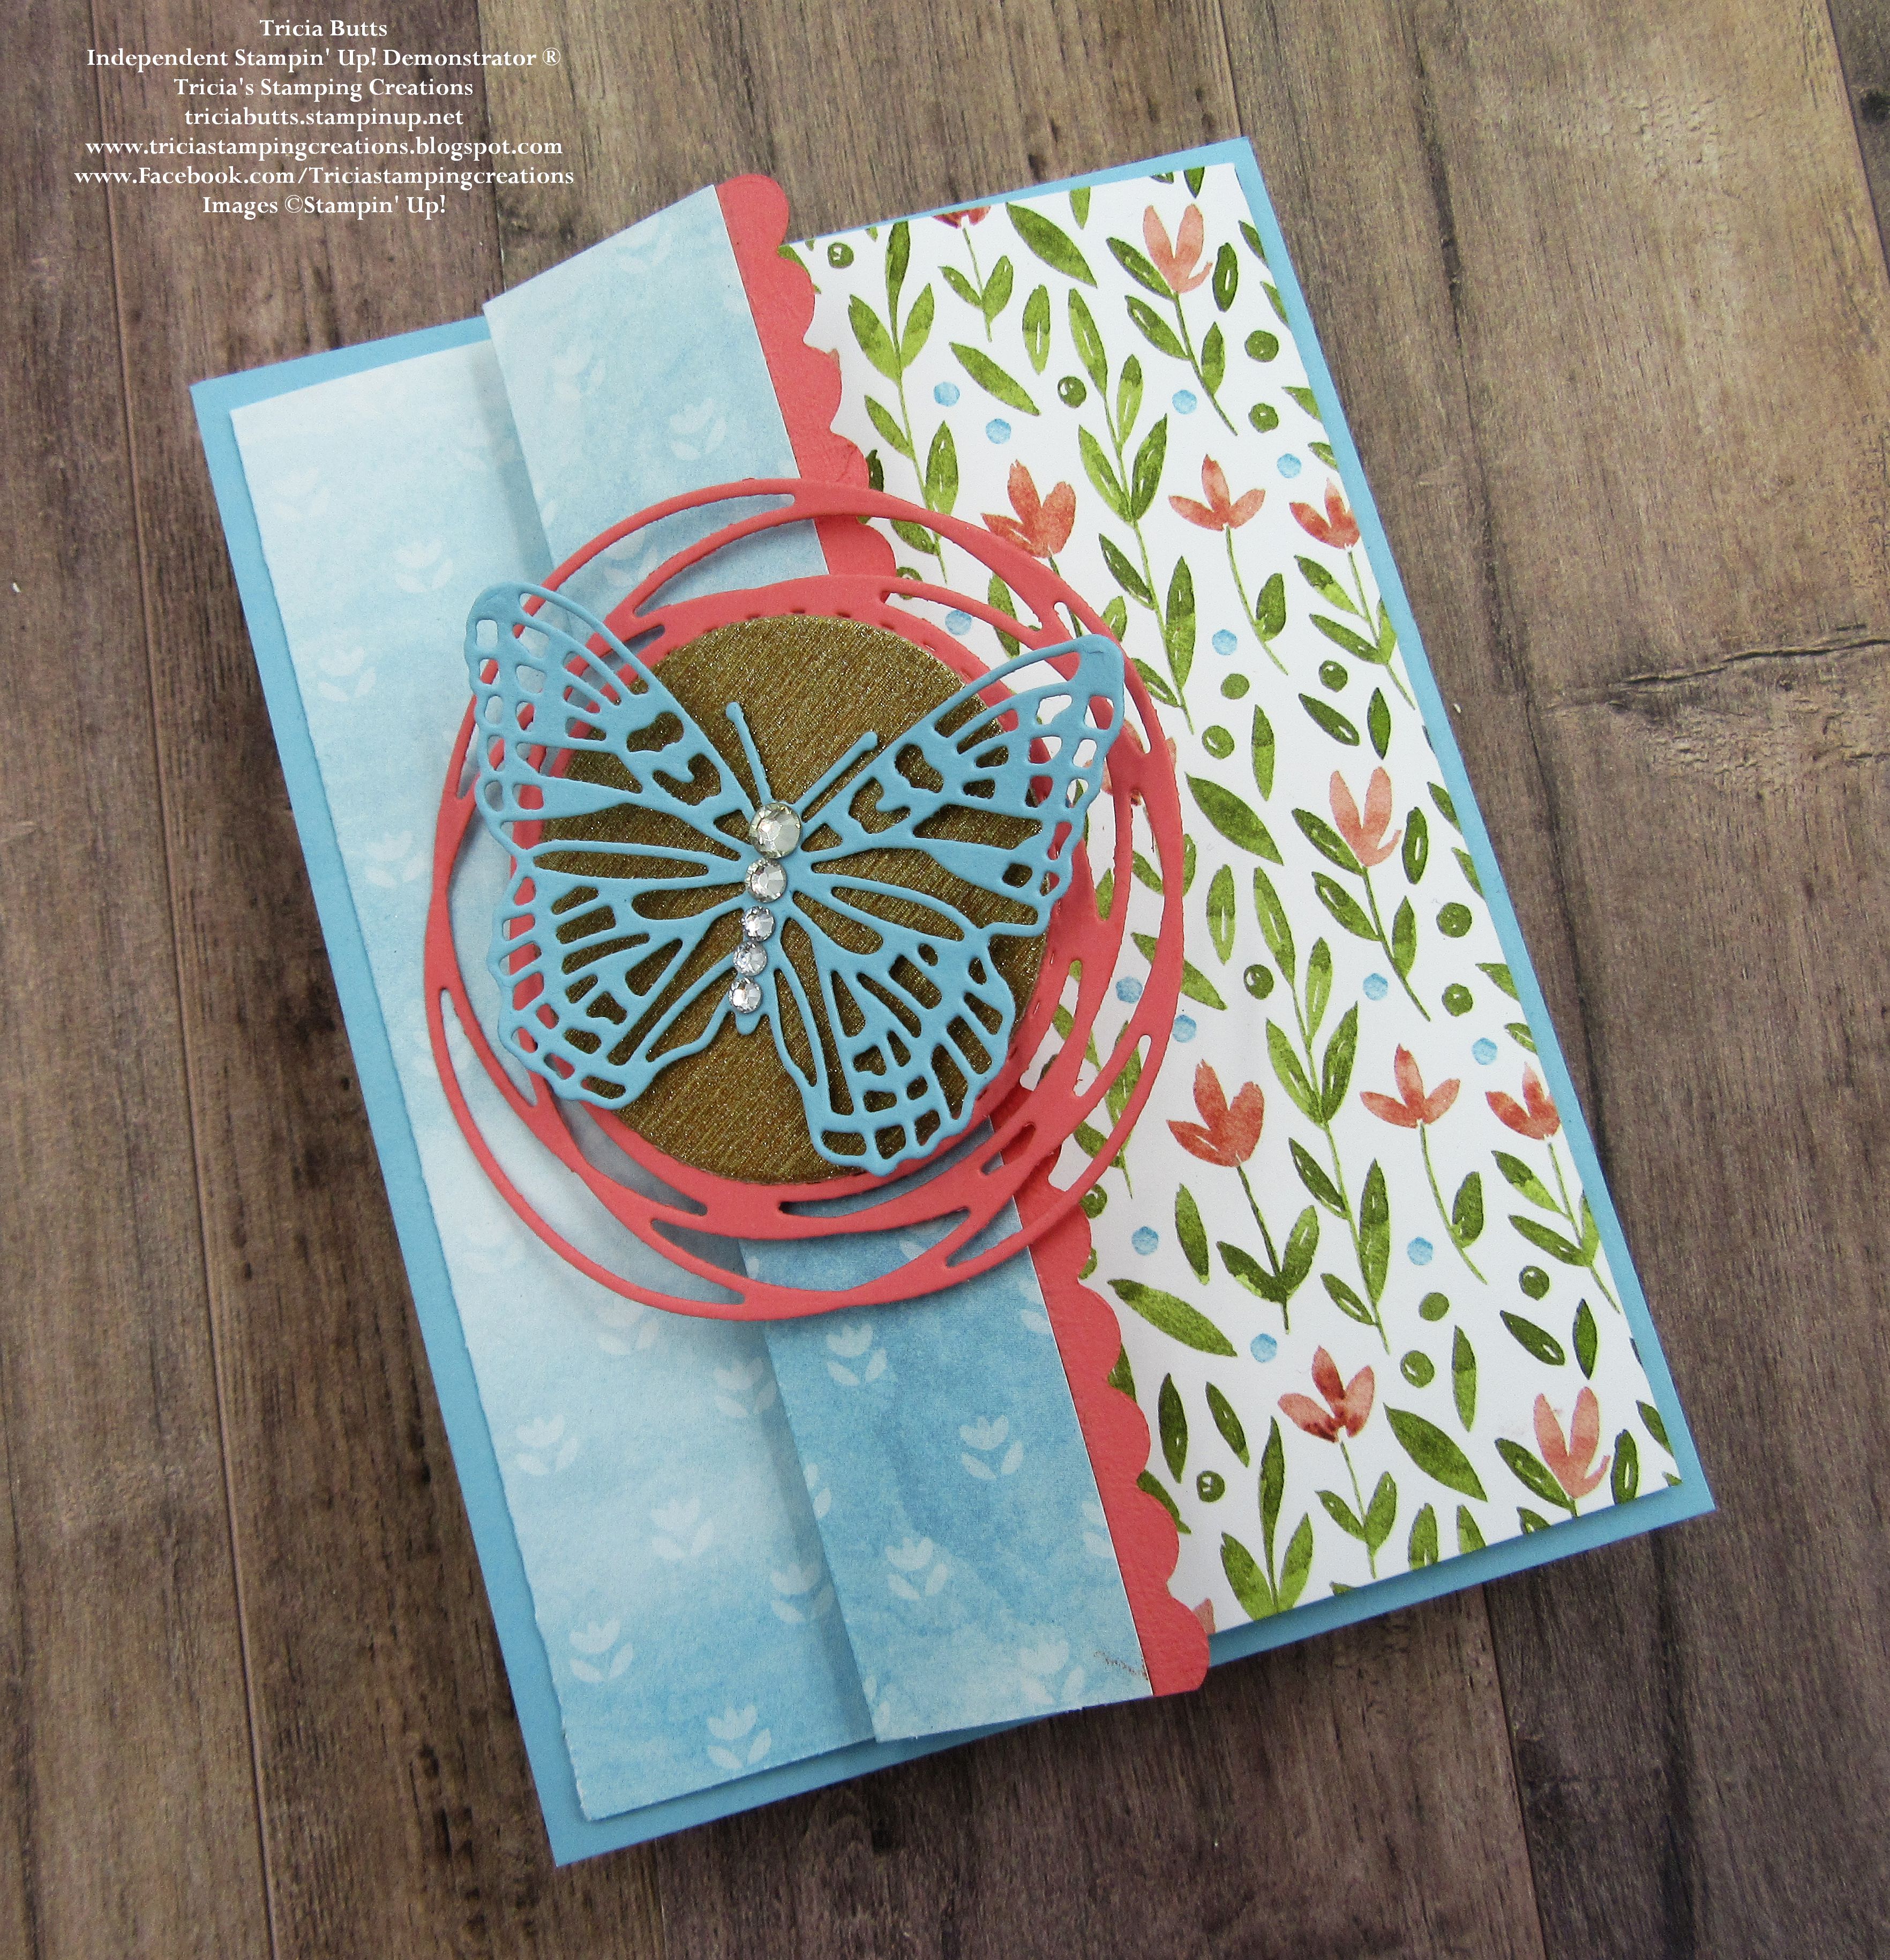
Today I wanted to showcase the beautiful Awash In Beauty Designer Series Paper, which is sadly retiring. I chose to create a simple Accordion Fun Fold that I saw on fellow Demonstrator, Tami White's blog. The wonderful thing about this fun fold is that it allows you to see both sides of the designer series paper for an extra Wow factor. I paired it with several retiring die sets, including the Brilliant Wings Dies, which as the most beautiful detailed butterfly die cuts that are wonderful focal designs. 
Products Used:
Graceful Tiles stamp set (item #159390) Retiring
Penned Flowers Dies (item 155557) Retiring
Painted Labels Dies (item #151605) Retiring
Brilliant Wings Dies (item #155523) Retiring
Layering Circles Dies (item #151770) Retiring 
Awash In Beauty Designer Series Paper (item #158973) Retiring
Gold & Rose Gold 6"x6" Metallic Specialty Paper (item #156844) Retiring
Balmy Blue Cardstock (item #146982)
Calypso Coral Cardstock (item #122925) 
Basic White Cardstock (item #159276)
Calypso Coral Classic Ink Pad (item #147101)
Basic Rhinestone Jewels (item #144220)
Stampin' Dimensionals (item #104430)
Mini Glue Dots (item #103683)
Measurements:
Balmy Blue Cardstock
Card Base - 5 1/2" x 4 1/4"
Detailed Butterfly die cut with the Brilliant Wings Dies
Inside Layer - 3 1/4" x 4 1/2"
Basic White Cardstock
Inside Sentiment Layer - 3" x 4 1/4"
Gold Metallic Specialty Paper
Circle die cut with the Layering Circles Dies
Calypso Coral Cardstock
Detailed Swirl Circle die cut with the Painted Labels Dies
Decorative Scalloped Edge die cut with Penned Flowers Dies 
Awash In Beauty Designer Series Paper
Fun Fold Layer - 12" x 5 1/4" (Scored at 1", 4" & 8"
This pretty Accordion Fun Fold is simple to create and so much fun to decorate. After scoring the designer series paper layer and folding on the score lines, I attached the back panel to the Balmy Blue card base to create the basic card design. For the inside insert, I stamped the sentiment with Calypso Coral Classic ink onto the Basic White layer and attached it to the Balmy Blue cardstock layer. I then attached this to the inside back panel of the designer series paper. To decorate the front panel, I added a Calypso Coral cardstock scalloped border to the inside edge of the front panel so that the stitched line is visible on the inside front layer and scalloped edge is even and straight when viewing from the front of the card. I attached the Swirled Circle to the front folded flap with Stampin' Dimensionals and then added the Gold Metallic circle to the center. For the detailed butterfly, I attached it to the center of the Gold circle with Mini Glue Dots and added Basic Rhinestones to the center of the butterfly for a touch of bling. This is a great way to display both sides of your designer series paper to create a beautiful card design.
Thank you for taking the time to visit my blog. I hope that my Fun Fold card design will help inspire you to experiment with creating your own designs to share with family and friends. There are so many wonderful possibilities to explore. 
Now it's time to visit Judith's blog and see what fabulous fun fold she has to share with us. Just click on the Next button to visit her blog or use the Roll Call List to find your way. We would love it if you would leave us a comment and let us know what you liked about our projects. I hope you enjoy the rest of our blog hop.


If you live in the U.S. and do not have a Stampin' Up! Demonstrator, please contact me and I would be happy to help you with your creative projects. You may also visit my Online Store to place your order and have it shipped to you. 

Until Next Time

Happy Stamping,

Tricia Butts
Independent Stampin' Up! Demonstrator

Like What You See? Visit My Online Store Here

Visit My Facebook Business Page for Updates & Ideas

Click here to Contact Me

Take Advantage Of The Last Chance Sale
Save Up To 60% Off Select Retiring Products
Visit My Online Store To Place Your Order


Ink. Stamp. Share. April Showcase Blog Hop

Welcome to the Ink. Stamp. Share. April Showcase Blog Hop as we share projects and ideas that we are currently working on. While I am waiting for my preorder to arrive full of great new products from the 2023-2024 Annual Catalog, I have been keeping busy showing some love to some old favorites before they retire.
One of my favorite cards to create are clean and simple designs using designer series paper. There is something so beautiful about letting the design on a pretty piece of paper be the star of the show. One of my favorite designer series paper packs in the 2022-2023 Annual Catalog would have to be the Pretty Prints Designer Series Paper. The combination of beautiful colors and botanical designs just makes my heart happy and I am so sorry to see it retire. So I decided to create a clean and simple card using one of the Bermuda Bay sheets to create my card design. I used Basic White for the sentiment and the layer to frame the designer series paper to make it pop and bring it to life. This style of card works so well for so many occasions and it is a great way to create a lot of beautiful cards in a short amount of time.
Products Used:
Nature's Prints Bundle (item # 158801)
Pretty Prints Designer Series Paper (item #159245) Retiring
Bermuda Bay Cardstock (item #131197) Retiring
Basic White Cardstock (item #159276)
Bermuda Bay Classic Ink Pad (item #147096)
Iridescent Rhinestones Basic Jewels (item #158130)
Stampin' Dimensionals (item #104430)
Measurements:
Bermuda Bay Cardstock 
Card Base - 8 1/2" x 5 1/2" (Scored at 4 1/4")
Basic White Cardstock
Layer 1 - 5 1/4" x 4"
Sentiment Label stamped & die cut with the Nature's Prints Bundle
Pretty Prints Designer Series Paper
Card Front - 5" x 3 3/4"
To create this card, I started with a Bermuda Bay cardstock card base to coordinate with the designer series paper layer. I added the focal layer to the Basic White cardstock to create a frame and then added it to the card base using Stampin' Dimensionals. For the sentiment label, I stamped the sentiment with Bermuda Bay Classic ink onto the Basic White cardstock label and added it to the card front with Stampin' Dimensionals. To finish off the design, I added several Iridescent Rhinestones for a touch of bling. This layout would work well with so many of the retiring designer series paper packs, so make sure to check out the Last Chance Sale to stock up on your favorites. 
Thank you for taking the time to visit my blog. I hope that my card design will inspire you to show some love to your retiring favorites and maybe even encourage you to take a look at the many wonderful products on the Last Chance Sale List to see if there is anything you just can't live without. Remember, these retiring products are available only while supplies last, so don't wait too long to place your order.
Now it's time to visit with my fellow Design Team members and see what they have been working on lately. Just use the Roll Call List below to visit their blogs and show them some love by leaving a comment and letting us know what you liked about our projects. We appreciate your feedback.

If you live in the U.S. and do not have a Stampin' Up! Demonstrator, please contact me and I would be happy to help you with your creative projects. You may also visit my Online Store to place your order and have it shipped to you. 

Until Next Time

Happy Stamping,

Tricia Butts
Independent Stampin' Up! Demonstrator

Like What You See? Visit My Online Store Here

Visit My Facebook Business Page for Updates & Ideas

Click here to Contact Me


Save Up To 60% Off Select Retiring Products
From The Last Chance Retirement Lists
Available Only While Supplies Last
Click Below To Order From My Online Store