Showing posts with label Graceful Tiles stamp set. Show all posts

Saturday, April 8, 2023

Stamping Inkspirations April Blog Hop Fun Fold Time

Welcome to the Stamping Inkspirations April Blog Hop as we month explore the wonderful world of "Fun Folds". Our talented Design Team members will be sharing their projects and ideas to help inspire to try creating your own beautiful projects and step outside your comfort zone. 
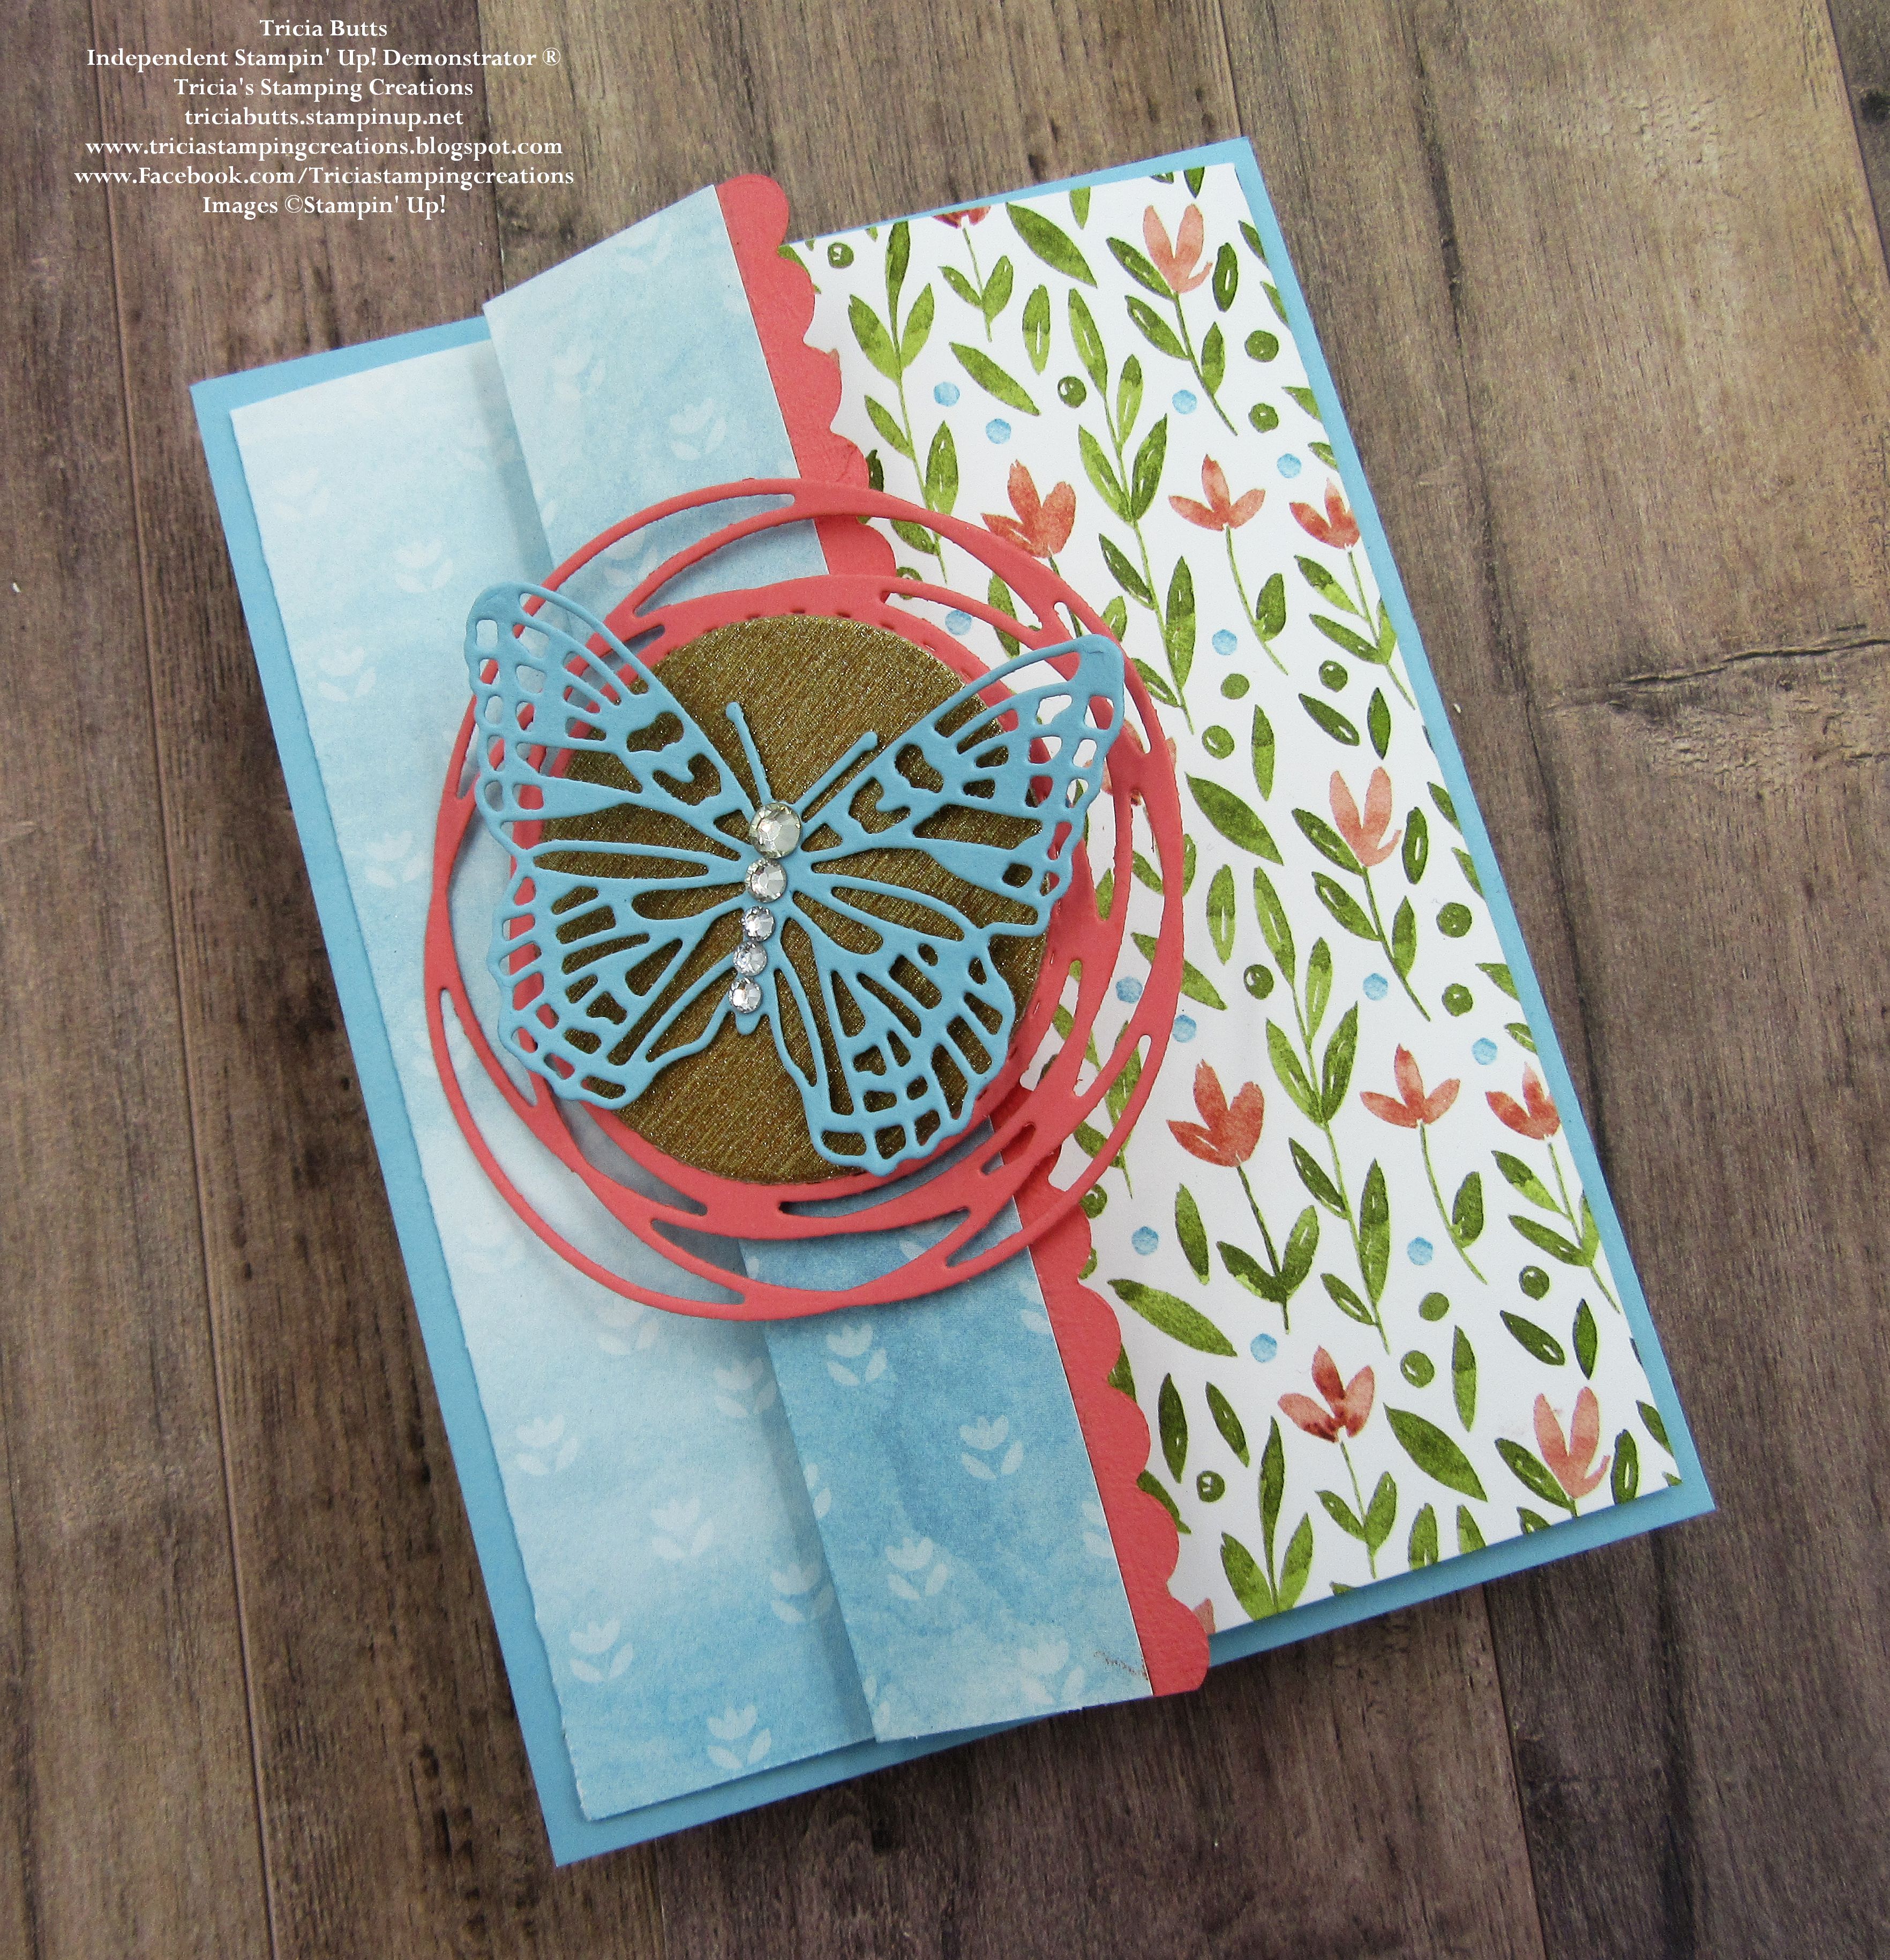
Today I wanted to showcase the beautiful Awash In Beauty Designer Series Paper, which is sadly retiring. I chose to create a simple Accordion Fun Fold that I saw on fellow Demonstrator, Tami White's blog. The wonderful thing about this fun fold is that it allows you to see both sides of the designer series paper for an extra Wow factor. I paired it with several retiring die sets, including the Brilliant Wings Dies, which as the most beautiful detailed butterfly die cuts that are wonderful focal designs. 
Products Used:
Graceful Tiles stamp set (item #159390) Retiring
Penned Flowers Dies (item 155557) Retiring
Painted Labels Dies (item #151605) Retiring
Brilliant Wings Dies (item #155523) Retiring
Layering Circles Dies (item #151770) Retiring 
Awash In Beauty Designer Series Paper (item #158973) Retiring
Gold & Rose Gold 6"x6" Metallic Specialty Paper (item #156844) Retiring
Balmy Blue Cardstock (item #146982)
Calypso Coral Cardstock (item #122925) 
Basic White Cardstock (item #159276)
Calypso Coral Classic Ink Pad (item #147101)
Basic Rhinestone Jewels (item #144220)
Stampin' Dimensionals (item #104430)
Mini Glue Dots (item #103683)
Measurements:
Balmy Blue Cardstock
Card Base - 5 1/2" x 4 1/4"
Detailed Butterfly die cut with the Brilliant Wings Dies
Inside Layer - 3 1/4" x 4 1/2"
Basic White Cardstock
Inside Sentiment Layer - 3" x 4 1/4"
Gold Metallic Specialty Paper
Circle die cut with the Layering Circles Dies
Calypso Coral Cardstock
Detailed Swirl Circle die cut with the Painted Labels Dies
Decorative Scalloped Edge die cut with Penned Flowers Dies 
Awash In Beauty Designer Series Paper
Fun Fold Layer - 12" x 5 1/4" (Scored at 1", 4" & 8"
This pretty Accordion Fun Fold is simple to create and so much fun to decorate. After scoring the designer series paper layer and folding on the score lines, I attached the back panel to the Balmy Blue card base to create the basic card design. For the inside insert, I stamped the sentiment with Calypso Coral Classic ink onto the Basic White layer and attached it to the Balmy Blue cardstock layer. I then attached this to the inside back panel of the designer series paper. To decorate the front panel, I added a Calypso Coral cardstock scalloped border to the inside edge of the front panel so that the stitched line is visible on the inside front layer and scalloped edge is even and straight when viewing from the front of the card. I attached the Swirled Circle to the front folded flap with Stampin' Dimensionals and then added the Gold Metallic circle to the center. For the detailed butterfly, I attached it to the center of the Gold circle with Mini Glue Dots and added Basic Rhinestones to the center of the butterfly for a touch of bling. This is a great way to display both sides of your designer series paper to create a beautiful card design.
Thank you for taking the time to visit my blog. I hope that my Fun Fold card design will help inspire you to experiment with creating your own designs to share with family and friends. There are so many wonderful possibilities to explore. 
Now it's time to visit Judith's blog and see what fabulous fun fold she has to share with us. Just click on the Next button to visit her blog or use the Roll Call List to find your way. We would love it if you would leave us a comment and let us know what you liked about our projects. I hope you enjoy the rest of our blog hop.


If you live in the U.S. and do not have a Stampin' Up! Demonstrator, please contact me and I would be happy to help you with your creative projects. You may also visit my Online Store to place your order and have it shipped to you. 

Until Next Time

Happy Stamping,

Tricia Butts
Independent Stampin' Up! Demonstrator

Like What You See? Visit My Online Store Here

Visit My Facebook Business Page for Updates & Ideas

Click here to Contact Me

Take Advantage Of The Last Chance Sale
Save Up To 60% Off Select Retiring Products
Visit My Online Store To Place Your Order



Saturday, December 10, 2022

Colour Combo December Blog Hop

It's time to hop along with the Colour Combo December Blog Hop and for our last hop of the year, our color challenge is Poppy Parade, Flirty Flamingo and Coastal Cabana. Join our talented Design Team members as they share their projects and ideas to help inspire you to explore this beautiful color combination. 
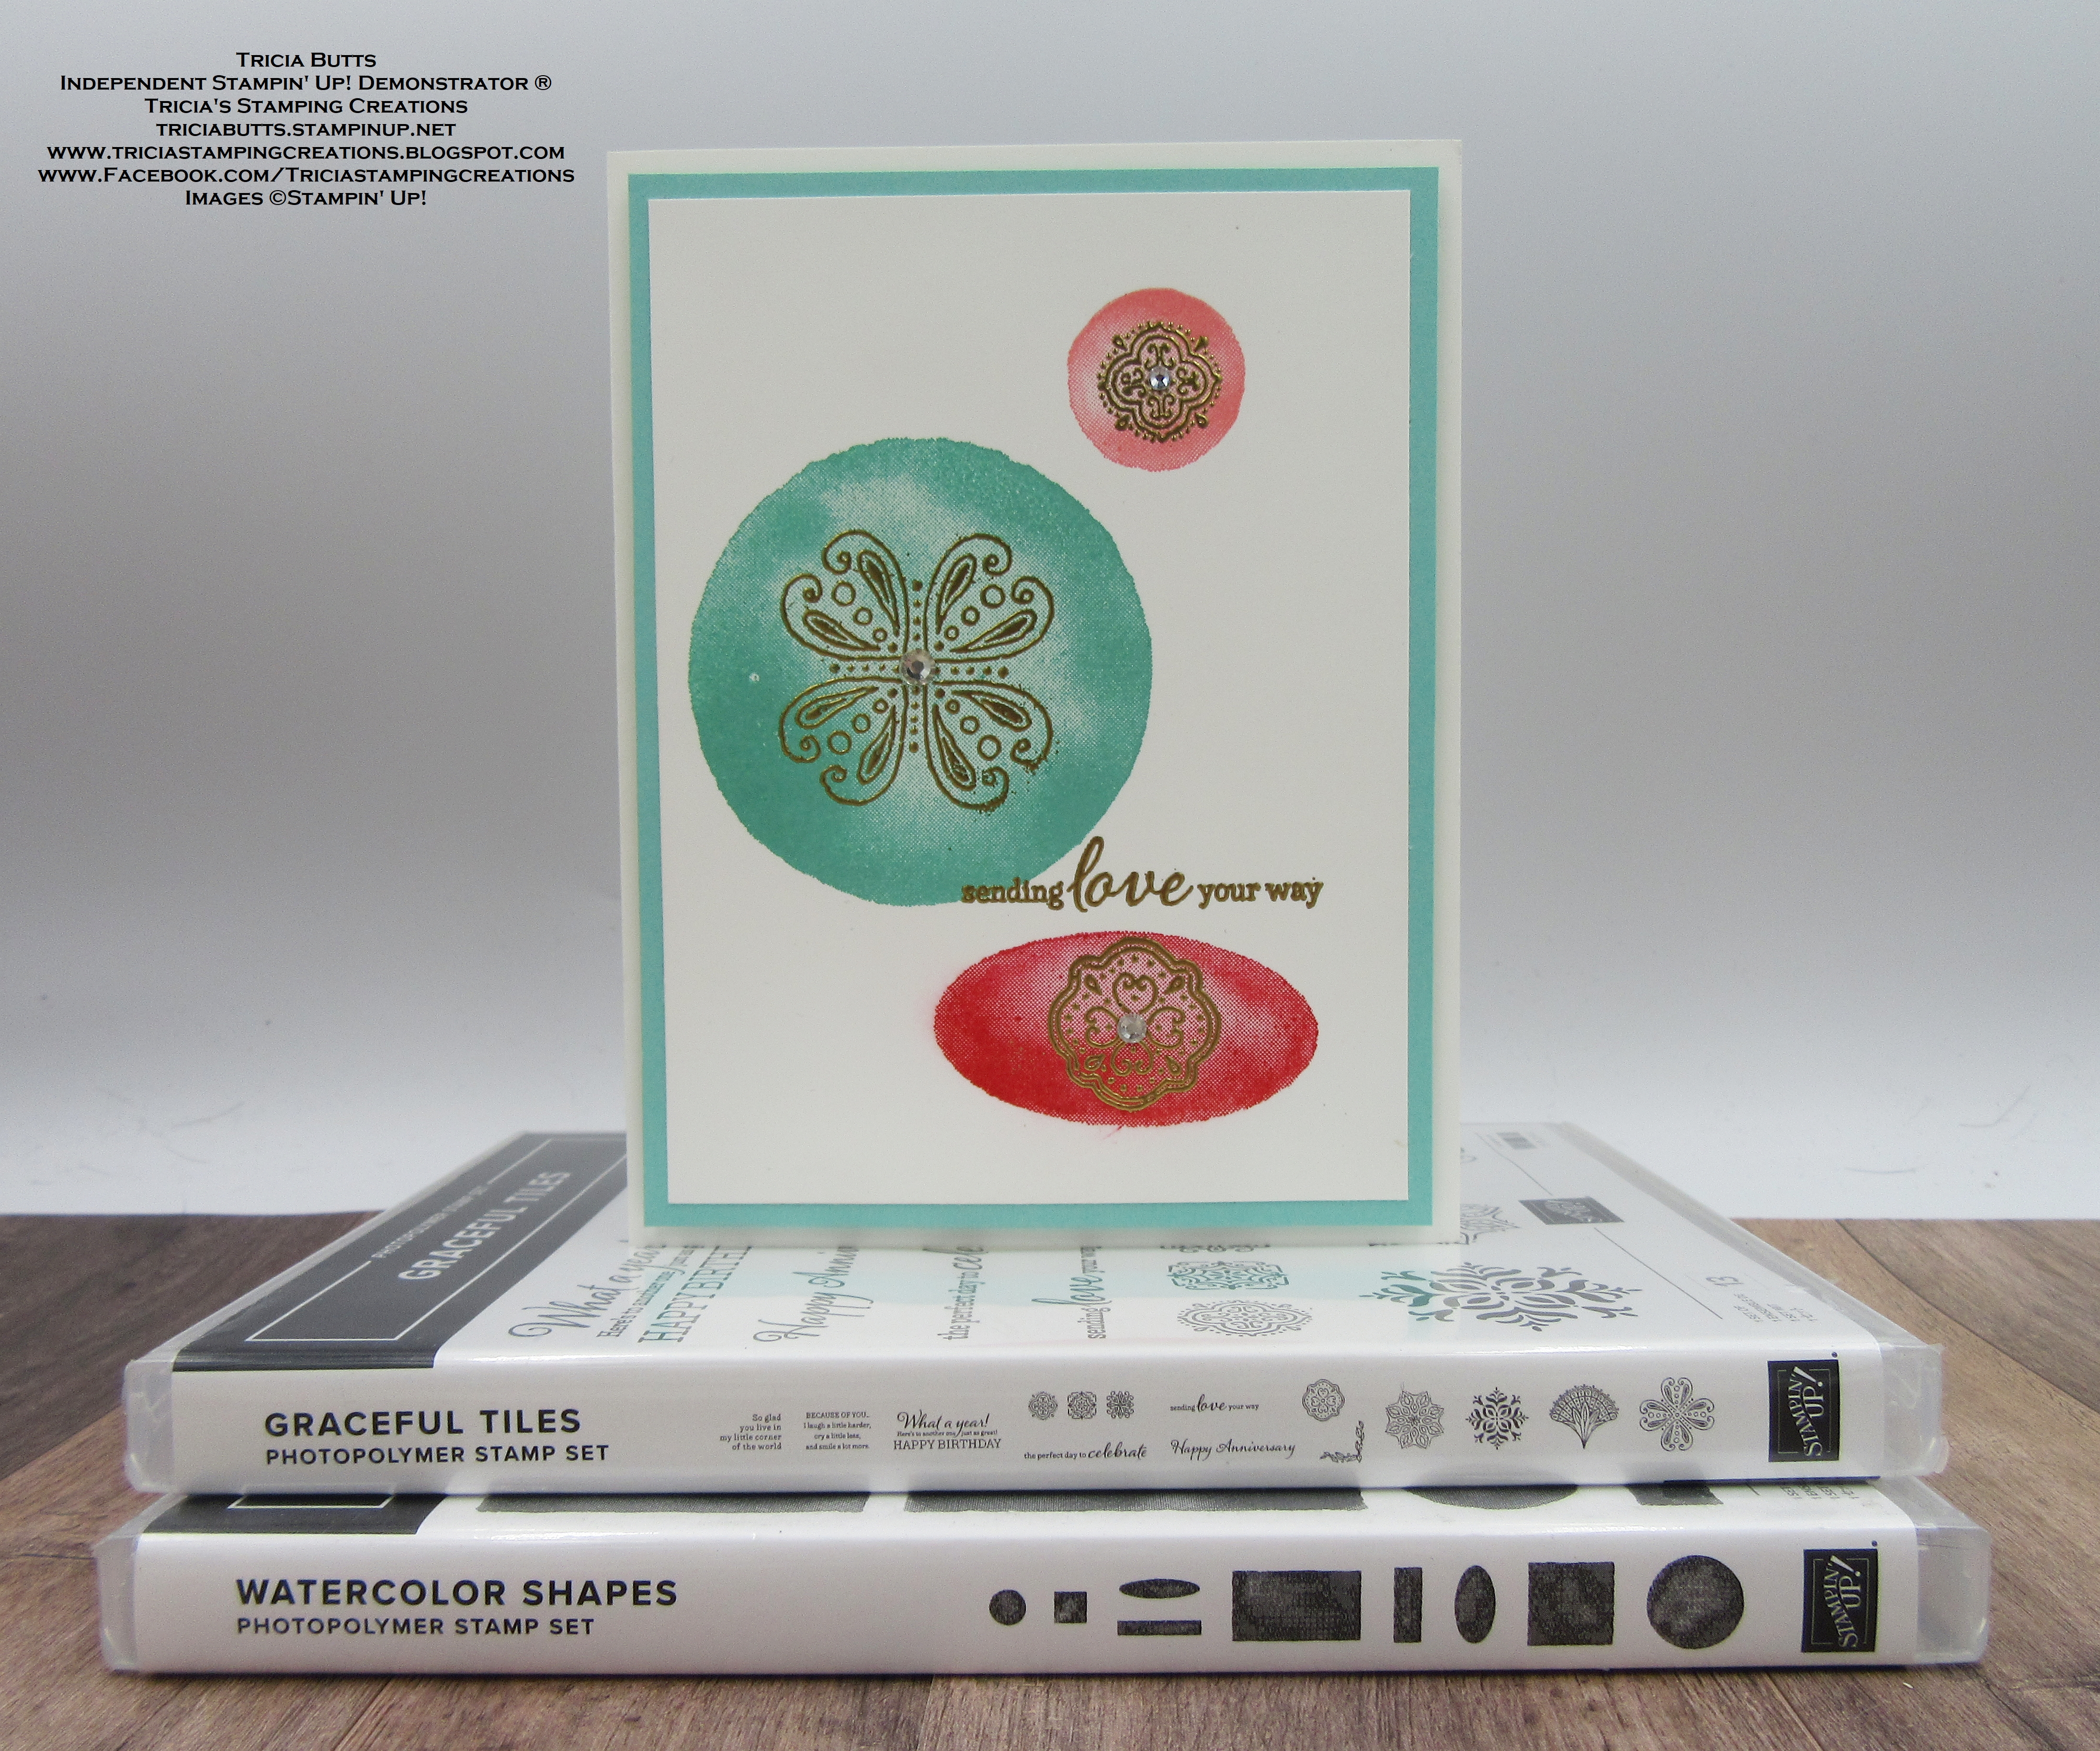
For my card design this month, I decided to keep it clean and simple. I love how these colors work together and I wanted to let them shine through with just a touch of Gold embossing to step it up. For this card, I chose two stamp sets that work really well together and are hidden gems in the 2022-2023 Annual Catalog. For the background shapes, I used the Watercolor Shapes stamp set and I used images from the Graceful Tiles stamp set to decorate the shapes. This card design would work well for so many occasions and you could experiment with different color combinations to personalize your cards.
Products Used:
Graceful Tiles stamp set (item #159390)
Watercolor Shapes stamp set (item #156968)
Coastal Cabana Cardstock (item #131297)
Basic White Cardstock (item #159276)
Thick Basic White Cardstock (item #159229)
Coastal Cabana Classic Ink Pad (item #147097)
Flirty Flamingo Classic Ink Pad (item #147052)
Poppy Parade Classic Ink Pad (item #147050)
Versamark Pad (item #102283)
Metallics Embossing Powders (item #155555)
Basic Rhinestone Jewels (item #144220)
Stampin' Dimensionals (item #104430)
Measurements:
Thick Basic White Cardstock
Card Base - 8 1/2" x 5 1/2" (Scored at 4 1/4")
Basic White Cardstock
Card Front - 5" x 3 3/4"
Coastal Cabana Cardstock
Layer 1 - 5 1/4" x 4"
This card design is so simple to create and requires just a few supplies. I chose to use Thick Basic White cardstock for the card base to help make the focal layer pop. The layer of Coastal Cabana cardstock adds a nice frame around the card front and helps step up the design. The Gold embossed images on top of the stamped background shapes adds a simple elegance to the card and I love how the sentiment ties in with the rest of the design. To finish off the card, I added some Basic Rhinestones to add a touch of bling. The simplicity of this card design is so beautiful and I look forward to trying this layout with other color combinations. 
Thank you for taking the time to visit my blog. I hope that my card design will inspire you to explore this wonderful color combination when creating your own beautiful projects. As you can see from my design, it doesn't have to be fancy with lots of layers. Sometimes it's all about keeping it clean and simple. 
Now it's time to visit Annette's blog and see what she has created with this month's color combination. Just click the Next button below to visit her blog. We would love it if you would leave us a comment and let us know what you like about our projects. I hope you enjoy the rest of our blog hop. 

Roll Call List

If you live in the U.S. and do not have a Stampin' Up! Demonstrator, please contact me and I would be happy to help you with your creative projects. You may also visit my Online Store to place your order and have it shipped to you. 

Until Next Time

Happy Stamping,

Tricia Butts
Independent Stampin' Up! Demonstrator

Like What You See? Visit My Online Store Here

Visit My Facebook Business Page for Updates & Ideas

Click here to Contact Me


Save Up To 60% Off Select Retiring Products 
From The July-December 2022 Mini Catalog Last Chance List
Click Below To Visit My Online Store To Place Your Order 

Shop The Clearance Rack Refresh
Save Up To 60% Off Discontinued Products
Available Only While Supplies Last
Click Below To Place Your Order