Showing posts with label Layering Leaves stamp set. Show all posts

Friday, December 13, 2024

Crafty Collaborations Monochromatic Color Challenge Week 50 - Highland Heather

It's hard to believe, but we have finally reached Week 50 of the Monochromatic Color Challenge for 2024. This has been such an amazing journey and I am excited to share with you the card I created with Highland Heather, the featured color for Week 50. 
This beautiful purple has a soothing feeling to it and I wanted to create a pretty card design featuring the Perennial Lavender Designer Series Paper. I love this wonderful layout and how the strips of designer series paper frame the heat embossed sentiment from the Layering Leaves stamp set. This card design is simple to create, yet it has a wonderful Wow feel to it. 
Products Used:
Layering Leaves stamp set (item #161277)
Perennial Lavender Designer Series Paper (item #162593)
Highland Heather Cardstock (item #146986)
Basic White Cardstock (item #159276)
Versamark Pad (item #102283)
Basics Wow Embossing Powders (item #165679)
Purple Fine Shimmer Gems (item #162611)
Measurements:
Highland Heather Cardstock
Card Base - 5 1/2" x 8 1/2" (Scored at 4 1/4")
Center Panel - 1 15/16" x 3 3/16"
Basic White Cardstock 
Card Front - 5 1/4" x 4"
Perennial Lavender Designer Series Paper
2 Panels - 2 7/8" x 7/8"
2 Panels - 7/8" x 4 1/8"
This beautiful card design is all about the layout and once you have your strips cut, it really is a matter of assembling them to create the frame for the focal sentiment panel. This card design is a great way to use up strips of designer series paper. I chose to heat emboss the sentiment from the Layering Leaves stamp set with White embossing powder to make it pop and I added several of the smaller floral images to coordinate with the floral design in the designer series paper. For a touch of bling, I added several of the Purple Fine Shimmer Gems to complete this lovely clean and simple card design.
Thank you for taking the time to visit my blog. I hope that you have enjoyed my final card design for this year's challenge and I hope that it will inspire you to explore using this pretty purple in your future projects. Thank you for following me on this amazing journey this year and I hope that my cards have inspired you to try these wonderful colors and explore new possibilities. Let me know in the comments what your favorite color was for 2024. 
Please take a moment to check out the amazing projects featuring Highland Heather in this week's Monochromatic Insta Hop. Just click here to get started. We would love it if you would leave us a comment and let us know what you liked about our projects. 

If you live in the U.S. and do not have a Stampin' Up! Demonstrator, please contact me and I would be happy to help you with your creative projects. You may also visit my Online Store to place your order and have it shipped to you. 

Until Next Time

Happy Stamping,

Tricia Butts
Independent Stampin' Up! Demonstrator

Like What You See? Visit My Online Store Here

Visit My Facebook Business Page for Updates & Ideas

Click here to Contact Me


Friday, January 12, 2024

Crafty Collaborations Monochromatic Color Challenge - Wild Wheat

It's time for Week 2 of the Crafty Collaborations Monochromatic Challenge and this week our color is Wild Wheat, one of our 2023-2025 In Colors. We have been challenged to create a card design using this color to showcase Stampin' Up!'s amazing color coordination to help spark your own creativity. 
Wild Wheat is one of those colors that people can have strong feelings about. At first glance, it may not be a color that you would be drawn to, but I am hoping that my card design will encourage you to give this chameleon like color a second look. I have chosen to use one of the designs from the Softly Stippled Designer Series Paper, a Sale-a-bration Level 1 Reward you can earn Free with a qualifying $50 order. I love this beautiful tone on tone botanical design and it has this wonderful vintage feel to it. I wanted to create a clean and simple design that would allow this color to shine, so I chose to use the Layering Leaves stamp set from the 2023-2024 Annual Catalog, with its wonderful sentiments that work well for a variety of occasions. With some detailed die cuts using the coordinating Stippled Roses Dies to add some texture and a little coordinating bling, I think this card design showcases this beautiful color.
Products Used:
Layering Leaves stamp set (item #161277)
2 3/8" Circle Punch (item #161354)
Stippled Roses Dies (item #162666)
Softly Stippled Designer Series Paper (item #162975) Sale-a-bration Level 1 Reward
Wild Wheat Cardstock(item #161725)
Basic White Cardstock (item #159276)
Wild Wheat Classic Ink Pad (item #161651)
2023-2025 In Color Dots (item #161620)
Stampin' Dimensionals (item #161620)
Measurements:
Wild Wheat Cardstock
Card Base - 5 1/2" x 8 1/2" (Scored at 4 1/4")
Detailed Leaves die cut with the Stippled Roses Dies
Basic White Cardstock
1 Large Circle punched out with the 2 3/8" Circle Punch
Softly Stippled Designer Series Paper
Card Front - 5 1/4" x 4"
This is such a simple card design but I feel like the simplicity helps to showcase what a beautiful color Wild Wheat really is. I love how it looks with botanical prints like the one I have chosen for the card front for this design. I feel like this color has a slight olive tinge to it that lends itself well with leaves and foliage, so I added the detailed die cuts created with the Stippled Roses Dies to add some contrast and texture to the design. For the sentiment, I stamped the image from the Layering Leaves stamp set with Wild Wheat Classic ink onto Basic White cardstock and punched it out with the 2 3/8" Circle Punch. I added the circle to the card front to pop it up using Stampin' Dimensionals, layering it over the detailed die cuts. For a touch of bling, I added several of the Wild Wheat Dots to finish off the design. To me, this card design has the look of aged Gold that you would find on a vintage card. So what do you think? Are you a fan of Wild Wheat? Let me know what you think.
Thank you for taking the time to visit my blog. I hope that my card design will encourage you to give Wild Wheat a second look and hopefully you will see the amazing possibilities with this color. With all the coordinating products available, you can have so much fun mixing and matching to create your own beautiful design.

I would love it if you would take the time hop along our Insta Hop here to visit with my fellow Stampin' Up! Demonstrators and see what they created with this week's color, Wild Wheat. We would appreciate it if you would leave us a comment to let us know what you liked about our projects.  I hope you will join me next week for a new color challenge to help inspire you.
Don't forget to take advantage of the wonderful Sale-a-bration products that are available to earn free with a qualifying order until February 29th. In addition to the beautiful Softly Stippled Designer Series Paper, there are a variety of stamp sets, designer series papers, Dies and even an Embossing Folder to choose from. Visit my Online Store here to learn more. 

If you live in the U.S. and do not have a Stampin' Up! Demonstrator, please contact me and I would be happy to help you with your creative projects. You may also visit my Online Store to place your order and have it shipped to you. 

Until Next Time

Happy Stamping,

Tricia Butts
Independent Stampin' Up! Demonstrator

Like What You See? Visit My Online Store Here

Visit My Facebook Business Page for Updates & Ideas

Click here to Contact Me


Get Creative In 2024
With The January-April 2024 Mini Catalog
Click Below To Shop Now

Sale-a-Bration Is Here!
Earn Exclusive Free Products With A Qualifying Order
Click Below For More Details


Monday, November 13, 2023

Demonstrator Training November Blog Hop

 
Happy Monday everyone. Today we are hopping along with Bruno & Kylie Bertucci's Demonstrator Training Blog Hop for November. Our theme is Thank You and/or Congratulations and you will have the opportunity to visit with wonderful Stampin' Up! Demonstrators from around the world and see their amazing projects. I hope that we can inspire you to get creative and step outside your comfort zone. 
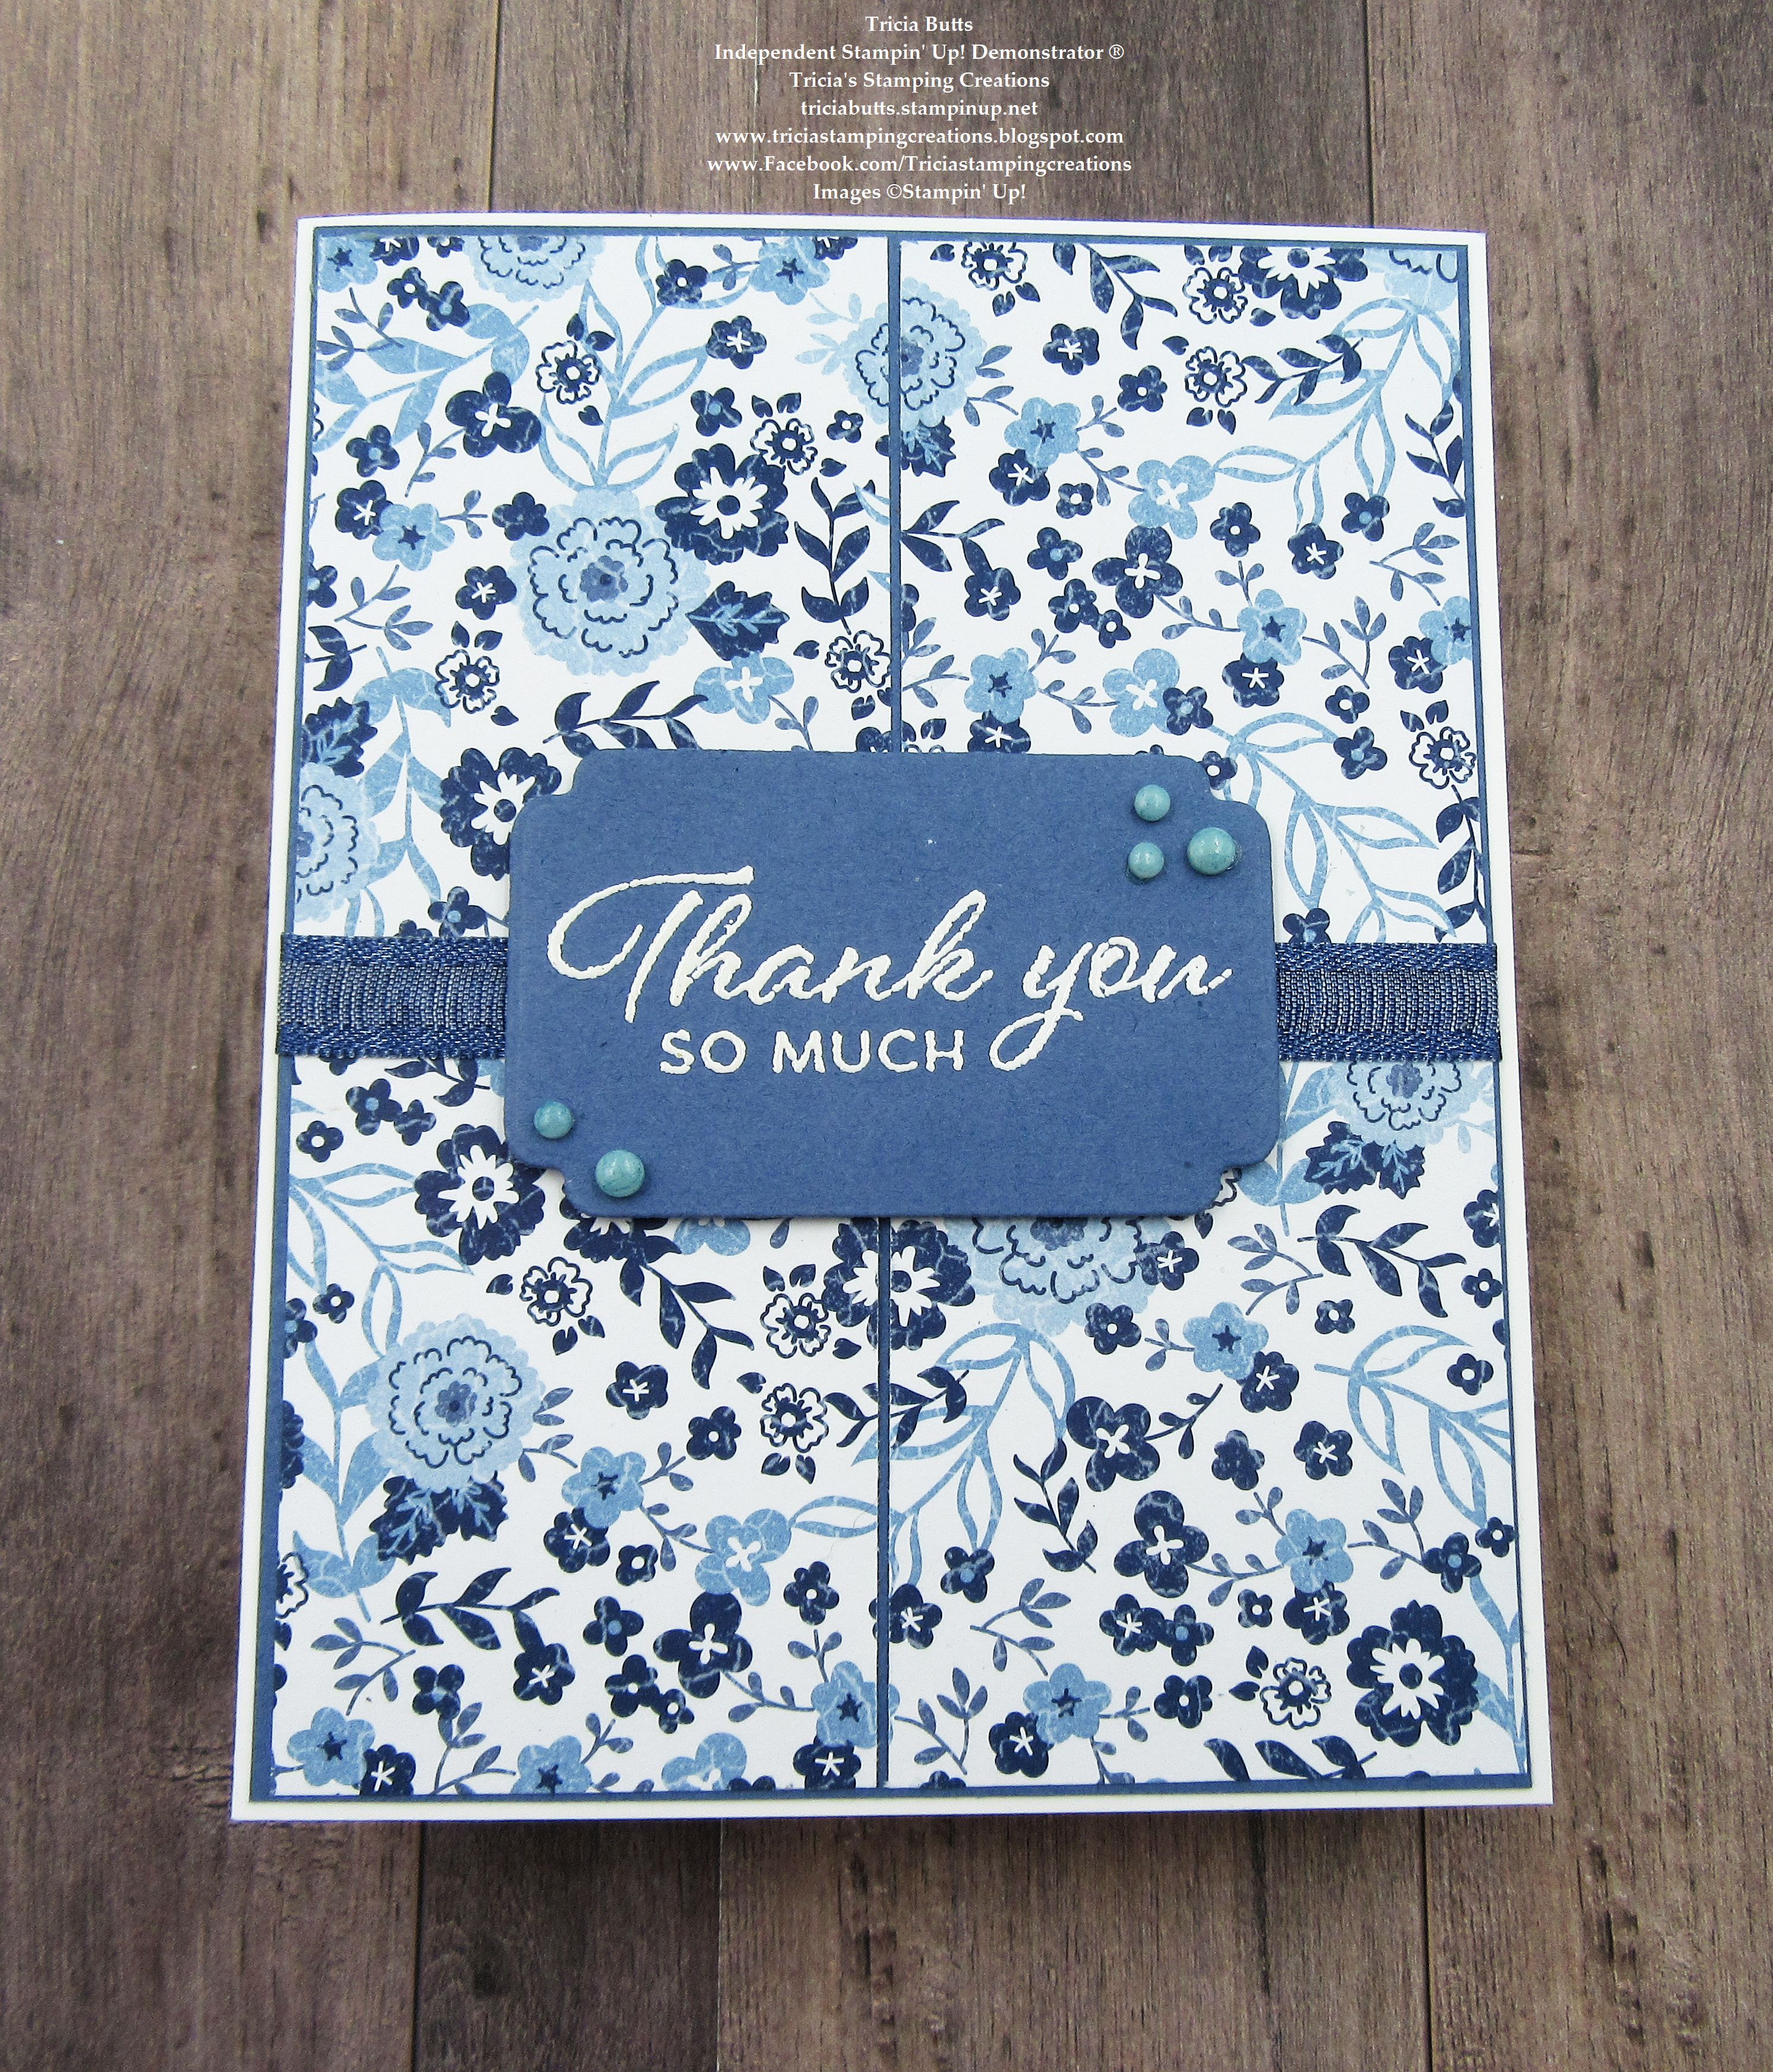
Today is World Kindness Day and what better way to spread some love and kindness than with a handmade card. This beautiful Thank You card features the Countryside Inn Designer Series Paper with some of my favorite blues. I wanted to keep the design fairly simple to allow this pretty paper to shine and added a simple sentiment from the Layering Leaves stamp set, heat embossing it with White embossing powder to step up the design. This is such a happy, cheerful card design and I hope it will brighten the day of the person who receives it.
Products Used:
Layering Leaves stamp set (item #161277)
Something Fancy Dies (item #160424)
Countryside Inn Designer Series Paper (item #161467)
Misty Moonlight Cardstock (item #153081)
Thick Basic White Cardstock (item #159229)
Versamark Pad (item #102283)
Basics Embossing Powders (item #155554)
Balmy Blue Stampin' Blends Combo Pack (item #154830)
Classic Matte Dots (item #158146)
Night of Navy 3/8" Bordered Ribbon (item #160581)
Stampin' Dimensionals (item #104430)
Measurements:
Thick Basic White Cardstock
Card Base - 8 1/2" x 5 1/2" (Scored at 4 1/4")
Misty Moonlight Cardstock
Layer 1 - 5 3/8" x 4 1/8"
Sentiment Label die cut with the Something Fancy Dies
Countryside Inn Designer Series Paper
Card Front - 5 1/4" x 4" cut into quarters, each piece 2 5/8" x 2"

The Countryside Inn Designer Series Paper is one of my favorite packs of designer series paper. I love all the wonderful shades of blue in the designs and this paper is perfect for creating beautiful clean and simple card designs. For this card, I chose to cut the card front into quarters and then adhere then onto a slightly larger piece of Misty Moonlight cardstock so that there is a very small border between the pieces. I added a piece of the Night of Navy Bordered Ribbon around the middle of the card front and attached the ends to the back. For the sentiment, I heat embossed the image with White embossing powder so that it pops against the Misty Moonlight cardstock. I attached it to the card front with Stampin' Dimensionals, centering it over the ribbon. For the embellishments, I colored several of the Very Vanilla Classic Dots with the Dark Balmy Blue Stampin' Blends Marker to customize the color of the embellishments before adding them to my sentiment label. I love how it ties them back to the color of some of the flowers in the designer series paper. 
Thank you for taking the time to visit my blog. I hope that my card design will help inspire you to get creative and find ways to create your own beautiful cards to send out to family and friends. Remember that tomorrow begins Stampin' Up!'s Seasonal Sale with cardstock designer series paper, inks, ribbons and trims from the 2023-2024 Annual Catalog going on sale with savings up to 20%. It's a wonderful opportunity to stock up on your everyday supplies. 
Please take a moment to visit with the other Demonstrators and see their wonderful projects by clicking on the links in the Roll Call List below. We would appreciate it if you would leave us a comment and let us know how our projects inspired you. I hope you enjoy the rest of our blog hop. 

If you live in the U.S. and do not have a Stampin' Up! Demonstrator, please contact me and I would be happy to help you with your creative projects. You may also visit my Online Store to place your order and have it shipped to you. 

Until Next Time

Happy Stamping,

Tricia Butts
Independent Stampin' Up! Demonstrator

Like What You See? Visit My Online Store Here

Visit My Facebook Business Page for Updates & Ideas

Click here to Contact Me


Stampin' Up!'s Seasonal Sale November 14-16
Save Up to 20% On Ribbons, Trims, Inks & Paper 
From The 2023-2024 Annual Catalog

New Online Exclusive Products 
Now Available While Supplies Last
Click Below To Shop From My Online Store

Get Creative For The Holidays
With The September-December 2023 Mini Catalog
Click Below To Shop Now


Monday, August 7, 2023

Kylie Bertucci's August Monthly International Blog Highlights

Welcome to Kylie Bertucci's August Monthly International Blog Highlights as we share projects and ideas with the theme "Thank You". Stampin' Up! Demonstrators from around the world are taking part in this wonderful blog hop and I hope you will take the time to visit their blogs and be inspired by their amazing projects.
My card design today features the Les Shoppes Designer Series Paper to create a masculine Thank You card design. At first glance, you wouldn't think that this designer series paper would be an obvious choice for this style of card. As I looked through the various patterns, I came across a geometric pattern in shades of gray that I thought would be perfect. I paired it with the Stylish Shapes Dies and Nested Essentials Dies to continue the geometric design for my card and used neutral colors for my color palette. I used Copper embossing powder to help step up the design and I love the finished design.
Products Used:
Layering Leaves stamp set (item #161277)
Stylish Shapes Dies (item #159183)
Nested Essentials Dies (item #161597)
Les Shoppes Designer Series Paper (item #161322)
Basic Gray Cardstock (item #121044)
Basic Black Cardstock (item #121045)
Versamark Pad (item #102283)
Metallics Embossing Powders (item #155555)
Copper Clay 3/8" Textured Ribbon (item #161629)
2023-2025 In Color Dots (item #161620)
Stampin' Dimensionals (item #104430)
Measurements:
Basic Gray Cardstock
Card Base - 8 1/2" x 5 1/2" (Scored at 4 1/4")\
Basic Black Cardstock
Card Front - 5" x 3 3/4"
Sentiment Label die cut with the Nested Essentials Dies
Les Shoppes Designer Series Paper
6 Squares die cut with the Stylish Shapes Dies
To create this card design, I die cut six squares using the second smallest square die from the Stylish Shapes Dies. I arranged them so that the patterns were pointing in random directions to create more interest and then adhered them to the Basic Black card front, leaving a space down the center. I added a piece of Copper Clay Textured Ribbon across the center of the card front to add a pop of color. The sentiment was created by heat embossing the image with Copper embossing powder onto the Basic Black label. I love the shape created using the Nested Essentials Dies and the sentiment from the Layering Leaves stamp set fit perfectly. I added the sentiment label to the center of the card front with Stampin' Dimensionals, over the Copper Clay Ribbon. Using Stampin' Dimensionals, I adhered the card front to the Basic Gray card base to add dimension to the design. To complete the design, I added several Copper Clay Dots to the card front.
Thank you for taking the time to visit my blog. I hope that my card design will inspire you to create your own beautiful cards to send to family and friends. Thank you cards are a wonderful way to show the people in our life how much we appreciate them.
Please take the time to vote for my card design as part of this month's International Blog Highlights. Simply click the Vote button below and click on the heart for my card design (#17) to vote for my card. You can vote for up to 5 cards each day over the next week, so please share the love with my fellow Stampin' Up! Demonstrators. We would also appreciate it if you would leave us a comment and let us know what you liked about our projects. 


If you live in the U.S. and do not have a Stampin' Up! Demonstrator, please contact me and I would be happy to help you with your creative projects. You may also visit my Online Store to place your order and have it shipped to you. 

Until Next Time

Happy Stamping,

Tricia Butts
Independent Stampin' Up! Demonstrator

Like What You See? Visit My Online Store Here

Visit My Facebook Business Page for Updates & Ideas

Click here to Contact Me


August's Meaningful Flowers Kit
Includes A Bonus Free Stamp Set
Click Below To Subscribe By August 10th

Save Up To 30% Off Kits
In The Kits Collection
Click Below To Shop From My Online Store

Redeem Your Bonus Days Coupons & Save
During The Month Of August
Click Below To Visit My Online Store


Tuesday, August 1, 2023

We Create August Blog Hop Let's Recycle

Welcome to the We Create August Blog Hop and this month our theme is "Let's Recycle". Our Design Team will be sharing their projects and ideas to help inspire you. There are so many options to explore and ways to recycle things around us to create fun projects. 
For my card design today, I chose to use the scraps and strips of cardstock I had left over from cards I have made over the past couple of months. Each month I create cards for blog hops as well as card swaps and challenges, so I accumulate quite a lot of thin strips of cardstock when I cut card fronts and layers for my designs. I also had some flower die cuts and circles that I have kept in a bag that were from a swap that I participated in. Rather than throwing away these scraps and left over pieces, I like to recycle them and use them to create strip cards. This card design features strips of approx. 1/4" wide in colors of Misty Moonlight, Pretty Peacock, Lost Lagoon and Moody Mauve that I had left over from cutting card fronts. The focal design was created using left over die cuts created using the Sending Smiles stamp set and coordinating Sending Dies along with a Basic White 2 3/8" Circle Punch from a swap. I love how these scraps combined to create a beautiful new card design instead of ending up in the trash. 
Products Used:
Layering Leaves stamp set (item #161277)
Sending Smiles stamp set (item #158701)
Sending Dies (item #159271)
2 3/8" Circle Punch (item #161354)
Lost Lagoon Cardstock (item #133679)
Misty Moonlight Cardstock (item #153081)
Pretty Peacock Cardstock (item #150880)
Moody Mauve Cardstock (item #161723)
Basic White Cardstock (item #159276)
Lost Lagoon Classic Ink Pad (item #161678)
Boho Blue Classic Ink Pad (item #161650)
Daffodil Delight Classic Ink Pad (item #147094)
Tinsel Gems Three Pack (item #161624)
Stampin' Dimensionals (item #104430)
Measurements:
Lost Lagoon Cardstock
Card Base - 8 1/2" x 5 1/2" (Scored at 4 1/4")
1/4" Strips for card front
Pretty Peacock Cardstock
1/4" Strips for card front
Misty Moonlight Cardstock
1/4" Strips for card front 
Moody Mauve Cardstock
1/2" Strips for card front
Basic White Cardstock
Layer 1 - 4 1/4" x 4"
Card Front - 5 1/4" x 4" trimmed to 5" x 3 3/4" once strips are adhered to card front
Circle punched out with the 2 3/8" Circle Punch
Flowers stamped and die cut (left over from previous card design)
This design was a fun experiment with different colored strips to create a colorful background for my card. I started by arranging the strips on my Basic White cardstock card front until I was happy with the order of colors. I chose colors from my stash of cardstock strips that I thought would work well together but would have a variety of contrasts. Once I was happy with the order, I adhered the strips to the card front, leaving a small amount of white space between the strips to add to the design. Once I had finished creating the card front design, I trimmed it to the finished size of 5" x 3 3/4" and then adhered it to another piece of Basic White cardstock measuring 5 1/4" x 4" to create a clean white border around the edge of the card front. I then attached these layers to the Lost Lagoon card base with Stampin' Dimensionals. For the focal design, I stamped the sentiment from the Layering Leaves stamp set using Lost Lagoon Classic ink and attached the circle to the card front with Stampin' Dimensionals. The flowers that I chose to use were left over from a card swap I created recently and I chose to use two of them to decorate the sentiment circle. The flowers were stamped using Boho Blue and Daffodil Delight Classic inks using the Sending Flowers stamp set and they have been die cut with the coordinating Sending Dies. I attached the flowers, one at the top left and the other towards the bottom right of the circle. To complete the design, I added several Misty Moonlight Gems from the Tinsel Gems Three Pack to add a touch of bling. The wonderful thing about creating strip cards with left overs from your cards, is that each card will have a unique design and feel to it. It's a fun and creative way to recycle your left over supplies to create beautiful cards.
Thank you for taking the time to visit my blog. I hope that my card design will help inspire you to recycle your scraps of cardstock to create your own beautiful projects. There are so many wonderful possibilities to explore and each card design can be a unique work of art to share with family and friends. 
Now it's time to visit Cheryl's blog and see what she has created. Just click on the Next button below to visit her blog. We would appreciate it if you would leave us a comment and let us know what you liked about our projects. I hope you enjoy the rest of our blog hop.


If you live in the U.S. and do not have a Stampin' Up! Demonstrator, please contact me and I would be happy to help you with your creative projects. You may also visit my Online Store to place your order and have it shipped to you. 

Until Next Time

Happy Stamping,

Tricia Butts
Independent Stampin' Up! Demonstrator

Like What You See? Visit My Online Store Here

Visit My Facebook Business Page for Updates & Ideas

Click here to Contact Me


Save Up to 30% Off Kits
In The Kits Collection
Click Below To Visit My Online Store

Redeem Your Coupons & Save
August 1-31
Click Below To Shop In My Online Store